Appetizers · Part 2 of 3: Instructions
Dill Pickle Oyster Crackers: Tangy, Crispy, Ready in 20 Minutes Step-by-step instructions
- Prep
- Cook
- Total
- Serves
- 8
Before you start
Take the butter out and cut it into tablespoon-size pieces so it melts quickly and gently. Pull the pickle juice from the refrigerator; cold brine can seize warm butter, so let it sit on the counter while the oven heats. Set out the garlic powder, dried dill, a small saucepan or microwave-safe bowl, a clear measuring cup for drizzling, and the large baking dish.
Open the bag or box of oyster crackers and check for clumps, breaking up any stuck-together pieces before they go into the dish. Position a wire rack where the hot dish will land after baking, since the crackers need open air to finish crisping. With everything staged, the active work takes barely ten minutes.
Ingredients at a glance (5)
- 9 oz small round soup crackers (about 6 cups)
- 1/2 cup unsalted butter, melted
- 3 tbsp dill pickle juice
- 1 tsp garlic powder
- 2 tsp dried dill
Instructions
Build the pickle butter
- Heat the oven and melt the butterHeat the oven to 375°F (190°C) and set a rack in the center. Melt the butter in a small saucepan over low heat or in a microwave-safe bowl in short bursts, stirring until fully liquid. Do not let it brown; the coating tastes best when the butter stays pale and sweet.Look for The butter pours clear and golden with no milk solids clinging to the pan.Tip Low heat keeps the butter from separating, so the pickle juice emulsifies in smoothly.
- Whisk in the pickle juice and garlic powderStir the dill pickle juice and garlic powder into the warm butter until the mixture looks uniform and slightly cloudy. It may thin and glisten as the acid blends in. Give it a taste on the tip of a spoon; it should taste distinctly tangy with a savory garlic edge behind it.Look for A pale, cloudy butter with tiny garlic specks suspended throughout.Tip Whisking while warm keeps the acid and butter from splitting before the coating hits the crackers.
At the end of phase one, the butter is fully melted and blended with the pickle juice into a uniform, slightly cloudy liquid, pale gold with fine garlic specks suspended throughout. It pours in a thin, steady stream from the measuring cup rather than in thick ribbons, and a spoon-tip taste reads strongly tangy first, with garlic and butter rounding out the finish. If the mixture looks separated or oily on top, whisk it again for a few seconds; it should re-emulsify while still warm. Only when it looks smooth and pours easily move on to the crackers, because a broken coating will pool instead of glazing.
Coat and season
- Pile the crackers into the baking dishSpread the oyster crackers in an even layer across the large baking dish. Break up any clumps with your hands so every cracker stands loose; crowded, stacked crackers bake unevenly and stay chewy where they touch. Aim for a shallow, level bed rather than a deep pile.Look for A single loose layer of crackers covering the bottom of the dish evenly.Tip A rimmed baking sheet gives more surface area, which means more crisp edges per batch.
- Drizzle and toss with the pickle butterPour the warm pickle butter evenly over the crackers, then fold gently with a spatula from the bottom of the dish upward, turning the crackers until every one looks glossy. Take a full minute here; thorough coating now is what carries the tang into every bite after baking.Look for No dry, pale crackers left; the whole batch glistens uniformly.Tip Folding instead of stirring keeps the delicate crackers from shattering into crumbs.
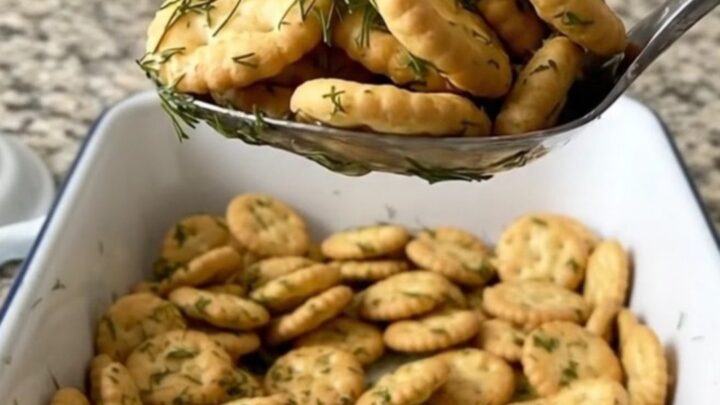
- Sprinkle the dill over the topSprinkle the dried dill evenly across the coated crackers, then give one more gentle fold to distribute the green flecks. Some will cling to the buttered surfaces and some will settle into the dish, which is exactly right; the oven will toast both into place.Look for Green specks visible on most crackers, not pooled in one spot.Tip Rubbing the dried dill between your fingers over the dish wakes up its aroma before it bakes.
Phase two ends with every cracker visibly coated: no dry, pale, powder-white pieces anywhere, and the dill flecks distributed across the whole dish instead of clustered in one green patch. The crackers should still hold their shape, glossy but not swimming, with no standing butter at the corners of the dish. Tilt the dish slightly; if a shallow river of butter runs free, fold a few more times to work it into the crackers. The layer should look shallow and level, never a deep pile, since stacked crackers steam instead of bake. When the batch looks evenly glazed and smells of garlic and dill even before the oven, it is ready.
Bake, cool and crisp
- Bake until crisp and fragrantBake for 12 to 15 minutes, folding the crackers once halfway through so the edges move to the center. They are ready when the crackers look dry and lightly toasted, smell strongly of garlic and dill, and make a dry rattle when the dish is nudged.Look for A dry, crisp rattle and a toasty garlic-dill aroma filling the kitchen.Tip Pull them the moment they rattle; a few extra minutes tips them from toasted to bitter.
- Cool completely in the dishSet the dish on a wire rack and let the crackers cool completely, about 15 minutes, without covering them. They crisp further as they cool; covering traps steam and softens the coating. Serve straight from the dish with a large spoon, or transfer to a bowl.Look for Crackers snap cleanly when bitten, with no bend or chew left in them.Tip Line a bowl with a paper towel if serving warm; it catches stray butter and keeps the bowl tidy.
Out of the oven, the crackers are dry to the eye, lightly golden at the edges, and fragrant enough that the garlic-dill smell reaches across the kitchen. Nudge the dish and listen for a loose, dry rattle; that sound is the surest signal the coating has set. Bite one after a few minutes of cooling: it should snap, not bend.
The full crispness arrives as the batch cools uncovered for about fifteen minutes, so resist tasting a verdict on hot crackers, which always seem softer than they are. If anything still looks glossy or feels pliable, two more minutes in the oven fixes it; anything darker than lightly toasted is past the point of no return.
Common mistakes
The most common slip is drowning the crackers. More than the listed butter leaves a greasy batch that never dries, so measure rather than free-pour. Rushing the melt is next: butter browned over high heat tastes nutty in the wrong way here and can separate, so melt low and slow.
Folding too roughly shatters the crackers into crumbs; use a spatula to scoop from the bottom and turn, not stir. Skipping the halfway fold gives a dark bottom layer and a pale top. Pulling the dish too early leaves soft crackers, while pushing too long turns the dill bitter; listen for the dry rattle. And do not cover warm crackers to store them; trapped steam undoes all the crisping.
How to tell it’s done
Finished crackers look dry and matte rather than glossy, with lightly toasted edges and dark green dill flecks bonded to the surface. Lift one and bite it: it should snap cleanly with a dry crunch, no bend, no chew, no visible wet spot. Nudge the dish and listen; a properly baked batch rattles loosely instead of shifting as a heavy mass.
The aroma is unmistakable, warm garlic and dill with a faint toasty note. If any crackers still look shiny or feel pliable in the center, return the dish to the oven for two-minute intervals, folding between checks. This recipe contains no raw meat, poultry, fish or eggs, so there is no internal temperature to hit; visual and textural cues carry the whole judgment.
Up next · Part 3 of 3
4 variations · storage & make-ahead · 5 answers · printable card
Tips, FAQ & printable recipe (Part 3)← Back to the ingredients (Part 1)