Desserts · Part 2 of 3: Instructions
Decadent Peanut Butter Chocolate Trifle for Easy Entertaining Step-by-step instructions
- Prep
- Cook
- Total
- Serves
- 8
Before you start
Before beginning, ensure all ingredients are properly measured and chilled. The heavy cream must be cold to whip effectively, so keep it in the refrigerator until the very last second.
Have your trifle dish cleaned and ready on a level surface. If you are preparing your own pudding, ensure it has cooled completely, as warm pudding will melt the whipped cream and ruin the integrity of your layers.
Ingredients at a glance (5)
- 1 cup creamy peanut butter
- 2 cups heavy whipping cream
- 2 cups chocolate pudding, prepared
- 1/4 cup chocolate syrup
- 1/2 cup mini peanut butter cups, chopped
Instructions
Creating the Mousse
- Prepare the Mousse and CreamIn a large chilled bowl, whip the heavy cream until stiff peaks form. Fold half of the whipped cream into the creamy peanut butter until the mixture is smooth and aerated. Keep the remaining whipped cream in the refrigerator to use for piping the final rosettes later.Look for The mixture should be light, fluffy, and uniform in color.Tip Ensure the heavy cream is very cold before whipping to achieve the best volume and stability.
The peanut butter and whipped cream mixture should be completely smooth, light, and airy. It should hold a gentle peak and have a uniform golden color. Check that there are no lumps of peanut butter remaining before proceeding to the assembly phase.
Layering the Trifle
- Assemble the Trifle LayersSpread a layer of the peanut butter mousse at the bottom of your trifle dish. Follow this with a generous layer of chocolate pudding. Repeat these layers until the dish is nearly full, ensuring the edges are clean to show off the beautiful contrast between the dark pudding and the pale peanut butter mousse.Look for The layers should be distinct and level for a professional appearance.Tip Use a clean spatula to smooth the edges of each layer against the glass walls of the dish.
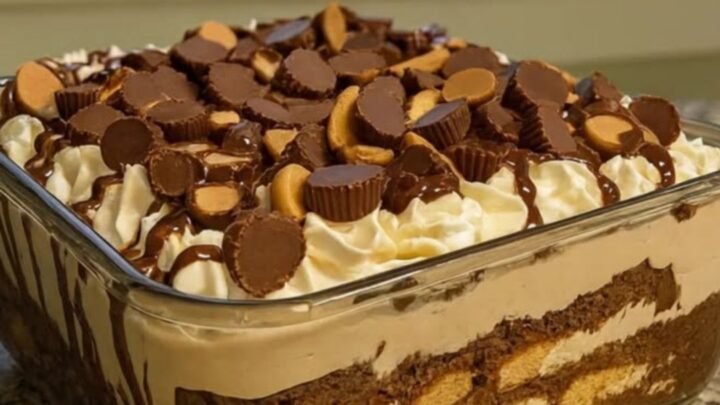
The layers should be crisp and clearly defined against the glass. Ensure each layer is distributed evenly to avoid gaps. The dish should look structured and appealing, with a clean transition between the dark chocolate and the creamy peanut butter base.
Final Decoration and Chilling
- Final Decoration and ChillingCook the custard base for the pudding over medium heat until it reaches 160°F (71°C) to ensure the eggs are fully cooked. Pipe the remaining whipped cream into decorative rosettes over the top of the trifle. Drizzle the chocolate syrup over the cream and sprinkle the chopped mini peanut butter cups evenly across the surface. Refrigerate the assembled trifle for at least one hour before serving to allow the layers to set slightly.Look for The dessert should look firm and the toppings should be set in place.Safe temperature 160°F (71°C) internal temperature (egg dishes)Tip Wait until just before serving to add the chocolate syrup and peanut butter cups to maintain their texture.
The rosettes should be firm and hold their shape well. The chocolate drizzle should be glossy and the peanut butter cup pieces should be evenly distributed.
The entire dish should appear elegant and ready for the final chilling period before being brought to the table.
Common mistakes
A common mistake is failing to chill the pudding or mousse components adequately before layering, which results in a muddy appearance where the colors bleed into each other.
Another error is over-whipping the cream, which can lead to a grainy texture. Finally, ensure you do not rush the layering process; take your time to smooth each layer to achieve that clean, professional look.
How to tell it’s done
The trifle is ready when the layers are visibly distinct and the mousse has set firmly enough to hold its shape when scooped.
The whipped cream rosettes should remain upright and stable on top of the dessert. Ensure the egg-based pudding reaches 160°F (71°C) during the cooking phase to ensure safety.
- Egg dishes: 160°F (71°C) in the thickest part
Up next · Part 3 of 3
2 variations · storage & make-ahead · 3 answers · printable card
Tips, FAQ & printable recipe (Part 3)← Back to the ingredients (Part 1)