Desserts · Part 2 of 3: Instructions
Decadent No-Bake Chocolate Caramel Crunch Dessert Step-by-step instructions
- Prep
- Cook
- Total
- Serves
- 8
Before you start
Before beginning, ensure that all ingredients are measured and ready. If using a pre-made caramel sauce, ensure it is at room temperature so it is easy to drizzle. Chill your mixing bowl and the beaters for the whipped cream, as cold equipment significantly aids in the aeration process.
Clear sufficient space in your refrigerator for the baking dish, ensuring it sits on a level surface so the layers remain even while chilling. Having everything organized beforehand ensures a smooth assembly process.
Ingredients at a glance (5)
- 2 cups chocolate cookie crumbs
- 2 cups heavy whipping cream
- 1 cup caramel sauce
- 1/2 cup chocolate chunks
- 1/4 cup chocolate cookie crumbs
Instructions
Crust assembly
- Prepare the crustPress the chocolate cookie crumbs firmly into the bottom of an 8x8-inch glass baking dish to create an even, dense layer. Place in the refrigerator to chill while preparing the filling.Look for The crumbs should be packed tightly and hold their shape.Tip Use the bottom of a measuring cup to pack the crust down evenly for a cleaner slice.
The crust should be evenly distributed and firmly packed into the bottom of the dish. It should look dark and uniform, with no loose crumbs remaining on the surface. When you touch the surface, it should feel dense and compact, ready to receive the creamy layers that follow without shifting or breaking apart.
Filling and layering
- Whip the cream and layerBeat the heavy whipping cream in a bowl until stiff peaks form. Spread the whipped cream evenly over the chilled chocolate crust. Drizzle half of the caramel sauce over the whipped cream layer, using a spatula to gently marble it if desired.Look for The cream should be thick and hold stiff peaks.Tip Ensure the bowl and beaters are chilled to help the cream whip faster.
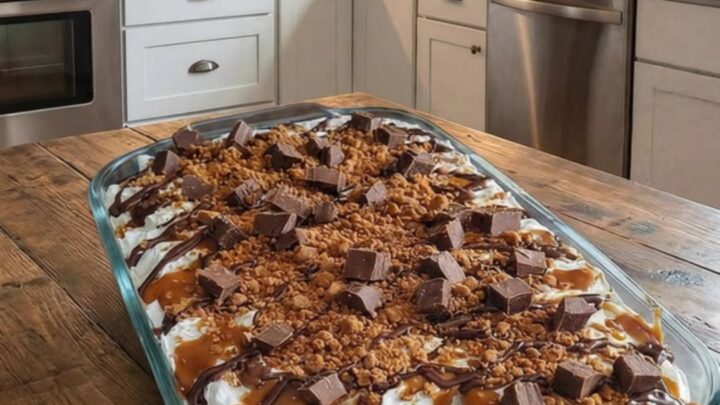
The whipped cream should be smooth and billowy, covering the crust entirely. The caramel should be drizzled in a consistent pattern, creating visible streaks throughout the cream layer. Ensure that the edges are clean and that the cream is spread right up to the sides of the glass dish for a professional look.
Topping and setting
- Add final toppings and chillScatter the chocolate chunks and the remaining cookie crumbs over the top of the dessert. Drizzle with the remaining caramel sauce. Refrigerate the dish for at least two hours to allow the layers to set properly before slicing and serving.Look for The caramel should look glossy and the dessert should be firm to the touch.Tip A warm knife creates smoother edges when slicing the chilled dessert.
The final toppings should be evenly scattered across the surface. The entire assembly should look cohesive, with the caramel drizzle resting on top of the cream and chocolate pieces.
After the chilling time, the dessert should feel firm and cold, showing no signs of separation between the layers when viewed from the side.
Common mistakes
A common mistake is using warm ingredients for the crust; always ensure the cookie crumbs are dry and ready for pressing. Another error is over-whipping the cream, which can cause it to become grainy or turn into butter.
Stop whipping as soon as stiff peaks form. Finally, do not rush the chilling process; allowing the dessert to set for the full two hours is crucial for achieving clean slices and the perfect textural contrast.
How to tell it’s done
The dessert is done when the whipped cream layer feels firm to the touch and the caramel has set slightly. Because there are no raw proteins involved, there is no temperature requirement for doneness.
Instead, rely on the visual cues of a set, stable structure that does not slide or sag when the dish is tilted slightly. The crust should feel solid, and the overall assembly should be cold throughout, indicating that the fats have solidified adequately for a clean slice.
Up next · Part 3 of 3
2 variations · storage & make-ahead · 3 answers · printable card
Tips, FAQ & printable recipe (Part 3)← Back to the ingredients (Part 1)