Desserts · Part 2 of 3: Instructions
Decadent Chocolate Layer Cake with Vanilla Cream and Ganache Step-by-step instructions
- Prep
- Cook
- Total
- Serves
- 12
Before you start
Before beginning the assembly, ensure the work area is clean and well-lit to monitor the consistency of the frosting and ganache. Gather the cake layers, buttercream, ganache, and sprinkles on the counter.
If the cake layers were refrigerated, allow them to come to room temperature for about thirty minutes to ensure they remain moist and easy to handle. Prepare the cake stand by wiping it clean. Keep all tools within reach to ensure the assembly process remains smooth and efficient once the decorating begins.
Ingredients at a glance (4)
- 2 layers chocolate sponge cake, store-bought or made ahead
- 2 cups vanilla buttercream, store-bought or made ahead
- 1/2 cup chocolate ganache, store-bought or made ahead
- 1 tbsp sprinkles
Instructions
Layering the base
- Prepare the layersPlace the first chocolate sponge cake layer onto a clear glass cake stand. Ensure the surface is level so the cake remains stable during the assembly process.Look for The cake layer stays firmly in place on the stand.Tip Use a cake board underneath if planning to move the cake later.
At the end of this phase, the bottom sponge layer should be securely positioned on the cake stand. Check that the stand is stable and that the layer is centered. The surface should be flat and ready to receive the filling. If the sponge shows any signs of instability, adjust the positioning before proceeding to the next step, as this will ensure the entire cake remains vertical and balanced throughout the assembly process.
Filling and frosting
- Apply the vanilla fillingUsing an offset spatula, spread a generous, even layer of vanilla buttercream over the top of the first sponge layer. Smooth it out toward the edges to ensure a clean look.Look for The cream is spread in a uniform, smooth layer.Tip Chill the bottom layer briefly if the cream seems too soft.
- Assemble the cakePlace the second chocolate sponge layer directly on top of the cream-covered bottom layer. Apply a thin layer of buttercream over the entire exterior of the cake to create a smooth base.Look for The two layers are perfectly aligned and the exterior is coated.Tip Ensure the cake is level after stacking the second layer.
The cake should now be stacked with the vanilla cream filling and coated with a thin layer of buttercream. Check that the sides are smooth and that there are no gaps between the layers. The cream should be evenly distributed, and the exterior should be uniform. If any gaps are visible, fill them with a small amount of buttercream and smooth them out, as this creates the necessary foundation for the final ganache topping.
Ganache and finish
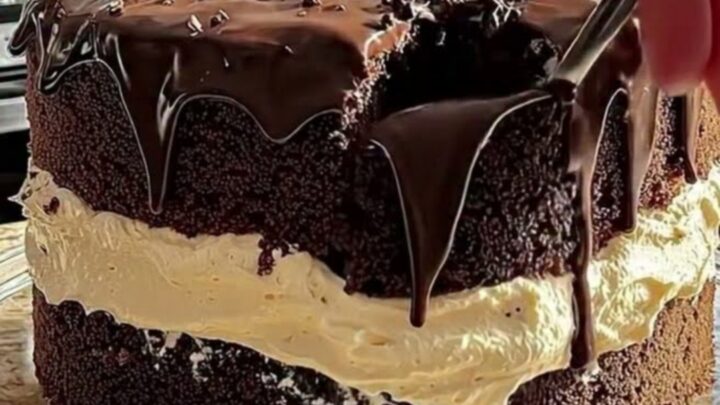
- Apply ganache and garnishPour the warm chocolate ganache over the top of the cake, allowing it to drizzle naturally over the edges. Immediately scatter the sprinkles over the top while the ganache is still wet to ensure they adhere properly. If using homemade custard-based ganache, ensure it reaches 160°F (71°C) during preparation to cook the eggs through.Look for The ganache creates a glossy, professional-looking drip pattern.Safe temperature 160°F (71°C) internal temperature (egg dishes)Tip Work quickly before the ganache begins to set.
The final phase is complete when the ganache is applied and the sprinkles are set. The cake should look polished, with uniform drips running down the sides. Check that the ganache has cooled sufficiently to hold its shape and that the sprinkles are securely attached to the top.
The overall presentation should be cohesive and visually enticing, ready for serving. Ensure no excess ganache has pooled on the cake stand, wiping it clean if necessary.
Common mistakes
A common mistake is applying ganache while it is too hot, which causes it to run too quickly down the sides and pool at the bottom, or applying it when it is too cold, preventing the desired drip effect.
Another error is attempting to frost the cake while the sponge is still warm, which will cause the buttercream to melt and slide. Always ensure the sponge is completely cool before starting. Finally, avoid using too much pressure when spreading the buttercream to prevent crumbs from pulling into the frosting.
How to tell it’s done
The cake is fully assembled when the ganache has been poured and the sprinkles are evenly distributed. The ganache should be glossy and have set slightly around the edges, creating a beautiful drip pattern. The structure should feel stable, and the layers should be perfectly aligned.
For any custard-based components, ensure the internal temperature reaches 160°F (71°C) to ensure the eggs are fully cooked. Visually check that the ganache has stopped flowing and has achieved a firm, set appearance before serving.
- Egg dishes: 160°F (71°C) in the thickest part
Up next · Part 3 of 3
2 variations · storage & make-ahead · 3 answers · printable card
Tips, FAQ & printable recipe (Part 3)← Back to the ingredients (Part 1)