Desserts · Part 2 of 3: Instructions
Decadent Chocolate Coconut Crumble Cake Step-by-step instructions
- Prep
- Cook
- Total
- Serves
- 8
Before you start
Ensure all components are prepared and at the correct temperature before starting the assembly. The cake layers should be at room temperature or slightly cooler, while the coconut cream must be thoroughly chilled.
Have your offset spatula and cake stand ready to avoid rushing the process, as the whipped cream can soften if left out at room temperature for too long.
Organizing your workspace with all necessary tools and ingredients within reach will streamline the assembly and help maintain the ideal temperature of the cream.
Ingredients at a glance (3)
- 2 layers chocolate cake, store-bought or made ahead
- 2 cups coconut cream, chilled and whipped
- 1 cup cocoa crumbs
Instructions
Whipping the filling
- Prepare the coconut fillingPlace the chilled coconut cream into a medium mixing bowl. Using an electric hand mixer, whip the cream on high speed until it forms stiff, stable peaks. Ensure the bowl and beaters are cold to achieve the best volume and texture for the filling.Look for The cream holds its shape firmly on the beaters.Tip Keep the coconut cream in the refrigerator overnight to ensure it separates from the water, allowing for a thicker, scoopable cream.
The coconut cream should be thick, glossy, and hold stiff peaks that stand upright on the spatula. If the mixture appears too soft or liquid, return it to the refrigerator for an additional fifteen minutes before attempting to whip it again.
Assembling the layers
- Assemble the cake layersPlace the first chocolate cake layer on a cake stand. Spread a generous, even layer of the whipped coconut cream over the top using an offset spatula. Carefully position the second cake layer on top of the cream, pressing down gently to secure the structure.Look for The cream is spread level to the edges of the cake.Tip Wipe the edges of the cake stand clean after spreading the cream to maintain a professional appearance.
The cake should look level and stable, with the cream filling visible in a uniform layer between the two sponges. Ensure there is no significant bulging of the cream at the sides, as this indicates the cake layers are not properly aligned.
Applying the finish
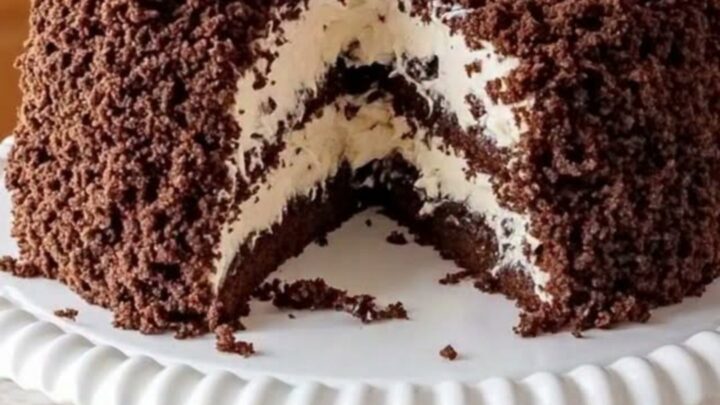
- Frost and garnishCover the top and sides of the assembled cake with the remaining whipped coconut cream. Carefully press the cocoa crumbs onto the sides and top of the cake, ensuring full coverage. Let the cake rest in the refrigerator for at least thirty minutes before slicing to allow the layers to firm up.Look for The cake is fully coated and the crumbs are adhered to the cream.Tip Use a gentle hand when pressing the crumbs into the cream to avoid flattening the layers or smearing the finish.
The cake should be completely covered in a uniform layer of cocoa crumbs. The finish should look textured and dark, contrasting beautifully with the white cream visible inside. Check that the base of the cake stand is clean and free of loose crumbs.
Common mistakes
A common mistake is failing to chill the coconut cream sufficiently, which results in a thin filling that oozes out from between the layers. Another error is applying the cocoa crumbs too forcefully, which can ruin the smooth finish of the cream.
Always work with a light touch and ensure the environment is cool to maintain the cream's integrity throughout the assembly phase. Avoid over-whipping the cream, as this can lead to a grainy texture that detracts from the smooth, luxurious mouthfeel desired in this dessert.
How to tell it’s done
The cake is ready to serve once the coconut cream has set and the crumbs are firmly attached to the exterior. There is no internal temperature to monitor for this dessert, as all components are pre-prepared.
Simply ensure the layers are stable and the structure holds its shape when touched lightly at the edges. The cream should feel firm and cool to the touch, indicating that the fats have properly set, providing a clean slice when the knife passes through the layers.
Up next · Part 3 of 3
2 variations · storage & make-ahead · 3 answers · printable card
Tips, FAQ & printable recipe (Part 3)← Back to the ingredients (Part 1)