Desserts · Part 2 of 3: Instructions
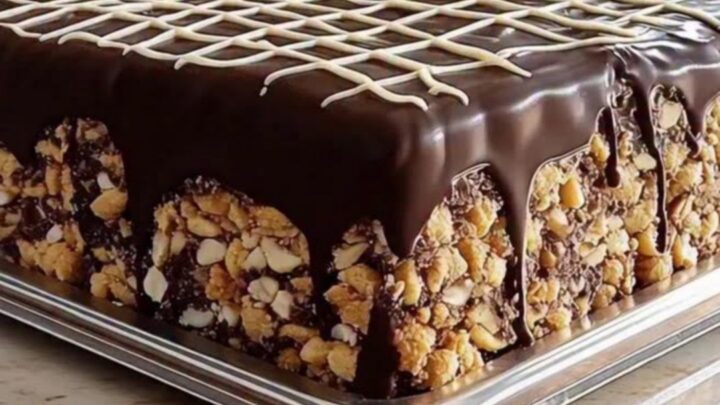
Decadent Chocolate Biscuit Cake with Glossy Glaze Step-by-step instructions
- Prep
- Cook
- Total
- Serves
- 8
Before you start
Ensure the baking pan is lined with parchment paper, allowing for an overhang on the sides so the cake can be easily lifted out after chilling.
Prepare the biscuits by breaking them by hand into pieces roughly the size of a quarter.
Make sure the workspace is clear and that both the dark and white chocolate are ready to be melted, as the process moves quickly once the chocolate begins to liquify.
Ingredients at a glance (3)
- 8 oz tea biscuits, broken into pieces
- 1 cup dark chocolate chips
- 1/4 cup white chocolate chips
Instructions
Base Preparation
- Prepare the biscuit basePlace the broken tea biscuits into a lined 8-inch square baking pan, ensuring they are distributed evenly across the bottom to create a uniform crunch for the base of the dessert.Look for The biscuits should be broken into bite-sized pieces that fit snugly in the pan.Tip Avoid crushing the biscuits into fine crumbs; keep them in chunky pieces to maintain the signature texture of the cake.
The biscuits are arranged evenly across the parchment-lined pan, creating a solid and stable foundation that is completely ready to be encased in the rich, melted chocolate glaze for optimal structure and crisp texture.
Glazing Process
- Glaze the cakeMelt the dark chocolate chips using a double boiler until smooth and glossy. Pour the warm, melted chocolate evenly over the prepared biscuits in the pan, ensuring all pieces are well coated.Look for The chocolate should be completely smooth, shiny, and pourable without any lumps.Tip Tap the pan gently on the counter to help the chocolate settle into the gaps between the biscuits.
The melted dark chocolate is exceptionally smooth, glossy, and entirely lump-free, flowing readily into every open crevice to fully bind the biscuits into a cohesive, uniform slab that smells deeply of rich cocoa.
Final Decoration
- Decorate and setMelt the white chocolate chips and transfer to a piping bag. Pipe delicate criss-cross lines over the surface of the dark chocolate. Allow the cake to set in the refrigerator until firm before slicing.Look for The chocolate lines should be fine and consistent across the surface of the cake.Tip Wait for the dark chocolate to firm up slightly before piping the white chocolate to ensure the lines stay crisp.
The delicate white chocolate lines form a neat, contrasting criss-cross pattern across the entire top surface, holding their shape cleanly as the pan is carefully transferred to the refrigerator to chill and set firm.
Common mistakes
Avoid overheating the chocolate, as this can cause it to seize or become dull rather than glossy. Ensure the biscuits are completely dry before adding the chocolate to prevent any moisture from affecting the texture.
Do not rush the chilling process; allowing the cake to set for at least two hours is essential for clean slices.
How to tell it’s done
The cake is done when the chocolate has fully set and feels firm to the touch. The surface should be smooth and the white chocolate drizzle should be hardened.
When slicing, the knife should pass through cleanly, creating sharp, crisp edges that showcase the layers of biscuit and chocolate clearly.
Up next · Part 3 of 3
2 variations · storage & make-ahead · 3 answers · printable card
Tips, FAQ & printable recipe (Part 3)← Back to the ingredients (Part 1)