Desserts · Part 1 of 3: Ingredients
Dark Chocolate Oreo Cheesecake with Ganache and Whipped Cream Rosettes
- Prep
- Cook
- Total
- Serves
- 12
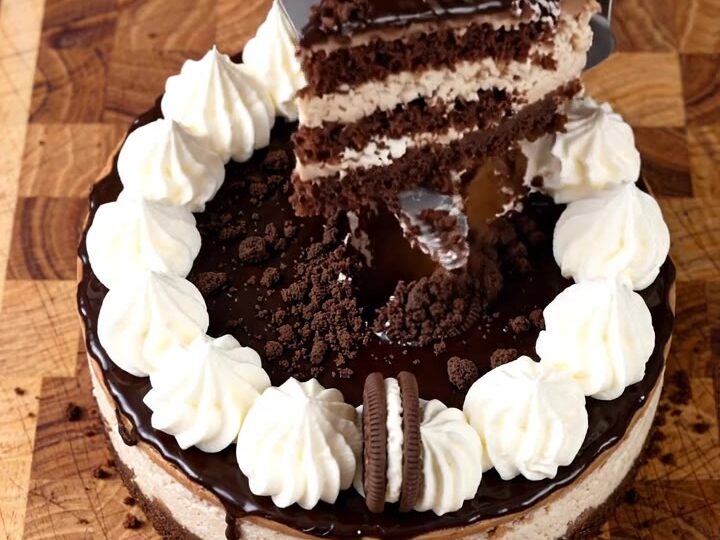
Picture a pale, dense cream cheese filling sitting on a dark chocolate cookie crust, then a pour of glossy ganache across the center. Cookie crumbs and rosettes of whipped cream finish the top. This is a showpiece dessert built from familiar ingredients and a few simple techniques, and it slices cleanly into tall, creamy wedges that look as good as they taste.
This dark chocolate Oreo cheesecake starts with a crust made from chocolate sandwich cookies pressed into a springform pan. The filling is a smooth blend of cream cheese, sugar, eggs and sour cream, baked gently until the edges are set and the center is still tender.
Once cooled, the top is finished with a layer of dark chocolate ganache, crushed cookies, whole sandwich cookies and a few grated chocolate curls. Whipped cream piped around the edge adds height and a light contrast to the rich layers. The cake needs time in the refrigerator to firm up, so plan the day ahead for the cleanest slices and the most stable texture.
Ingredients
Crust
- 24 chocolate sandwich cookies, such as Oreo-style, filling included
- 5 tbsp unsalted butter, melted
Filling and topping
- 4 oz dark chocolate bar, broken into pieces, plus more for grating
Filling
- 24 oz cream cheese, softened to room temperature
- 3/4 cup granulated sugar
- 3 large eggs, at room temperature
- 1/2 cup sour cream
- 1 tsp vanilla extract
Ganache
- 1/2 cup heavy cream
Topping
- 1 cup cold heavy cream, for whipped cream
- 2 tbsp confectioners' sugar, for whipped cream
Why this recipe works
The chocolate cookie crust works because the crumbs hold their shape when mixed with melted butter and pressed firmly. Butter binds the crumbs so the base slices cleanly and resists sogging under the filling. Pressing the crust before chilling helps it firm up, which keeps the layers separate when you spread the cream cheese filling on top.
Baking the cheesecake in a water bath keeps the heat gentle and even, so the filling sets evenly without cracking across the surface. Cooling the cheesecake slowly in the turned-off oven reduces the temperature shock that causes cracks.
Chilling overnight lets the proteins and fats settle, which gives the dense, creamy interior that defines a good cheesecake. Adding the ganache only after the cheesecake is cool keeps the chocolate glossy instead of melting into the filling.
Notes and substitutions
Dark chocolate gives the cheesecake a deeper, less sweet flavor than milk chocolate, which balances the sweetness of the cookies and the sugar in the filling. Choose a bar you enjoy eating on its own, and break it into pieces so it chops and grates easily.
Use cream cheese at true room temperature, because cold cream cheese leaves small lumps in the batter that do not beat out smoothly. Bring the eggs to room temperature too, so they blend evenly into the filling without cooling it down.
A 9-inch springform pan is essential because the sides release cleanly once the cheesecake has chilled. Wrap the outside in foil before setting it in the water bath to keep water from seeping into the crust. A box grater makes fine chocolate curls for the top, and a piping bag with a star tip gives neat whipped cream rosettes.
If you do not have a food processor, a sealed bag and a rolling pin crush the cookies just as well. Substitutions such as dark chocolate chips or store-bought whipped topping are possible, but they change the texture and flavor slightly.
- dark chocolate bar: dark chocolate chips, melted, for a similar flavor
- sour cream: additional cream cheese, same weight, for a slightly milder tang
- heavy cream for whipping: store-bought whipped topping, for a lighter and more stable piped finish
Equipment
- 9-inch springform pan
- Wooden cutting board
- Chef's knife
- Box grater
- Food processor or rolling pin
- Electric mixer
- Small saucepan
- Piping bag with star tip
- Offset spatula
Up next · Part 2 of 3
9 steps · 1 h of cooking · what to look for at each stage
Step-by-step instructions (Part 2)