Dinner · Part 2 of 3: Instructions
Smoked Gouda Sour Cream Tater Tot Bake: Easy Crockpot Comfort Food Step-by-step instructions
- Prep
- Cook
- Total
- Serves
- 8
Before you start
Before starting, make sure you have all ingredients ready. Chop the bacon and cook it until crispy, then crumble it. Grate the cheeses if you're not using pre-shredded. Spray the slow cooker insert with nonstick spray (optional) to make cleanup easier.
Measure out the tater tots, soup, sour cream, and cheeses. Everything should be at room temperature except the tater tots, which should stay frozen. Have a mixing spoon and measuring cups handy. This recipe is all about layering, so have the ingredients within reach.
Ingredients at a glance (6)
- 2 lb frozen tater tots
- 1 cup crispy crumbled bacon
- 1 can (10.5 oz) condensed cream of chicken soup
- 1 cup sour cream
- 2 cups shredded smoked gouda
- 1/2 cup freshly grated Parmigiano-Reggiano
Instructions
Layer and Cover
- Layer the BasePlace the frozen tater tots in an even layer in the bottom of a 6-quart slow cooker. Sprinkle the crispy crumbled bacon evenly over the tater tots.Look for The tater tots should cover the bottom of the slow cooker completely.Tip No need to thaw the tater tots—they will cook perfectly in the slow cooker.
- Add Creamy MixtureIn a small bowl, stir together the condensed cream of chicken soup and sour cream until smooth. Spoon this mixture over the tater tots and bacon, spreading it gently to cover most of the surface.Look for The soup and sour cream should be well combined and spread evenly.Tip Use a spatula to spread the mixture without disturbing the tater tots too much.
- Top with CheesesSprinkle the shredded smoked gouda evenly over the top, followed by the freshly grated Parmigiano-Reggiano. Do not stir—let the cheeses form a crust as they melt.Look for The top should be completely covered with cheese.Tip Grating the Parmesan finely helps it melt more evenly.
At the end of this phase, you'll have a neat layer of tater tots topped with bacon, then a creamy mixture of soup and sour cream, and finally a blanket of shredded cheeses. The slow cooker will be filled about 3/4 full.
The ingredients should be evenly distributed, and the top should be completely covered with cheese. This is the 'dump and forget' stage—no need to stir or mix. Just put the lid on and set the timer.
Slow Cook and Simmer
- Slow CookCover the slow cooker with its lid and cook on LOW for 4 hours, or until the tater tots are tender and the cheese is melted and bubbly. Do not lift the lid during the first 3 hours to keep the heat in.Look for The edges will look bubbly and the cheese will be fully melted.Tip Resist the urge to peek—lifting the lid adds 20 minutes of cooking time.
- Check for DonenessAfter 4 hours, check the casserole by inserting a fork into a tater tot. It should pierce easily. If not, continue cooking for another 30 minutes and check again.Look for The tater tots should be fork-tender and the cheese should be golden in spots.Tip If the top is browning too much, turn the slow cooker to WARM until ready to serve.
After 4 hours on LOW, the casserole will be bubbling at the edges and the cheese will be fully melted and starting to brown in spots. The kitchen will smell of smoky bacon and melted cheese. The tater tots should be tender when pierced with a fork. The sauce will have thickened and coated the tots. If the top is browning too much, you can turn the slow cooker to WARM. This is the moment to check for doneness.
Rest and Serve
- Let It RestTurn off the slow cooker and let the casserole rest, uncovered, for 5 minutes. This allows the cheese to set slightly and makes serving easier.Look for The casserole will stop bubbling and the cheese will firm up a bit.Tip Resting helps the layers hold together when you scoop it out.
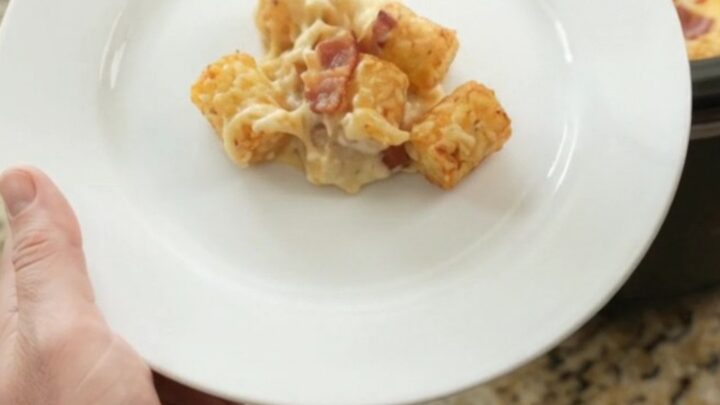
- Scoop and ServeUsing a large serving spoon, scoop the casserole onto plates. Serve hot, straight from the slow cooker or transferred to a serving dish.Look for Each scoop should have a mix of tater tots, bacon, and creamy cheese sauce.Tip For a crispy top, place the casserole under the broiler for a few minutes before serving.
After turning off the slow cooker and letting the casserole rest for 5 minutes, the cheese will have set slightly, making it easier to scoop. The casserole will be steamy and fragrant. When you scoop it out, you'll see layers of creamy potato, bacon, and cheese that hold together nicely. Serve it hot, straight from the slow cooker, and watch it disappear. The leftovers can be stored in the fridge for up to 3 days.
Common mistakes
One common mistake is lifting the lid too often to check on the casserole. Each time you lift the lid, heat escapes and adds 20 minutes to the cooking time. Another mistake is using pre-shredded cheese that doesn't melt well due to anti-caking agents.
Grate your own for the smoothest sauce. Also, avoid stirring the casserole after adding the cheese—this can break up the tater tots and create a mushy texture. Finally, don't overcook, or the tater tots will become too soft and lose their shape.
How to tell it’s done
The bake is done when the tater tots are fork-tender and the cheese is melted and bubbly. Insert a fork into a tater tot; it should pierce easily with little resistance. The edges of the casserole will look golden and slightly crispy, and the center will be hot and steaming.
If the cheese isn't fully melted, cook for another 30 minutes. The internal temperature should reach at least 165°F (74°C) if you're using chicken soup. Let it rest for 5 minutes before serving to allow the cheese to set.
Up next · Part 3 of 3
4 variations · storage & make-ahead · 5 answers · printable card
Tips, FAQ & printable recipe (Part 3)← Back to the ingredients (Part 1)