Dinner · Part 2 of 3: Instructions
Crockpot Pepper Jelly Turkey Tenderloin: Sweet, Spicy, 4 Ingredients Step-by-step instructions
- Prep
- Cook
- Total
- Serves
- 4
Before you start
Slice one large yellow onion in half pole to pole, then cut it into half-moons about a quarter inch thick and separate the layers. Measure out the garlic powder and the red pepper jelly so everything is within reach.
Check the turkey tenderloins for any netting or packaging bands and remove them, then pat all sides dry with paper towels — a dry surface takes the seasoning evenly and keeps the sauce from thinning. Set the slow cooker where it will run undisturbed, plug it in, and confirm the insert is clean and dry before you start layering.
Ingredients at a glance (4)
- 3 lb turkey tenderloins (about 3 whole pieces)
- 1 large yellow onion, cut into half-moons
- 1 tbsp garlic powder
- 1 cup red pepper jelly
Instructions
Build the layers
- Layer the onion baseScatter the onion half-moons evenly over the bottom of the slow cooker insert, building a thin, even bed. The onions will sit directly under the turkey and slowly dissolve into the pepper jelly as everything cooks, giving the sauce body, sweetness and a mellow bite without any extra work.Look for The insert floor should be covered in an even layer with no bare ceramic showing through.Tip Keep the slices about a quarter-inch thick; thinner slices nearly vanish, thicker ones hold their shape.
- Season the turkeyPat the turkey tenderloins dry with paper towels, then sprinkle the garlic powder over all sides, rubbing it in lightly so it clings. Season generously with salt and pepper. Drying the surface first helps the seasoning stick and keeps the finished sauce from tasting watered down.Look for Each tenderloin should look evenly coated with no dry powdery patches left on the surface.Tip If the tenderloins have a netting or band, remove it before seasoning.
- Nest the turkey on the onionsLay the whole turkey tenderloins flat on top of the onion bed, nestling them side by side in a single snug layer. Keeping them whole and flat means every piece cooks at the same pace, and the onions underneath stay in contact with the meat so the sauce keeps moving while it simmers.Look for No tenderloin should be stacked on another; they can touch, but not overlap.Tip If the insert feels crowded, shift the tenderloins so the thickest ends point in alternating directions.
At the end of this phase the insert should look organized and quiet: an even bed of raw onion half-moons across the bottom, whole tenderloins laid flat side by side on top, each one coated in garlic powder and seasoned, and a blanket of red pepper jelly spooned over everything. Nothing should be stacked, nothing should be dry, and no bare turkey should show through the jelly. The lid goes on, the cooker goes to low, and the only thing left to do is wait.
Low and slow
- Spoon over the pepper jellySpoon the red pepper jelly evenly over the tenderloins, letting it slide down into the onions. It will look thick and sticky now, but over hours of low heat it loosens into a glossy, pourable sauce that coats every piece. Cover the insert with the lid.Look for Every tenderloin should have a visible blanket of jelly on top before the lid goes on.Tip If the jelly is very stiff, warm the spoon under hot water so it releases in clean scoops.
- Cook low and slowCook on low for about 4 hours, or until the turkey reaches an internal temperature of 165°F (74°C) at its thickest point. Keep the lid closed the whole time; every peek releases heat and can add 20 minutes or more to the cook. The sauce will bubble gently at the edges.Look for The jelly has thinned into a pourable sauce and the onions have gone soft and translucent.Safe temperature 165°F (74°C) internal temperature (poultry)Tip Set the cooker on the low setting rather than high — tenderloins turn dry quickly at a faster simmer.
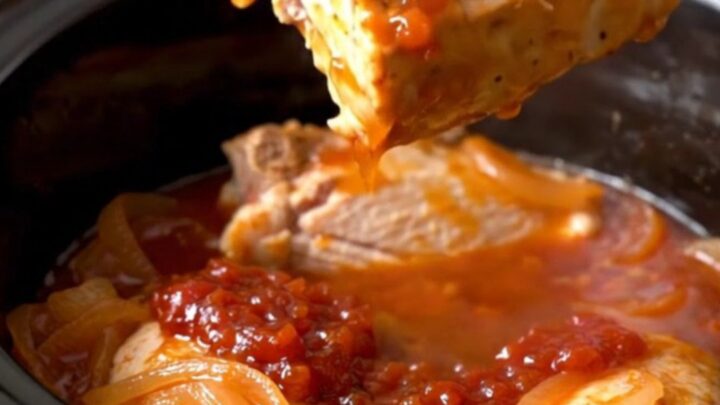
Four hours in, the transformation should be unmistakable. The stiff, sticky jelly has loosened into a glossy, pourable sauce that bubbles gently at the edges of the insert, and the onions have gone from crisp white half-moons to soft, translucent ribbons.
The kitchen smells sweet and gently spicy. The turkey should look plump and glazed, not shriveled. Before moving on, confirm the internal temperature has reached 165°F (74°C) at the thickest point of the largest piece.
Rest and serve
- Check the temperatureLift the lid away from you so the steam escapes sideways, then insert an instant-read thermometer into the thickest part of the largest tenderloin. It must read at least 165°F (74°C). If any piece falls short, recover and check again in 15 minutes before moving on.Look for The juices run clear and the meat gives easily when pressed with tongs.Tip Test two pieces if they differ in size — smaller tenderloins finish sooner.
- Rest and glazeTurn off the heat and let the turkey rest in the sauce for about 5 minutes. As it rests, the fibers relax and reabsorb juice, and the sauce thickens slightly. Use tongs to turn each tenderloin once in the sauce so every surface picks up a glossy coat of pepper jelly.Look for The sauce clings to the meat in a shiny, pourable layer rather than pooling thin.Tip Skim any pale foam from the surface of the sauce before serving.
- Serve with the onionsTransfer the tenderloins to a warm platter and spoon the softened onion half-moons and sauce over the top. Serve the turkey whole and slice it at the table, or pull it apart with two forks for a shredded version that soaks up every drop of the sweet-spicy sauce.Look for The meat pulls apart with light pressure and the sauce coats the back of a spoon.Tip Spoon extra sauce into a small pitcher for anyone who wants more over rice or mashed potatoes.
After the five-minute rest, the sauce should cling to each tenderloin in a shiny coat rather than pooling thin and pale around it. The meat should resist slightly when pressed, then give, pulling apart with a fork in moist strands. The onion half-moons should still hold their shape enough to spoon over the top. If the sauce looks foamy, skim the surface once, turn each tenderloin through it, and bring everything to the table while it steams.
Common mistakes
The most common slip is cooking on high to save time; tenderloins are lean and tighten up fast at a rolling simmer, so stay on low for the full four hours. Another frequent error is stacking the tenderloins, which leaves the buried piece undercooked while the top one dries out — keep them in one snug layer.
Lifting the lid repeatedly releases steam and stretches the cook, so trust the process until the temperature check. Skipping the pat-dry step waters down the sauce, and cutting the onions too thin makes them disappear entirely instead of softening into visible half-moons.
How to tell it’s done
The turkey is done when an instant-read thermometer inserted into the thickest part of the largest tenderloin reads at least 165°F (74°C), the safe internal temperature for poultry. Visually, the meat should look opaque throughout with clear, not pink, juices, and the surface should be glazed and glossy from the sauce.
The tenderloins should give easily under tongs and pull apart with light pressure. If the sauce still looks thin and watery rather than pourable and slightly syrupy, the cook is not finished — recover and give it another 20 to 30 minutes on low.
- Poultry: 165°F (74°C) in the thickest part
Up next · Part 3 of 3
4 variations · storage & make-ahead · 5 answers · printable card
Tips, FAQ & printable recipe (Part 3)← Back to the ingredients (Part 1)