Appetizers · Part 2 of 3: Instructions
Crockpot Garlic Parmesan Beef Meatballs (5-Minute Prep) Step-by-step instructions
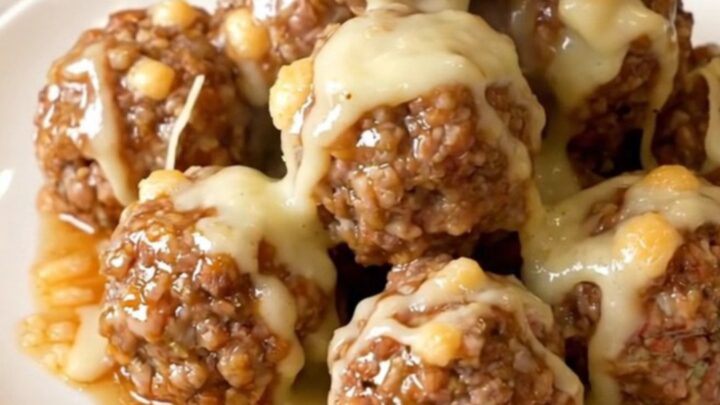
- Prep
- Cook
- Total
- Serves
- 6
Before you start
Check the slow cooker insert for cracks and set the cooker where it will stay for the next three hours, away from anything that should not sit near gentle warmth. There is nothing to thaw, chop, or measure ahead: the meatballs go in frozen, and the parmesan, seasoning packet, and wing sauce each need only a moment.
Have the spatula and thermometer within reach so the mid-cook stir and the final temperature check are quick, and decide before starting whether this is an appetizer or a dinner, since that decides the serving plan later.
Ingredients at a glance (4)
- 2 lb frozen fully cooked beef meatballs, standard-size, no need to thaw
- 1/2 cup grated parmesan cheese, finely grated so it melts into the sauce
- 1 garlic seasoning packet, about 1 oz, such as a garlic and herb or savory garlic mix
- 12 oz garlic parmesan wing sauce, one standard bottle
Instructions
Load the cooker
- Layer the meatballsPlace the frozen fully cooked beef meatballs directly into the ceramic insert of a 5- to 6-quart slow cooker, still frozen and unthawed. Spread them into a fairly even layer across the bottom so each one heats at the same pace and picks up sauce evenly as it warms.Look for The meatballs sit in a single, mostly even layer with a little breathing room between them.Tip No thawing needed here; frozen meatballs hold their shape better during the long, gentle cook and never turn mushy.
- Add parmesan and seasoningScatter the grated parmesan cheese evenly over the meatballs, then shake the garlic seasoning packet over the top, distributing it across the whole surface rather than dumping it in one spot. The cheese melts down into the sauce later, thickening it and adding a savory, salty backbone.Look for Every meatball shows a light dusting of cheese and seasoning, with no bare patches.Tip Fine-grated parmesan dissolves into the sauce; coarse shreds stay visible but melt less smoothly, so grate fine if starting from a wedge.
- Pour and tossSqueeze the garlic parmesan wing sauce over everything, then use a silicone spatula to toss the meatballs gently until each one is coated. Scrape any sauce pooled on the sides back down over the meat, then cover the slow cooker with its lid.Look for Every meatball glistens with sauce and the bottom of the insert shows a shallow pool of it.Tip Rinse the sauce bottle with a tablespoon of water and pour that in too, so no sauce is left clinging to the plastic.
By the end of this phase, the slow cooker is fully loaded and covered: frozen meatballs in an even layer, parmesan and seasoning scattered across the top with no bare patches, and sauce poured over everything and tossed so each meatball glistens.
Before switching the cooker on, do one visual check around the rim: no sauce smeared on the stoneware above the food line, where it could dry and scorch, and the lid seated squarely. The insert should look like a sauce-covered pile with a shallow pool at the bottom, not a dry mound, and not a deep lake either.
Slow cook and verify
- Cook low and slowSet the slow cooker to low and cook for 3 hours, keeping the lid closed the whole time. Every lift of the lid releases heat and adds roughly 20 minutes to the cook, so trust the timer and let the gentle heat do the work of thawing, heating, and flavoring the meatballs.Look for Steam collects on the glass of the lid and the edges of the sauce begin to bubble faintly.Tip Low heat is the right setting here; high heat can scorch the cheese at the edges before the center meatballs are heated through.
- Stir halfway throughAfter about 90 minutes, lift the lid and stir the meatballs once, turning the ones on the bottom up to the top and redistributing the sauce. This keeps the lower layer from sitting in thickening sauce too long and gives every meatball equal time in the glossiest part of the coating.Look for The sauce is loose and fluid at this point, coating the spoon in a thin, even layer.Tip Work quickly when stirring; close the lid immediately so the cooker does not lose the heat it has built up.
- Check the temperatureAt the 3-hour mark, stir once more and check the internal temperature of several meatballs in different spots of the cooker with an instant-read thermometer. The beef meatballs are safe to eat once they register at least 160°F (71°C) throughout; if any fall short, cover and continue cooking in 20-minute increments.Look for The thermometer reads 160°F (71°C) or higher in every meatball tested, including ones from the center.Safe temperature 160°F (71°C) internal temperature (ground meat)Tip Test at least three meatballs in different areas; the outer ring heats faster than the center of the insert.
After the halfway stir and the full three hours on low, this phase ends with a thermometer reading, and that reading is the real checkpoint. Lift out meatballs from the edge and from the center and confirm each reads at least 160°F (71°C).
The sauce should be visibly thicker than at the halfway mark, with the melted parmesan giving it a creamy, opaque look instead of a translucent sheen. The kitchen should smell strongly of garlic and butter. If any tested meatball falls short of temperature, cover and keep cooking before moving on.
Finish and serve
- Thicken the coatingOnce the meatballs are fully heated and at temperature, turn the cooker to warm, stir well, and let them sit uncovered for 10 minutes. The sauce tightens slightly as it stops actively bubbling, and the melted parmesan settles into a glossy, clingy coating that stays on each meatball instead of pooling below.Look for The sauce clings to the back of the spoon and leaves a slow, glossy trail when lifted.Tip If the sauce seems thinner than expected, stir in an extra tablespoon of grated parmesan and let it sit 5 more minutes.
- Serve warmSpoon the meatballs onto a warm serving plate or shallow bowl, scraping every bit of sauce over the top. Serve them straight away while the coating is glossy and the steam is still rising, with toothpicks alongside if this is an appetizer spread, or over pasta or rice if it is dinner.Look for The coating looks shiny and thick, and the meatballs hold their gloss for several minutes on the plate.Tip A warm plate keeps the cheese-based sauce fluid longer; rinse the plate under hot water and dry it just before serving.
The final phase is short but visible: ten minutes uncovered on warm, one good stir, and the sauce tightens into a coating that clings to each meatball with a glossy shine. Lift a single meatball on a spoon and watch the sauce; it should coat it thickly and drip slowly rather than run off. The meatballs themselves should look plump, evenly lacquered, and steaming. Serve them immediately while the coating is at its glossiest, since the sauce will continue to thicken as the plate sits.
Common mistakes
The most common slip is cooking on high to save time, which scorches the cheese at the walls before the center meatballs are heated through; low heat for three hours is the dependable setting. Another frequent error is lifting the lid repeatedly to check on progress, each peek costing about twenty minutes of cooking time.
Skipping the halfway stir leaves the bottom layer over-coated and the top layer pale. Finally, serving straight from a full boil makes the sauce seem thin; the ten-minute rest on warm is what gives the coating its glossy, clingy finish.
How to tell it’s done
The meatballs are done when they register at least 160°F (71°C) in the center on an instant-read thermometer, checked in at least three places around the cooker. Visually, look for meatballs that are plump and uniformly coated, with sauce that clings rather than pools. The coating should look glossy and thick, leaving a slow trail on the spatula. If the sauce is ready but the temperature is short, keep cooking covered; if the temperature is met but the sauce seems thin, the brief uncovered rest will tighten it before serving.
- Ground meat: 160°F (71°C) in the thickest part
Up next · Part 3 of 3
4 variations · storage & make-ahead · 5 answers · printable card
Tips, FAQ & printable recipe (Part 3)← Back to the ingredients (Part 1)