Dinner · Part 2 of 3: Instructions
Crockpot Cream Cheese Taco Chicken, Set It and Forget It Step-by-step instructions
- Prep
- Cook
- Total
- Serves
- 6
Before you start
Ten minutes of setup is all this recipe asks. Take the cream cheese out of the refrigerator if there is time — though it goes in cold here, a slightly softened block melts even faster at the end.
Open the can of diced tomatoes, drain the corn if it is canned, and measure the taco seasoning so everything is within reach of the slow cooker. Check the chicken breasts for size and pound any thick ends flat. Set the cooker on the counter where it will stay for the whole cook, plug it in, and have two forks ready for shredding later.
Ingredients at a glance (5)
- 4 boneless skinless chicken breasts (about 2 lb)
- 1 1/2 cups frozen or canned corn kernels, drained
- 1 can (14.5 oz) diced tomatoes with juices
- 1 tbsp taco seasoning (about one packet)
- 8 oz cream cheese, full-fat, cut in half
Instructions
Layer everything in
- Layer the chickenPlace the chicken breasts in a single layer in the insert of a 6-quart slow cooker. Keep the pieces touching but not stacked; a flat, even layer helps every breast cook at the same pace. If one breast is much thicker than the others, pound it lightly so all four are close in size.Look for The chicken should sit in one snug layer with a little room around each piece.Tip No added liquid is needed here; the tomatoes release plenty of juice as they cook.
- Spoon on the corn and tomatoesSpoon the corn over the chicken, then pour in the whole can of diced tomatoes with their juices, spreading them evenly across the top. Resist the urge to stir; layering keeps the vegetables on top where they steam gently while the chicken cooks below.Look for The corn and tomatoes should blanket the chicken without sliding off to one side.Tip Drain the corn well so the sauce does not thin out over the long cook.
- Season and add the cream cheeseSprinkle the taco seasoning evenly over everything, then set the block of cream cheese right on top, unwrapped and whole. It will sit there like a lid over the sauce and melt slowly as the cooker heats, folding itself into the tomatoes below.Look for The cream cheese block should rest centered on top of the vegetables.Tip Full-fat cream cheese melts smoothest; reduced-fat can turn slightly grainy.
By the end of the first phase the slow cooker is loaded and ready to be forgotten: chicken in a flat layer, corn and tomatoes spooned evenly over the top, taco seasoning sprinkled across, and the cream cheese block sitting whole in the center.
Nothing should be stirred. Before closing the lid, confirm the cream cheese is unwrapped, the seasoning is spread and not clumped in one spot, and the chicken is not stacked double — a stacked pile cooks unevenly and the bottom piece may lag behind on temperature.
Cook and check
- Cover and cook low and slowPut the lid on and cook on low for 3 1/2 to 4 hours, or on high for about 2 1/2 hours, until the chicken is cooked through. Keep the lid closed the whole time; every peek releases heat and adds 15 to 20 minutes to the cook.Look for The liquid around the chicken should be bubbling gently at the edges.Tip Low heat gives the most tender, shreddable chicken; use high only when short on time.
- Check the temperatureNear the end of the cook, check the thickest breast with an instant-read thermometer: the chicken is safe when it reads 165°F (74°C) at the center. Underdone pieces go back under the lid for another 20 to 30 minutes on the same setting.Look for The juices around the chicken should run clear, not pink.Safe temperature 165°F (74°C) internal temperature (poultry)Tip Probe the thickest part of the largest breast; smaller ones finish first.
After the long cook the kitchen should smell of warm taco spices and gently simmering tomatoes. Lift the lid once, near the end of the cook time only: the liquid should be bubbling softly at the edges, the chicken opaque throughout, and the cream cheese slumping and partially melted into the sauce. Probe the thickest breast for 165°F (74°C). If the reading is short, close the lid and give it 20 to 30 minutes more on the same setting before moving on to the final phase.
Sauce, shred, serve
- Stir the sauce smoothLift the chicken out onto a plate and stir the cream cheese into the hot corn-tomato liquid until it melts completely into a thick, creamy taco sauce. If any stubborn bits of cream cheese remain, press them against the side of the insert with the back of the spoon.Look for The sauce should look glossy and uniform, with no white streaks left.Tip Hot liquid melts the cream cheese fast; a cold block would leave lumps.
- Shred the chickenShred the warm chicken with two forks, pulling along the grain into bite-size strands. The breasts should give way with almost no pressure; if they resist, they need a few more minutes in the cooker rather than more force.Look for The strands should be tender and moist, pulling apart easily.Tip Shred while warm; chilled chicken tightens and shreds less cleanly.
- Return and serveReturn the shredded chicken to the slow cooker and fold it through the creamy sauce until every strand is coated. Serve straight from the insert, spooned over rice, into warm tortillas, or over chips, letting everyone scoop what they like.Look for The chicken should glisten with sauce, thick enough to cling to a spoon.Tip Leave the cooker on warm for casual serving; the sauce stays spoonable for an hour.
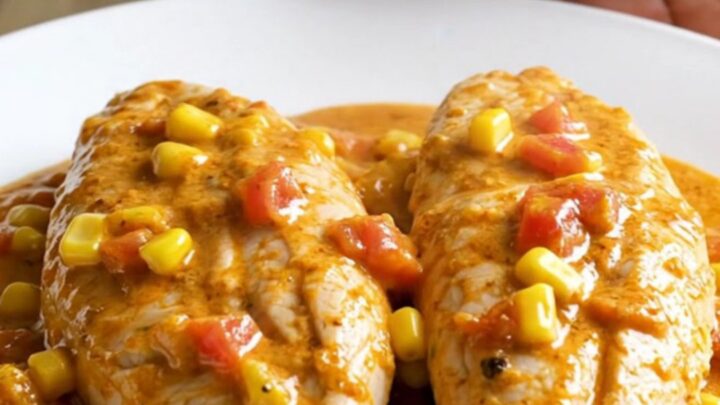
The finished dish looks thick and glossy: a creamy taco sauce clinging to golden strands of shredded chicken, with corn and tomato pieces distributed throughout. No white streaks of unmelted cream cheese should remain, and the sauce should hold its shape on a spoon rather than pooling watery around the chicken. Taste before serving and adjust the seasoning only now — the long cook mellowed the spices, and a final pinch of salt or an extra half teaspoon of taco seasoning wakes the whole dish up.
Common mistakes
The three most common slips are all easy to avoid. First, lifting the lid to check: every peek drops the temperature and stretches the cook, so trust the timer and the thermometer instead. Second, stirring everything together at the start; stirring distributes the cream cheese too early and the vegetables sink, while layering keeps the sauce glossy and the chicken tender.
Third, overshooting the cook time — chicken left hours past done turns dry and stringy even in sauce. On high, check at two hours; on low, check at three and a half. Finally, shred the chicken while it is warm; cold chicken tightens and shreds raggedly.
How to tell it’s done
The chicken is done when an instant-read thermometer pushed into the thickest part of the largest breast reads 165°F (74°C). Visually, the meat should look opaque white all the way through, the juices around it should run completely clear, and a fork twisted into the surface should pull strands away with almost no effort.
The sauce at that point looks loose and separated, with the cream cheese just beginning to melt — that is correct, because it comes together in the final stir. If any breast resists shredding, give it another 20 to 30 minutes under the lid rather than forcing it.
- Poultry: 165°F (74°C) in the thickest part
Up next · Part 3 of 3
4 variations · storage & make-ahead · 5 answers · printable card
Tips, FAQ & printable recipe (Part 3)← Back to the ingredients (Part 1)