Dinner · Part 2 of 3: Instructions
Crockpot Cheesy Hash Brown Pork Chops Made in One Pot Step-by-step instructions
- Prep
- Cook
- Total
- Serves
- 5
Before you start
Take the bag of frozen hash browns and the cheddar out of the refrigerator and freezer and set them on the counter, since everything gets used in quick succession. Open the can of condensed cream of chicken soup and give it a good stir right in the can if it looks separated at the top; a smooth start means an even sauce later.
Shred the cheese from a block if there is time, or measure out the pre-shredded cups. Check that the ceramic insert is clean and dry, and place the slow cooker where it will spend the day, close to an outlet and away from the edge of the counter.
Ingredients at a glance (4)
- 5 boneless pork chops, about 1 1/2 inches thick
- 20 oz frozen shredded hash browns
- 2 cups shredded cheddar cheese
- 1 can (10.5 oz) condensed cream soup, cream of chicken style
Instructions
Build the layers
- Arrange the pork chopsSet the pork chops in the ceramic insert of the slow cooker in a single layer, side by side and close together but not stacked. Keeping them in one even layer helps every chop sit in the same amount of moisture, so they finish at the same time and stay evenly tender from edge to edge.Look for The chops should cover the bottom of the insert with no gaps and no pile-ups.Tip Thicker chops hold up better over a long cook; very thin ones can dry out before the potatoes are done.
- Scatter the hash brownsScatter the frozen shredded hash browns by the handful over the pork chops, spreading them into an even layer that reaches the sides of the insert. There is no need to thaw them first; straight from the freezer they hold their shape and soak up the sauce slowly as everything cooks together.Look for The pork should no longer be visible under an even blanket of frosty shreds.Tip Break up any frozen clumps with your fingers so the layer stays light and cooks through evenly.
- Sprinkle the cheddarSprinkle the shredded cheddar evenly over the hash browns, letting it fall in a steady shower from edge to edge. An even layer melts into the sauce below instead of clumping into one thick mass, so every scoop of potatoes pulls away with cheese through the whole crock.Look for The white shreds of potato should be streaked with orange from edge to edge.Tip Shred the cheese from a block if possible; it melts smoother than pre-shredded, which is coated to resist clumping.
At the end of this phase the slow cooker is loaded and nothing has been stirred. The chops lie flat across the bottom of the insert, hidden under an even, frosty blanket of shredded hash browns that reaches the walls. Orange cheddar shreds streak the white potatoes from edge to edge, still cold and distinct.
Nothing should be bubbling yet and nothing should look wet; the soup has not gone on. Before moving on, check that no chop is stacked on another, no frozen clump of potato survives, and the cheese has not drifted into one corner. A level, evenly layered crock now is what makes every serving come out the same hours later.
Top, cover and cook
- Dollop the soup overSpoon the condensed cream of chicken soup over the cheese in large dollops, dropping them across the whole surface rather than in one spot. Do not stir. The soup melts down through the layers on its own, basting the potatoes and the pork as it goes and turning into the creamy sauce that ties the dish together.Look for Dollops of soup should sit across the entire top like a dotted pattern.Tip Scrape the can clean with a spatula; every bit of soup goes into the sauce.
- Spread it levelWith the back of the spoon, gently spread the dollops so the soup covers the whole surface in a rough, even layer. Work lightly so the layers underneath stay in place. A level top melts and bubbles uniformly, which keeps the corners of the potato layer from drying out while the center finishes.Look for No bare patches of cheese or potato should show through the soup layer.Tip Resist the urge to stir everything together; layering is what keeps the potatoes from going gluey.
- Cover and slow-cookPut the lid on the slow cooker and cook on low for 5 to 6 hours, or on high for 3 to 4 hours. Keep the lid closed the whole time; each peek releases heat and can add 20 minutes or more to the cook. Low gives the most tender chops, high is the weeknight shortcut.Look for Bubbles around the edges of the insert and a creamy, thickened surface under the lid.Tip Start checking on the early side the first time this recipe runs in a specific slow cooker.
The soup dollops have been spread level across the top, the lid is on, and the crock is cooking undisturbed. As the hours pass, the surface relaxes from a dotted pattern of soup into one continuous creamy layer, and bubbles appear quietly around the edges of the insert.
The smell is mild and savory — chicken, cheese, slowly softening potato — never sharp or scorched. When the cooking time is nearly up, the sauce should look thick and glossy, the potatoes should have lost their separate shreds at the surface, and the whole crock should steam generously when the lid lifts.
Check, rest and serve
- Check the temperature and restNear the end of the cook, check the thickest chop with an instant-read thermometer in the center. The pork is safe and properly done at 145°F (63°C). Let the chops rest at least 3 minutes in the hot sauce before serving so the juices settle back into the meat. If the reading is below, put the lid back on and give it another 30 minutes on low, then check again before moving on.Look for The thermometer reads 145°F (63°C) or higher in the thickest part of a chop.Safe temperature 145°F (63°C) internal temperature (steaks, chops and roasts)Tip Push the probe into the center, not into a thin edge, for a true reading.
- Rest, then serveTurn off the slow cooker and let the chops rest at least 3 minutes in the sauce so the juices settle back into the meat. Lift a chop onto a warm plate with a spoonful of the cheesy potatoes alongside, and add more sauce from the crock. Serve straight away while the steam is still rising.Look for The sauce should coat the spoon thickly and the potatoes should hold their shreds.Tip A flat spatula under each chop lifts it out whole without tearing the soft meat.
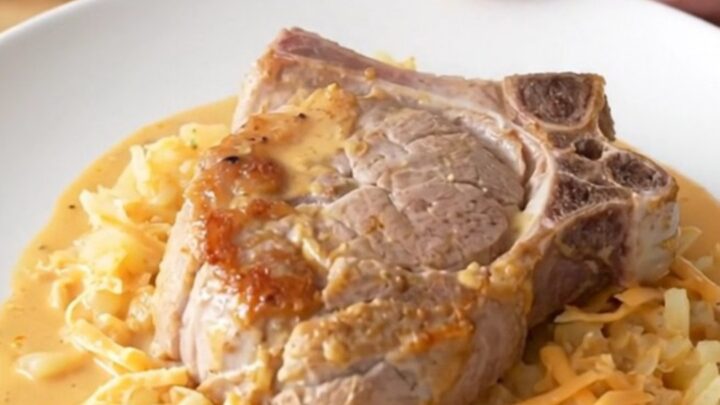
The thermometer has confirmed 145°F (63°C) or above in the thickest chop, and the meat has rested at least 3 minutes in the hot sauce. On the plate, a chop sits soft and spoon-tender over cheesy shredded potatoes, with the thick creamy sauce pooling around both and light steam rising off everything. The sauce should cling to the back of a spoon and the potatoes should hold their shreds rather than slumping into mush. Taste the sauce for the way the cheese reads; it should be savory and mellow.
Common mistakes
The most common trouble comes from thin chops, which can turn dry and chalky while the potatoes still need another hour; buy thick-cut chops or reduce the cook time and check early. The second mistake is stirring. Stirring the layers together before cooking mashes the potatoes, makes the sauce gluey, and robs the pork of its gentle braise — layer and leave alone.
Lifting the lid repeatedly is the third trap; every peek costs heat and stretches the cook by twenty minutes or more. Finally, adding water or milk to thin the soup is unnecessary; the condensed soup plus the moisture from the meat and potatoes makes exactly the right amount of sauce.
How to tell it’s done
The dish is done when two things are true at once. First, the thickest chop reads 145°F (63°C) or above at its center on an instant-read thermometer; that is the safe internal temperature for pork, and the meat should rest at least 3 minutes in the hot sauce before serving. Second, the potatoes have lost all raw firmness: a shred pressed against the side of the insert yields with no resistance, and the sauce has thickened enough to coat a spoon and hold a clean trail for a moment.
- Steaks, chops and roasts: 145°F (63°C) in the thickest part, then a 3-minute rest
Up next · Part 3 of 3
4 variations · storage & make-ahead · 5 answers · printable card
Tips, FAQ & printable recipe (Part 3)← Back to the ingredients (Part 1)