Dinner · Part 2 of 3: Instructions
Crockpot Beef Paprikash – Easy Dump-and-Go Dinner Step-by-step instructions
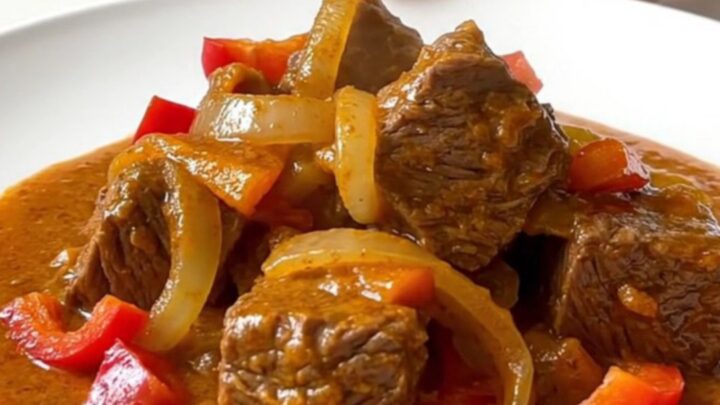
- Prep
- Cook
- Total
- Serves
- 6
Before you start
Set out all the ingredients and the equipment before the first cut: the beef, onion, red pepper, paprika, soup, broth and pepper, plus a sharp knife, a cutting board, a mixing bowl, a whisk and the slow cooker.
Blot the beef cubes dry with paper towels and season them with black pepper while the meat is still cold, then keep it in the refrigerator until the vegetables are ready.
Ingredients at a glance (7)
- 2 lb beef chuck, cut into bite-size cubes
- 1 yellow onion, sliced
- 1 red bell pepper, cut into strips
- 2 tbsp sweet paprika
- 1 can (10.5 oz) condensed cream soup, cream of chicken style
- 1/2 cup chicken broth
- 1/2 tsp black pepper
Instructions
Prep the meat and vegetables
- Pat the beef dry and seasonBlot the beef chuck cubes with paper towels so the paprika and seasoning cling instead of sliding off wet meat. Season all sides with black pepper, tossing the cubes in a bowl so every piece is coated evenly. Keep the beef in the refrigerator until the vegetables are cut and the slow cooker is ready to load.Look for The surface of each cube should look dry and matte, with seasoning visible on every side.Tip Dry meat holds its shape better during a long braise and gives the sauce a cleaner, deeper flavor.
- Slice the onionHalve the yellow onion from root to stem, peel away the skin, and slice each half into even strips about a quarter inch wide. Even slices cook at the same rate and melt into the sauce rather than staying crisp in some spots and disappearing in others. Set the slices aside next to the cutting board for easy layering.Look for Uniform, translucent-looking raw strips with no thick wedges or ragged ends.Tip A sharp knife matters more than technique here; a dull blade crushes the onion and makes it weep on the board.
- Cut the red pepper into stripsStand the red bell pepper upright, slice off the four flat sides around the core, and cut each panel into strips roughly half an inch wide. Discard the core and seeds. Wide, flat strips keep some texture after hours in the slow cooker, while thin slivers would dissolve into the sauce.Look for Bright red strips with clean edges, no white pith or seeds attached.Tip Cut the pepper before the onion if the board gets messy; pepper skins wipe away cleanly and keep the knife gliding.
By the end of this phase, the counter should hold three tidy piles: dry, seasoned beef cubes; even onion slices; and bright red pepper strips with no seeds or pith.
The beef surface should look matte and coated, not wet, so the seasoning clings through the long cook. The slices should be uniform enough that they will soften at the same rate.
Layer the slow cooker
- Layer the beef in the slow cookerArrange the seasoned beef cubes in an even layer over the bottom of the slow cooker insert. Spread them out rather than piling them in one corner, because even coverage helps every cube braise at the same pace. Keep the lid and the insert handy; everything else goes on top without stirring.Look for A single, mostly even layer of cubes covering the bottom of the black ceramic insert.Tip Resist stirring once the layers go in; the stack of flavors on top is what makes dump-and-go cooking work.
- Add the onions and peppers on topScatter the onion slices over the beef, then lay the red pepper strips over the onions in an even blanket. Vegetables on top stay slightly firm and sweet while their juices drip down into the meat below. Do not mix; the layers do the work of distributing flavor as everything cooks.Look for A colorful layer of red and pale strips fully covering the beef beneath.Tip Vegetables placed under the meat turn to mush; on top, they soften while keeping their shape and color.
- Shower in the paprikaSprinkle the sweet paprika evenly over the vegetables and beef, aiming for full coverage rather than one dark patch. Paprika needs moisture and time to bloom, and the slow cooker provides both. The layer will look dusty and bright red at this stage; that color deepens and turns glossy once the sauce forms.Look for A rust-red veil across the whole surface, no bare patches of meat or vegetable.Tip Buy paprika in a small quantity and replace it each year; old paprika tastes like dust instead of sweet red pepper.
- Pour the creamy soup over everythingWhisk the condensed cream soup with the chicken broth in a bowl until smooth, then spoon it evenly over the paprika-dusted layers. The thinned soup becomes the braising liquid and the sauce in one move. Spread it to the edges so no cube of beef sits dry against the ceramic wall.Look for A pale, creamy layer covering the red paprika beneath, reaching every corner of the insert.Tip Whisking the soup with broth first prevents the gummy lumps that form when condensed soup hits heat on its own.
The loaded insert should read like a cross-section: an even blanket of beef on the bottom, a colorful layer of onion and pepper above it, a rust-red veil of paprika over everything, and the creamy soup mixture pooled on top and reaching the corners. Nothing has been stirred, and nothing should be.
Cook, check and serve
- Cover and cook on lowPlace the lid on the slow cooker and set it to low for six to eight hours. Avoid lifting the lid during the cook; every peek releases heat and can add thirty minutes or more to the clock. The long, gentle braise breaks down the chuck's connective tissue until each cube yields to a spoon.Look for After an hour, the insert should be bubbling gently at the edges with a sweet, paprika-scented steam rising.Tip Start the cooker by mid-morning to serve a typical dinnertime; low and slow beats high for tender chuck.
- Check tenderness and the safe temperatureNear the end of the cook, insert an instant-read thermometer into a large cube: the beef is safe to eat at 145°F (63°C), and paprikash is at its best when the cubes read well past that and fall apart under gentle pressure. Turn off the heat and let the beef rest at least 3 minutes in the sauce before serving so the juices settle back in.Look for Cubes with a soft, braised surface that barely hold their shape, in a thick, glossy red sauce.Safe temperature 145°F (63°C) internal temperature (steaks, chops and roasts)Tip If the sauce seems thin, leave the lid off on high for the last twenty minutes; the steam escape thickens it quickly.
- Serve it hot from the crockGive the paprikash a gentle stir so the sauce, peppers and onions distribute evenly, then ladle it into shallow bowls while steaming. The sauce should coat the back of the spoon thickly, with soft peppers and onions visible throughout. Serve straight from the insert to keep it hot at the table.Look for Thick, creamy sauce clinging to every cube, with light steam rising off the bowl.Tip A wide spoon and a slow hand keep the tender cubes from breaking apart as they are served.
After six to eight hours on low, the kitchen should smell sweet and paprika-rich, with a gentle bubble visible at the edges of the insert. The beef cubes will have a soft, braised surface and barely hold their shape, the sauce will be thick and glossy, and the peppers will be silky but identifiable.
Common mistakes
The most common mistake is stirring the layers together at the start, which pushes the vegetables under the meat where they dissolve and leaves the paprika uneven. Layer, then leave it alone.
Lifting the lid to check on the pot is the second trap; each peek costs heat and stretches the cooking time. Using old paprika is a quiet failure: the sauce comes out brownish and dull instead of vivid red.
How to tell it’s done
The paprikash is done when three things line up. First, temperature: an instant-read thermometer stuck into a large beef cube must read at least 145°F (63°C), the safe internal temperature for whole cuts of beef, and in practice the cubes will read well beyond that after hours on low.
Second, texture: each cube should look soft and braised, with no browning or firm center, and yield to gentle pressure from a spoon.
- Steaks, chops and roasts: 145°F (63°C) in the thickest part, then a 3-minute rest
Up next · Part 3 of 3
4 variations · storage & make-ahead · 5 answers · printable card
Tips, FAQ & printable recipe (Part 3)← Back to the ingredients (Part 1)