Appetizers · Part 2 of 3: Instructions
Crockpot Bacon BBQ Sausage Cream Cheese Dip for Easy Entertaining Step-by-step instructions
- Prep
- Cook
- Total
- Serves
- 8
Before you start
Ten minutes of setup is all this recipe asks. Take the block of cream cheese out of the refrigerator first so it softens while everything else is handled — cold cream cheese in the center of the crock is the single most common reason a dip like this stays lumpy. Crumble the cooked sausage into small, even pieces and crumble the bacon, setting a spoonful of bacon aside for the top.
Ingredients at a glance (4)
- 1 lb cooked crumbled pork sausage (store-bought or made ahead)
- 6 cooked bacon slices, crumbled (store-bought or made ahead)
- 8 oz cream cheese, one block, softened
- 3/4 cup barbecue sauce, plus extra for swirling
Instructions
Prep the three toppings
- Set out the cream cheeseTake the block of cream cheese out of the refrigerator and leave it on the counter while the other ingredients are gathered. Softened cream cheese melts evenly in the slow cooker instead of staying cold in the middle, so the dip turns smooth on the first stir rather than needing extra time.Look for The block should give slightly when pressed with a finger, with no hard, chilled center.Tip Short on time? Unwrap the block and set it on a microwave-safe plate for 15 seconds to take off the chill.
- Crumble the cooked sausageBreak the cooked sausage into small, even crumbles with a spoon or clean hands, picking out any large pieces. Small crumbles distribute through the dip so every scoop gets meat. If the sausage was cooked ahead and chilled, let it sit out briefly so it is not clumped into a cold mass.Look for The crumbles should be pea-sized to fingertip-sized, with no chunks bigger than a marble.Tip Pat very greasy sausage crumbles with a paper towel so the dip is not greasy on top.
- Crumble the baconCrisp the cooked bacon slices or use them straight from the refrigerator, then crumble them into small, irregular pieces by hand or with a knife. Keep a few larger fragments aside; they make an appealing texture on the very top of the finished dip.Look for The pieces should be small enough to scatter freely but still give a visible bite.Tip Cooked bacon crumbles freeze well, so keep a bag ready for last-minute dips.
By the end of the first phase, everything that goes into the crock is within arm's reach and ready to layer. The cream cheese block sits softened on the counter, giving slightly when pressed, with no hard chilled center.
The sausage is broken into small, even crumbles — pea-sized to fingertip-sized — with no large chunks, and not clumped into a cold mass if it was cooked ahead. The bacon is crumbled into small irregular pieces, with a few larger fragments and a spoonful set aside for the top.
Layer, cover and melt
- Layer the sausage in the crockScatter the crumbled sausage in an even layer across the bottom of the ceramic insert of the slow cooker. Covering the base fully means the cream cheese will melt down onto the meat and pick it up when stirred, instead of the meat sitting in a single clump on one side.Look for The bottom of the insert should be covered edge to edge in a thin, even layer.Tip An oval slow cooker gives more surface area than a round one, which helps the dip melt evenly.
- Scatter the bacon overSprinkle the crumbled bacon evenly over the sausage layer, letting it fall where it wants rather than pressing it down. Keeping the bacon above the sausage keeps its texture distinct; buried bacon softens, while bacon near the top keeps a little bite in the finished dip.Look for Both meats should be visible in an even scatter, with no bare patches of ceramic showing through.Tip Reserve a tablespoon of bacon for sprinkling over the top just before serving.
- Set in the cream cheesePlace the softened block of cream cheese in the center of the meats, leaving it whole. As it melts, it spreads outward into the sausage and bacon, and the block form protects it from cooking too fast against the hot sides of the insert. Resist the urge to stir now.Look for The block should sit centered, touching meat on most sides but not pressed against the walls.Tip Cutting the block in half and stacking the halves in the center speeds melting slightly.
- Pour over the barbecue sauceDrizzle the barbecue sauce over the whole arrangement, letting it run down the sides of the cream cheese and pool over the meats. Save two or three tablespoons for swirling on top at serving. The sauce melts with the cheese and seasons the entire dip at once.Look for Every surface should be touched by sauce, with some pooling around the cream cheese block.Tip A thick, smoky sauce clings better than a thin, vinegary one in this slow, gentle melt.
- Cover and cook on lowPut the lid on and cook on low for about two hours, without lifting it. Every peek releases heat and adds fifteen minutes or more to the cook. The dip is ready when the cream cheese is fully melted and everything stirs together into a thick, uniform, creamy mixture. The sausage is already fully cooked, so the slow cooker only needs to heat it through to 160°F (71°C) for serving.Look for Lift the lid once near the end: the cheese should look slumped and glossy, with sauce bubbling gently at the edges.Safe temperature 160°F (71°C) internal temperature (ground meat)Tip High heat works in about one hour, but low gives a smoother, less likely-to-spit result.
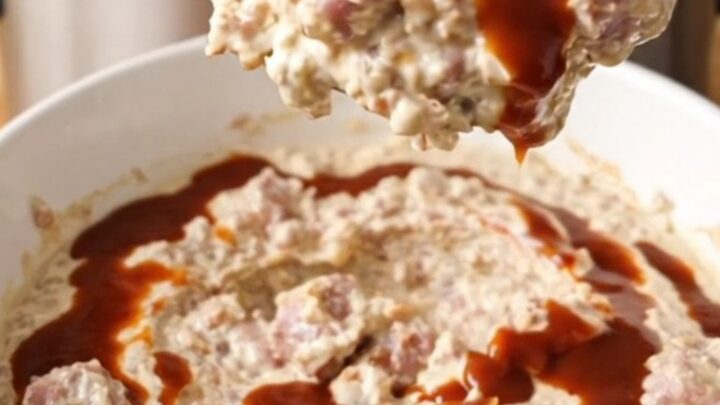
After two hours on low, lift the lid once and look: the cream cheese should have slumped and flattened into the meats, glossy on top, with barbecue sauce bubbling gently at the edges of the insert. There should be no firm white block remaining in the center and no dry-looking meat around the sides.
Give it one thorough stir with a flexible spatula, scraping the bottom and corners, and the mixture should come together into a thick, uniform dip — no streaks of white cheese, no separate pools of sauce.
Finish and serve warm
- Stir until smoothStir the melted mixture thoroughly with a flexible spatula, working from the bottom and corners of the insert until the sauce, cheese and meats combine into one thick, even dip. Scrape the sides well, where the cheese tends to set firmer than the center.Look for No streaks of white cheese or pools of separate sauce should remain; the color should be even throughout.Tip Stir again after five minutes on warm if any edge of cheese resists blending in.
- Serve warm from the crockSwitch the slow cooker to warm, swirl the reserved barbecue sauce over the top, and scatter the reserved bacon over it. Serve straight from the insert with the lid off, letting guests scoop at the table. The warm setting holds the dip at serving texture for hours.Look for The dip should slide thickly off a spoon, coating it rather than running off.Tip Set the crock on a trivet away from the edge of the table when guests are serving themselves.
The finished dip is thick enough to coat a spoon heavily and slide off slowly, with sausage and bacon distributed through every scoop rather than sitting at the bottom.
Swirl the reserved barbecue sauce over the top in loose ribbons and scatter the reserved bacon over it so the surface looks deliberate, not stirred in. Switch the slow cooker to warm and serve with the lid off, dipping straight from the insert.
Common mistakes
The most common mistake is lifting the lid during the two hours. Every peek drops the temperature inside the crock and stretches the melt by fifteen minutes or more, so trust the process and keep the lid on until near the end.
The second mistake is cold cream cheese: a chilled block takes far longer to melt and can leave a firm core even when the rest looks done, so soften it on the counter first.
How to tell it’s done
The dip is done when the block of cream cheese has slumped and flattened, the barbecue sauce bubbles gently at the edges of the insert, and one thorough stir brings everything together into a thick, even, glossy mixture with no white streaks of cheese and no separate pools of sauce. It should coat a spoon heavily and slide off slowly, with sausage and bacon visible throughout.
- Ground meat: 160°F (71°C) in the thickest part
Up next · Part 3 of 3
4 variations · storage & make-ahead · 5 answers · printable card
Tips, FAQ & printable recipe (Part 3)← Back to the ingredients (Part 1)