Appetizers · Part 2 of 3: Instructions
Crispy Zucchini Donut Rings with Garlic Yogurt Step-by-step instructions
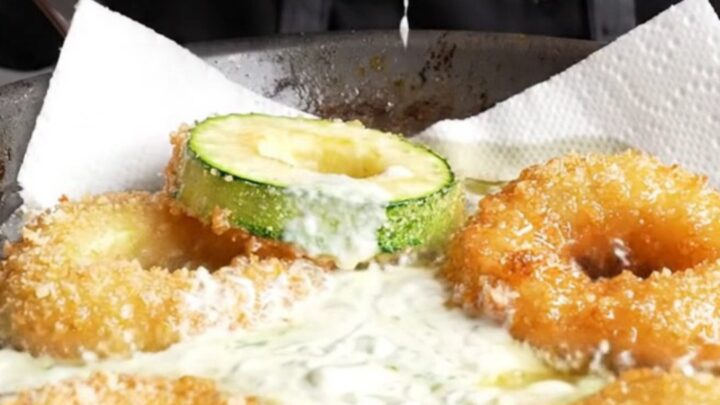
- Prep
- Cook
- Total
- Serves
- 4
Before you start
Before starting, set up your coating station: three shallow bowls for flour, beaten eggs, and breadcrumbs. Have a large skillet ready, along with tongs and a plate lined with paper towels. If you’re making the garlic yogurt, stir it together and set it aside.
The oil should be heated just before frying. Prep the zucchini rings first, then coat them all before you turn on the heat. This way, the coated rings are ready to go straight into the pan.
Ingredients at a glance (11)
- 2 large zucchinis
- 1/2 cup all-purpose flour
- 1 tsp garlic powder
- 1 tsp paprika
- 1/2 tsp salt
- 2 large eggs, beaten
- 1 1/2 cups golden breadcrumbs
- 1/2 cup olive oil, for shallow frying
- 1 cup plain yogurt
- 1 clove garlic, minced
- 1/4 tsp salt
Instructions
Prep and Coat
- Prep the Zucchini RingsScrub the zucchinis and trim the ends. Score the skin lengthwise with a fork, making shallow lines all around. Slice the zucchinis into 1/2-inch thick rounds. Use a bottle cap or small round cutter to punch out the center core of each round, creating hollow donut rings.Look for Rings are uniform and have a clean hole in the center.Tip Scoring helps the coating adhere and creates a decorative edge.
- Set Up the Coating StationIn a shallow bowl, whisk together the flour, garlic powder, paprika, and salt. In another bowl, beat the eggs. Place the breadcrumbs in a third bowl. Arrange the bowls in an assembly line: flour, egg, breadcrumbs.Look for Three separate bowls are ready and within easy reach.Tip Use one hand for dry coatings and the other for the egg to avoid clumping.
- Coat the RingsDredge each zucchini ring in the seasoned flour, shaking off any excess. Dip it into the beaten eggs, allowing the excess to drip off. Then press it into the breadcrumbs, turning to coat thoroughly. Place the coated rings on a plate.Look for Each ring is evenly coated with breadcrumbs, with no bare spots.Tip Press the breadcrumbs gently so they adhere well.
At this point, the zucchini rings are cut, scored, and coated. The flour, egg, and breadcrumb layers should be even and dry to the touch. The rings look like little donuts, with a neat hole in the center and a golden crumb coating. They should feel firm and not sticky. If any coating has fallen off, press it back on. The coating station is clean and the skillet is ready to heat.
Fry to Golden
- Heat the OilPour the olive oil into a large skillet to a depth of about 1/4 inch. Heat over medium-high heat until the oil shimmers and a breadcrumb dropped in sizzles immediately.Look for Oil is hot but not smoking; a test crumb sizzles on contact.Tip If the oil smokes, lower the heat slightly.
- Fry the RingsCarefully place a few zucchini rings in the hot oil, without crowding the pan. Fry for 3 minutes per side until dark golden brown, blistered, and crispy. Use tongs to flip them gently. Transfer the cooked rings to a paper towel-lined plate to drain.Look for Rings are deep golden brown and sound crisp when tapped.Safe temperature 160°F (71°C) internal temperature (egg dishes)Tip Fry in batches to keep the oil temperature steady.
- Drain and RepeatAfter frying each batch, remove the rings and drain on paper towels. Continue with the remaining rings, adding more oil if needed. Let the oil return to temperature between batches.Look for All rings are fried and draining; oil is still hot for the next batch.Tip Do not overcrowd the pan, as it lowers the oil temperature and makes rings soggy.
The rings are sizzling in the oil, turning deep amber with blistered spots. The kitchen smells of toasted breadcrumbs and olive oil. After 3 minutes per side, they are crisp and golden.
When you lift one with tongs, it feels light and crunchy, not heavy or greasy. The paper towel-lined plate collects the fried rings, and they drain without becoming soggy. The oil is still hot and ready for the next batch.
Finish and Serve
- Make the Garlic YogurtIn a small bowl, stir together the yogurt, minced garlic, and salt until smooth. Taste and adjust the seasoning if needed.Look for Dip is smooth and well combined.Tip For a thinner dip, add a teaspoon of water or lemon juice.
- Serve and EnjoyArrange the crispy zucchini rings on a serving platter. Serve immediately with the garlic yogurt on the side for dunking. The rings are best enjoyed hot, when the crust is at its crispiest.Look for Rings are still warm and crunchy; dip is cool and creamy.Tip Serve right away to maintain the crunch.
The garlic yogurt is smooth and cool, with a sharp garlic kick. The fried rings are arranged on a platter, still steaming. A bite produces a loud crunch, then a tender, sweet interior. The dip clings to the crispy ridges. Everything is ready to serve, and the contrast of hot, crunchy rings with cold, creamy yogurt is perfect. The rings should be eaten immediately, while they are at their crispiest.
Common mistakes
A common mistake is overcrowding the skillet, which drops the oil temperature and makes the rings greasy instead of crisp. Fry in batches, leaving space between each ring. Another issue is coating the rings too early; the breadcrumbs can become soggy if they sit too long.
Coat them right before frying. Finally, don’t skip the fork-scoring step—it’s what keeps the coating attached. And be sure the oil is hot enough: if it’s not, the coating will absorb oil and become heavy.
How to tell it’s done
The zucchini rings are done when they are deep golden brown on both sides and the crust is blistered and crisp. To test, tap one with tongs—it should sound hollow and crunchy.
The internal temperature of the egg coating should reach 160°F (71°C) to ensure the eggs are fully set. If you’re unsure, cut into a ring: the center should be tender but not raw, and the coating should be crisp all the way through. Serve immediately for maximum crunch.
- Egg dishes: 160°F (71°C) in the thickest part
Up next · Part 3 of 3
4 variations · storage & make-ahead · 5 answers · printable card
Tips, FAQ & printable recipe (Part 3)← Back to the ingredients (Part 1)