Appetizers · Part 2 of 3: Instructions
Crispy Upside-Down French Onion and Gruyere Puff Pastry Squares Step-by-step instructions
- Prep
- Cook
- Total
- Serves
- 4
Before you start
Before beginning, ensure your oven is fully preheated to 400°F (200°C) to provide the intense heat necessary for the pastry to puff instantly. Prepare your baking sheet with a fresh layer of parchment paper, as the cheese will melt and could potentially stick to the pan otherwise.
Have your ingredients pre-measured and ready to assemble, as the puff pastry should remain cold and firm until it enters the oven. If the puff pastry has become too warm, place it in the refrigerator for five minutes before cutting to ensure clean, crisp edges.
Ingredients at a glance (6)
- 2 tbsp butter, softened
- 1 tsp fresh thyme leaves
- 1 cup balsamic onion slices
- 1 cup gruyere cheese, shredded
- 1 sheet puff pastry, store-bought or made ahead
- 1/2 tsp flaky sea salt, for serving
Instructions
Arranging the base
- Prepare the baking trayPreheat the oven to 400°F (200°C). Line a large baking sheet with parchment paper to ensure easy removal. On the prepared parchment, place small mounds of butter, fresh thyme leaves, balsamic onion slices, and shredded gruyere cheese, spacing them out to accommodate the pastry squares.Look for ensure the ingredients are spaced evenly on the tray to prevent them from merging during the high-heat baking process.Tip use a light touch when arranging the ingredients to maintain the structural integrity of each pastry square base.
At this phase, the ingredients should be neatly portioned into distinct mounds on the parchment paper. You should see the butter and thyme arranged clearly, topped with the balsamic onions and cheese.
Everything should look organized and ready for the pastry to be placed on top. If the cheese is spread too thin or the onions are clumped, adjust them now so they are evenly distributed beneath where each pastry square will sit.
Assembling the pastry
- Assemble the pastryCut the puff pastry sheet into eight equal squares. Carefully place one pastry square directly over each mound of onions and cheese on the baking tray. Press the edges of the pastry lightly against the parchment paper to create a seal, ensuring the filling is contained underneath as it bakes.Look for the edges should be pressed firmly enough to keep the filling tucked inside while the pastry puffs up in the oven.Tip keep the puff pastry cold until the very moment of assembly to maintain the best rise and flakiness during the baking phase.
The pastry squares should now be securely placed over the mounds, with the edges pressed down to seal the filling inside. The tray should look uniform, with each square aligned to ensure even cooking. The pastry should be firm to the touch; if it has become soft or sticky, briefly chill the entire tray in the freezer for two minutes before putting it into the oven to ensure a dramatic, successful puff.
Baking to perfection
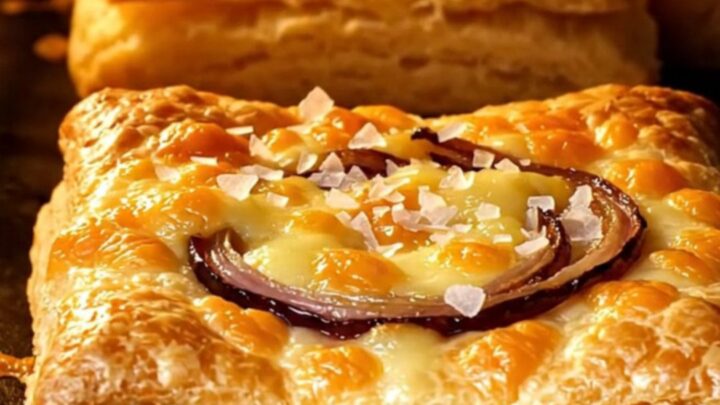
- Bake and finishBake the squares in the preheated oven for eighteen minutes. The pastry should be puffed and golden brown, with the cheese bubbling and slightly blistered. Remove from the oven, flip the squares over using a spatula, and immediately sprinkle with flaky sea salt before serving while hot.Look for the pastry is finished when it reaches a deep golden color and the cheese edges are crispy and caramelized.Tip let the squares rest for two minutes on the tray before attempting to flip them to allow the cheese to set slightly.
The oven should be filled with the rich, savory aroma of caramelized onions and toasted cheese. The pastry will have expanded into tall, golden-brown squares, and the edges of the cheese should look crispy and slightly browned. When you open the oven, the squares should look firm and stable. Before removing, confirm the color is consistent across all squares and that no raw pastry spots remain visible.
Common mistakes
A common mistake is failing to preheat the oven sufficiently, which prevents the pastry from puffing properly and leads to a dense, greasy texture. Another error is overloading the pastry with too much onion or cheese, which can cause the filling to leak out and make the pastry soggy rather than crisp.
Ensure the squares are spaced with enough room on the baking sheet to allow for proper airflow. Finally, avoid using warm pastry; always keep the dough chilled until the last second to ensure the butter layers remain distinct and capable of expanding during the bake.
How to tell it’s done
The pastry squares are done when the puff pastry has risen significantly and turned a deep, rich golden brown. The gruyere cheese should be visibly bubbling at the edges and exhibit small, toasted, blistered spots that indicate it has caramelized properly.
The balsamic onions should look dark, glossy, and tender. When lifted with a spatula, the bottom should be firm and golden, and the entire square should hold its shape without collapsing. Once these visual cues are met, the squares are ready to be flipped and seasoned with flaky sea salt.
Up next · Part 3 of 3
2 variations · storage & make-ahead · 3 answers · printable card
Tips, FAQ & printable recipe (Part 3)← Back to the ingredients (Part 1)