Dinner · Part 2 of 3: Instructions
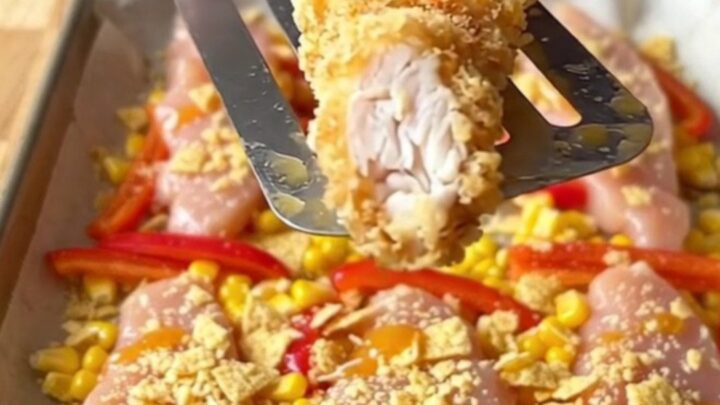
Crispy Sheet Pan Tortilla Chip Chicken Tenders with Roasted Corn Step-by-step instructions
- Prep
- Cook
- Total
- Serves
- 4
Before you start
Before beginning, ensure your oven is fully preheated to 400°F (200°C) to ensure the chicken cooks through without drying out. Prepare your workspace by lining a large rimmed baking sheet with high-quality parchment paper to prevent sticking.
Gather all your ingredients, including the chicken tenders, crushed tortilla chips, corn, and chili butter, so that you can assemble the pan efficiently.
Having everything ready at once ensures that the chicken stays cold until the very last moment before entering the oven, which is a critical practice for food safety.
Ingredients at a glance (5)
- 1 1/2 lb chicken tenders
- 2 cups yellow corn kernels
- 1 cup red pepper strips
- 2 cups tortilla chips (contains gluten), crushed
- 3 tbsp chili butter, melted
Instructions
Preparation and assembly
- Arrange the ingredientsPreheat your oven to 400°F (200°C). Arrange the chicken tenders, yellow corn kernels, and red pepper strips in a single layer on the prepared parchment-lined aluminum sheet pan.Look for The chicken is spread out evenly without overlapping.Tip Ensure the chicken is patted dry before placing on the sheet pan to help the crust adhere better.
The chicken tenders should be arranged in a single, even layer on the parchment-lined pan. The corn and peppers should be distributed around the chicken, not piled on top, to ensure they roast evenly. Everything is ready for the seasoning and crusting phase once the ingredients are neatly positioned.
Applying the crust and butter
- Apply the crust and butterPress the crushed tortilla chips firmly onto the tops of the chicken tenders. Drizzle the melted chili butter evenly over the tenders and the vegetable mixture.Look for The chips are pressed into the chicken and the butter is drizzled over.Tip Press the chips firmly so they stay attached during the baking process.
The tortilla chips should be pressed firmly into the chicken surface, creating a uniform, textured coating. The chili butter must be drizzled evenly to ensure every piece of chicken and vegetable receives a hint of flavor. The pan should look ready for the oven with no large gaps or uneven piles.
Baking the tenders
- Bake the chickenBake in the preheated oven until the chicken is golden brown and cooked through, reaching an internal temperature of 165°F (74°C). Serve hot from the oven.Look for The chicken is opaque white and the chips are golden brown.Safe temperature 165°F (74°C) internal temperature (poultry)Tip Use a meat thermometer to ensure the thickest part of the tender reaches the safe temperature.
The chicken should emerge from the oven with a deep golden-brown crust that is firm to the touch. The corn and peppers will appear slightly caramelized and tender. Check the internal temperature of the chicken to ensure it has reached 165°F (74°C) before removing it from the oven.
Common mistakes
A common mistake is overcrowding the sheet pan, which leads to steaming instead of roasting; ensure there is enough space between the tenders so they can crisp up properly. Another error is failing to press the tortilla chips firmly into the chicken, which causes the crust to fall off during the cooking process.
Finally, avoid using a temperature that is too low, as this will result in soggy crusts and overcooked, dry chicken. Always maintain the recommended oven temperature for the best results.
How to tell it’s done
The chicken is done when the outside is golden brown and crispy, and the meat is opaque white throughout with no signs of pink. Use a meat thermometer to confirm the internal temperature has reached 165°F (74°C).
The corn should be tender and lightly charred at the edges, while the red pepper strips should be softened and sweet. Because chicken tenders vary in size, always check the thickest tender on the pan to ensure everything is safely cooked.
- Poultry: 165°F (74°C) in the thickest part
Up next · Part 3 of 3
2 variations · storage & make-ahead · 3 answers · printable card
Tips, FAQ & printable recipe (Part 3)← Back to the ingredients (Part 1)