Dinner · Part 2 of 3: Instructions
Crispy Sesame Chicken Over Pan-Fried Chow Mein in 45 Minutes Step-by-step instructions
- Prep
- Cook
- Total
- Serves
- 4
Before you start
Set up the station before any heat goes on, because the cooking moves fast. Cut the chicken into even chunks and pat it thoroughly dry. Whisk the glaze ingredients in a bowl and park it next to the stove. Cut the bell pepper into bite-size pieces. Measure the cornstarch into a mixing bowl and the sesame seeds into a small dish.
Have the slotted spoon, a wire rack over a sheet pan, and paper towels standing by. If the noodles are fresh, loosen them gently so they lay flat in the pan. Two burners free, both skillets within reach, and the whole dish assembles in one unbroken run.
Ingredients at a glance (12)
- 14 oz boneless chicken thighs, cut into 1 1/2-inch chunks
- 1/2 cup cornstarch, for dusting the chicken
- 3 cups neutral frying oil, such as canola
- 1/4 cup pineapple juice
- 2 tbsp rice vinegar
- 3 tbsp ketchup
- 2 tbsp soy sauce
- 3 tbsp brown sugar, packed
- 12 oz thin egg chow mein noodles
- 1 bell pepper, cut into bite-size pieces
- 2 tbsp sesame oil, for pan-frying the noodles
- 1 tbsp toasted sesame seeds, for finishing
Instructions
Sauce and prep
- Whisk the pineapple glazeIn a medium bowl, whisk the pineapple juice, rice vinegar, ketchup, soy sauce, and brown sugar until the sugar dissolves and the sauce looks uniform and glossy. Taste it: it should hit sweet first, then tang. Set it beside the stove so it is ready to pour the moment the chicken comes out of the oil.Look for The sauce should be smooth, deep ruby-brown, with no grains of sugar at the bottom of the bowl.Tip Whisking the sauce cold keeps the cornstarch-free glaze from turning stringy later.
- Cut and dry the chickenPat the chicken thighs completely dry with paper towels, then cut them into chunks about 1 1/2 inches across. Dry meat is the difference between cornstarch that clings and cornstarch that slides off, so take a full minute here. Keep the pieces even in size so they fry at the same rate.Look for The surface of each chunk should look matte and dry, with no visible moisture.Tip Chilled chicken is firmer and easier to cut into clean, even chunks.
- Dust the chicken in cornstarchToss the chicken chunks with the cornstarch until every piece is coated in a thin, shaggy layer, then shake off the excess through your fingers. A light, uneven coating fries into crackly crags; a thick paste fries into a gummy shell. Let the coated pieces sit for five minutes while the oil heats.Look for Each chunk should look dry and chalky, with the meat barely visible beneath the dusting.Tip The five-minute rest hydrates the coating slightly so it puffs instead of sliding off.
At the end of this phase the glaze sits smooth and ruby in its bowl, sweet on the first taste with a clean vinegary edge behind it, and the chicken chunks wear a thin, chalky, shaggy coat of cornstarch with no wet spots.
The oil should be shimmering but not smoking, around 350°F on a thermometer. Check that every piece is coated and that the excess starch has been shaken off; bare patches will fry unevenly, and clumps will burn dark before the inside cooks through.
Fry and glaze
- Fry the chicken until glass-crispyHeat the frying oil in a wok or heavy skillet over medium-high until it shimmers, about 350°F. Slide in half the chicken and fry, turning occasionally, until deep golden and crisp, 4 to 5 minutes. The chicken is done when it registers 165°F (74°C) at the thickest point. Lift it out with a slotted spoon onto a wire rack and repeat with the rest.Look for The bubbles around each piece slow down and the coating looks glassy, hard, and deep gold.Safe temperature 165°F (74°C) internal temperature (poultry)Tip Frying in two batches keeps the oil temperature from dropping and the coating from turning greasy.
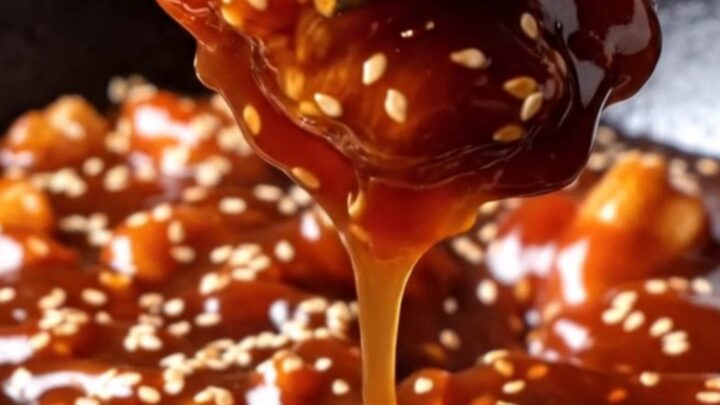
- Glaze the chicken and peppersPour off all but a tablespoon of oil, return the pan to medium-high, and stir-fry the bell pepper for one minute until it just loses its raw edge. Add the whisked sauce and let it bubble and thicken slightly, then slide the fried chicken back in and toss until every chunk is lacquered. Kill the heat and add half the sesame seeds.Look for The sauce should reduce to a thick, glossy glaze that clings rather than pooling in the pan.Tip Work fast here; glazed coating softens if it sits in the hot pan too long.
The chicken should come out of the oil deep golden, audibly crisp, and reading 165°F (74°C) inside, resting on a rack rather than paper. After the glaze step, every chunk should be lacquered in a thick, glossy ruby sauce that clings instead of pooling, with bell pepper pieces still bright and barely tender.
If the sauce looks thin and watery, keep it bubbling another thirty seconds; if it looks dull and pasty, it has gone too far and needs a splash of pineapple juice to loosen.
Crisp noodles and serve
- Sear the noodles into a crisp baseHeat the sesame oil in a second large skillet over high heat until it shimmers, right around 390°F (200°C). Press the noodles into an even layer and leave them alone for 2 to 3 minutes so the underside turns deep golden and crackly. Nudge one edge with tongs to check the color before committing to a flip.Look for The underside should lift easily and reveal a hard, golden, lacy crust that taps like a cracker.Tip Do not stir; the crispy bottom only forms where the noodles sit still against the hot pan.
- Top and finish the plateSlide the noodle cake onto a warm platter, crispy side down, or divide it between plates. Pile the glazed sesame chicken and peppers over the top so the sauce runs into the cracks of the crispy noodles. Shower with the remaining toasted sesame seeds and bring it to the table immediately, while the bottom still crackles.Look for You should hear the noodles crackle as the warm sauce hits them, and the glaze should shine like lacquer.Tip Serve within minutes; the magic is the contrast between the shattering base and the sticky top.
The noodle base should lift from the pan as a single golden cake, its underside hard, lacy, and deeply browned in patches, tapping like a cracker. The top strands stay pale and springy, which is exactly right. Once the chicken is piled on, listen for the crackle of the crust meeting the warm glaze and check that the sauce runs into the cracks rather than flooding the plate. Serve within two or three minutes; this is a dish where the clock is an ingredient.
Common mistakes
The most common failure is a crowded fryer: too much chicken at once drops the oil temperature and the coating drinks oil instead of crisping. Fry in two batches and let the oil climb back between them.
A second trap is stirring the noodles; the crispy base only forms where the strands sit still, so trust the heat and check one edge before flipping. Over-thick cornstarch turns gummy, so shake off the excess. And do not let glazed chicken sit in the pan; the glaze keeps cooking and the crust keeps softening. Assemble and serve immediately.
How to tell it’s done
The chicken is done when its thickest piece reads 165°F (74°C) on an instant-read thermometer and the coating is deep gold and hard. The glaze is ready when it thickens enough to coat the back of a spoon and shine. The noodles are done when the underside is a uniform golden crust that lifts in one piece and sounds hollow when tapped. The finished plate should crackle audibly when the sauce hits it, and the first bite should shatter before it turns sticky.
- Poultry: 165°F (74°C) in the thickest part
Up next · Part 3 of 3
4 variations · storage & make-ahead · 5 answers · printable card
Tips, FAQ & printable recipe (Part 3)← Back to the ingredients (Part 1)