Dinner · Part 2 of 3: Instructions
Saltine Cracker Chicken Fried Steak with Creamy Pepper Gravy Step-by-step instructions
- Prep
- Cook
- Total
- Serves
- 4
Before you start
Before starting, set up a dredging station with three shallow dishes: one for the buttermilk-egg wash, one for the cracker crumb mixture, and one for the seasoned chicken. Pound the chicken breasts to an even thickness and pat them dry with paper towels.
Measure out all ingredients, crush the saltine crackers finely, and have the cast-iron skillet ready. The oil needs to reach 350°F (175°C) before frying, so start heating it while you bread the chicken. Keep the cooked chicken on a wire rack so the crust stays crisp.
Ingredients at a glance (11)
- 2 lb boneless, skinless chicken breasts (about 2 large)
- 1 cup buttermilk
- 2 large eggs
- 2 sleeves salted saltine crackers (about 80 crackers)
- 1/2 cup all-purpose flour
- 2 tsp cracked black pepper
- 1/2 cup vegetable oil, for frying
- 3 tbsp all-purpose flour (for gravy)
- 2 cups whole milk
- 1 tbsp cracked black pepper (for gravy)
- Kosher salt, to taste
Instructions
Prep and Bread the Chicken
- Pound and Set Up the Dredging StationPlace the chicken breasts between two sheets of plastic wrap and pound with a meat mallet to an even 1/2-inch thickness. In a shallow dish, whisk the buttermilk and eggs until fully combined. In a second shallow dish, crush the saltine crackers into fine crumbs, then stir in the 1/2 cup flour and 2 teaspoons cracked black pepper. Season the chicken lightly with salt on both sides.Look for The cracker crumbs should be uniform, about the size of fine breadcrumbs, with no large shards.Tip Pounding to an even thickness ensures the chicken cooks evenly and stays juicy inside the crispy crust.
- Double-Dip the ChickenWorking with one piece at a time, dip the pounded chicken into the buttermilk-egg mixture, letting the excess drip off. Then press it into the cracker crumb mixture, coating thoroughly. Dip it back into the buttermilk-egg mixture and then again into the crumbs, pressing firmly so the crumbs adhere. Place the breaded cutlets on a wire rack and let them rest for 5 minutes while the oil heats.Look for The coating should feel evenly moistened and cling to the chicken without bare spots.Tip The double-dip creates a thick, craggy crust that stays crisp and doesn't peel off during frying.
The chicken should be pounded to an even 1/2-inch thickness and fully coated with a thick, craggy layer of cracker crumbs. The dredging station should be tidy, with the crumb mixture holding together when pressed.
The oil should be heating in the cast-iron skillet, shimmering but not smoking. The breaded cutlets should rest on a wire rack for a few minutes so the coating sets before frying.
Fry and Make the Gravy
- Heat the Oil in the Cast-Iron SkilletPour the vegetable oil into a 12-inch cast-iron skillet and place over medium-high heat. Heat until the oil registers 350°F (175°C) on an instant-read thermometer. If the oil starts to smoke, lower the heat slightly. The oil should shimmer but not smoke.Look for A pinch of cracker crumbs dropped in the oil should sizzle immediately and float.Tip Keeping the oil at a steady 350°F (175°C) prevents the crust from burning before the chicken cooks through.
- Pan-Fry the Chicken CutletsCarefully lay two breaded cutlets into the hot oil, making sure not to overcrowd the skillet. Fry for 4 minutes per side, turning once, until deep golden brown and crispy. The internal temperature of the chicken should reach 165°F (74°C) when checked with an instant-read thermometer. Transfer the fried chicken to a wire rack set over a baking sheet and repeat with the remaining cutlets.Look for The crust should be deep golden brown and sound shatteringly crisp when tapped.Safe temperature 165°F (74°C) internal temperature (poultry)Tip Resist the urge to move the chicken while it fries; the crust needs to set before turning.
- Make the Pepper Gravy in the SkilletAfter removing all the chicken, pour off all but about 3 tablespoons of the hot oil from the skillet, leaving the browned bits and drippings in the pan. Place the skillet over medium heat and whisk in the 3 tablespoons flour. Cook, whisking constantly, for 1 to 2 minutes until the flour is golden and smells nutty. Slowly pour in the whole milk while whisking to prevent lumps.Look for The roux should be smooth and lightly browned before adding the milk.Tip Whisking constantly as you add the milk is the key to a lump-free, velvety gravy.
- Season the Gravy and SimmerAdd the 1 tablespoon cracked black pepper and salt to taste. Continue whisking and simmering for 2 to 3 minutes until the gravy thickens to a pourable, creamy consistency. It should coat the back of a spoon. Taste and adjust the seasoning with more salt or pepper if needed.Look for The gravy should be smooth, thick enough to coat a spoon, and speckled with black pepper.Tip The gravy thickens more as it cools, so keep it slightly looser than you want when serving.
The chicken should be golden brown and crisp, with an internal temperature of 165°F (74°C). The skillet should have browned bits and drippings left after removing the chicken. The gravy should be smooth, creamy, and speckled with cracked black pepper, thick enough to coat a spoon. The kitchen should smell of buttery crackers, fried chicken, and peppery cream.
Rest and Serve with Gravy
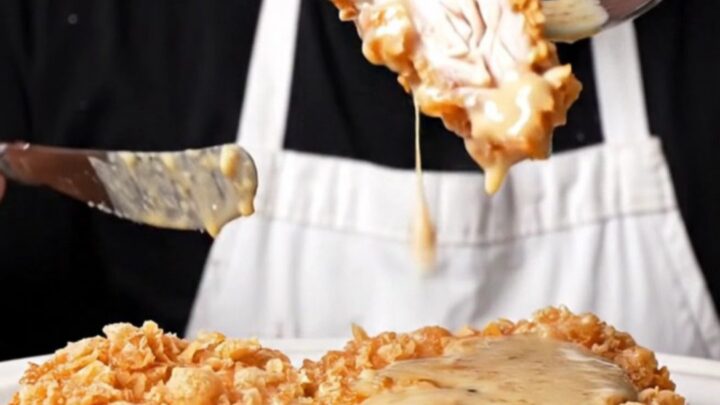
- Rest the Chicken and ServeLet the fried chicken rest on the wire rack for at least 3 minutes before serving. To serve, place a cutlet on a plate and ladle a generous amount of the warm pepper gravy over the top, letting it cascade down the crispy crust. Serve immediately while the crust is still shatteringly crisp.Look for The gravy should pool around the chicken and soak into the bottom crust without making it soggy immediately.Safe temperature 165°F (74°C) internal temperature (poultry)Tip Resting the chicken lets the juices redistribute, keeping the meat moist when you cut into it.
The fried chicken should rest on a wire rack for at least 3 minutes to keep the crust crisp and the juices locked in. The gravy should be warm and pourable, ready to be ladled generously over each cutlet. When you cut into the chicken, the crust should shatter audibly, and the meat should be juicy and tender. Serve immediately for the best texture.
Common mistakes
One common mistake is overcrowding the skillet, which lowers the oil temperature and makes the crust greasy instead of crisp. Fry in batches if needed. Another mistake is crushing the saltine crackers too coarsely, which can cause the coating to fall off during frying.
Aim for fine, uniform crumbs. Also, don't skip the double-dip—it's what creates that thick, craggy crust. Finally, when making the gravy, add the milk slowly while whisking constantly to avoid lumps.
How to tell it’s done
The chicken is done when the crust is deep golden brown and an instant-read thermometer inserted into the thickest part registers 165°F (74°C). The crust should feel shatteringly crisp when tapped, and the meat should be juicy and white throughout with no pink remaining.
Let the chicken rest for at least 3 minutes before serving so the juices redistribute. The gravy is done when it coats the back of a spoon and has a smooth, creamy consistency.
- Poultry: 165°F (74°C) in the thickest part
- Egg dishes: 160°F (71°C) in the thickest part
Up next · Part 3 of 3
4 variations · storage & make-ahead · 5 answers · printable card
Tips, FAQ & printable recipe (Part 3)← Back to the ingredients (Part 1)