Appetizers · Part 2 of 3: Instructions
Loaded Samosa Chaat with Spiced Chickpeas and Three Chutneys Step-by-step instructions
- Prep
- Cook
- Total
- Serves
- 4
Before you start
Before starting, ensure the samosas are frozen and ready to bake. If using homemade chickpeas, have them cooked and seasoned. Make or purchase the three chutneys and the sev. Chop the red onion and measure the pomegranate arils.
Whisk the yogurt with the toasted cumin and set aside. Preheat the oven to 365°F. Have all components within reach for quick assembly, as the dish is best served immediately after layering. The total active time is about 20 minutes, with 8 minutes of baking.
Ingredients at a glance (10)
- 4 large frozen Punjabi samosas (about 12 oz total)
- 150 g spiced chana masala chickpeas (canned or homemade)
- 1/2 cup plain whole-milk yogurt
- 1/2 tsp ground cumin, toasted
- 1/2 cup spicy cilantro-mint chutney
- 1/2 cup sweet tamarind-date chutney
- 1/2 cup crunchy sev (crispy chickpea noodles)
- 1/4 cup finely chopped red onion
- 1 tsp chaat masala
- 1/4 cup fresh pomegranate arils
Instructions
Crisp and Prep
- Crisp the samosasHeat the oven to 365°F (185°C). Line a baking sheet with parchment paper. Arrange the frozen samosas on the sheet in a single layer. Bake for 4 minutes, then flip and bake for another 4 minutes until golden and crisp. Alternatively, air-fry at 365°F for 4 minutes. Remove and let cool slightly.Look for The samosas turn deep golden and the pastry feels shatteringly crisp when pressed.Tip Do not overcrowd the baking sheet; give each samosa room for hot air to circulate.
- Whip the cumin yogurtIn a small bowl, whisk together the plain yogurt and toasted ground cumin until smooth and creamy. Set aside. The yogurt should be thick enough to dollop, not runny.Look for The yogurt is smooth, pale, and has a distinct toasted cumin aroma.Tip If the yogurt is very thick, whisk in a teaspoon of water to loosen it slightly.
At the end of this phase, the samosas are golden and shatteringly crisp, the yogurt is smooth and fragrant with toasted cumin, and all chutneys and toppings are ready. The kitchen smells of warm pastry and spices. The samosas should be cool enough to handle but still warm. Check that the yogurt is thick and the chutneys are at room temperature for easy drizzling. This is the calm before the assembly storm.
Assemble the Layers
- Smash the samosasIn a large serving bowl, gently crush the warm samosas with a fork or your hands into large, uneven chunks. Leave some bigger pieces for texture. The pastry should break apart easily but not turn to crumbs.Look for The samosas break into rustic chunks with flaky layers visible.Tip Do not over-crush; you want a mix of crispy shards and soft potato filling.
- Layer with chickpeasSpoon the spiced chana masala chickpeas evenly over the smashed samosas. The chickpeas should be hot; warm them in a saucepan over medium heat for 3–4 minutes if needed. Spread them in an even layer.Look for The chickpeas are steaming and the spiced gravy coats each one.Tip Warm the chickpeas just before assembling so the chaat is served hot.
- Drizzle the chutneysDrizzle the spicy cilantro-mint chutney and sweet tamarind-date chutney over the chickpeas in zigzag patterns. Use about half of each chutney first, then add more to taste. Reserve some for the final drizzle.Look for The chutneys create bright green and deep brown ribbons over the chickpeas.Tip Start with less chutney; you can always add more at the end.
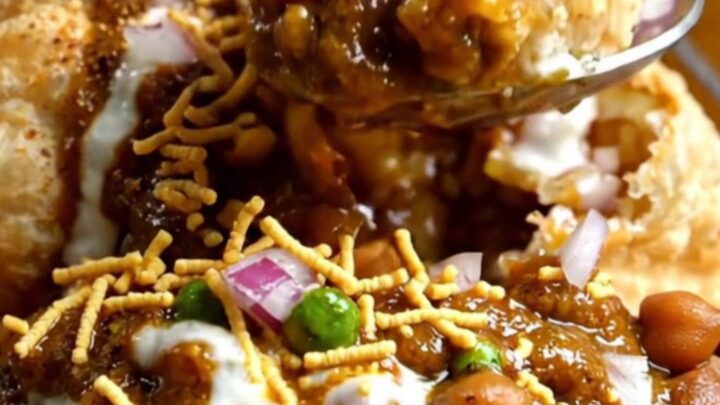
- Top with yogurt and crunchDollop the cumin yogurt over the chutneys. Sprinkle with crunchy sev, finely chopped red onion, and a generous dusting of chaat masala. Finish with fresh pomegranate arils.Look for The top is a colorful mosaic of white yogurt, orange sev, red onion, and ruby pomegranate.Tip Add the sev just before serving to keep it crunchy.
The bowl now holds a colorful mosaic: golden samosa chunks, steaming chickpeas, green and brown chutney ribbons, white yogurt dollops, orange sev, red onion, and ruby pomegranate. The aromas are intoxicating—spicy, tangy, and sweet.
The samosas should still be crisp, and the chickpeas hot. Check that the layers are evenly distributed and that the sev is on top to stay crunchy. This is the moment to taste and adjust seasoning.
Finish and Serve
- Finish and serveSpoon the chaat into individual bowls or serve directly from the large bowl. Drizzle with any remaining chutney and a final sprinkle of chaat masala. Serve immediately while the samosas are still crisp and the chickpeas are hot.Look for The chaat is layered, colorful, and the aromas of mint, tamarind, and spices are intense.Tip For extra crunch, add a handful of sev on top right before serving.
The chaat is fully assembled, with a final drizzle of chutney and a sprinkle of chaat masala. The bowl is vibrant, and the textures are varied. The sev is crunchy, the samosas crisp, the chickpeas hot, and the yogurt cool. Serve immediately, spooning from the bowl to individual plates. The contrast of temperatures and flavors is at its peak. Check that the chaat is not sitting too long before serving.
Common mistakes
One common mistake is over-crushing the samosas, turning them into crumbs instead of chunky pieces. Aim for large shards to preserve texture. Another is using runny yogurt, which makes the chaat watery; use thick yogurt and drain if necessary.
Overloading with chutney can make the dish soggy and overpowering—start with less and add more. Skipping the sev or adding it too early results in a loss of crunch. Finally, serving the chaat cold or after sitting too long dulls the contrast of temperatures and textures.
How to tell it’s done
The dish is done when the samosas are deeply golden and crisp, the chickpeas are hot throughout, and all toppings are layered. There is no protein to check for a safe internal temperature. The chaat should be served right away, while the samosas retain their crunch.
If the samosas lose crispness after sitting, you can re-crisp them in the oven for a minute before assembling. The flavors are balanced when the tangy, sweet, spicy, and cooling elements each come through in every bite.
Up next · Part 3 of 3
4 variations · storage & make-ahead · 5 answers · printable card
Tips, FAQ & printable recipe (Part 3)← Back to the ingredients (Part 1)