Desserts · Part 2 of 3: Instructions
Crispy Dubai Chocolate Truffles: 15-Minute Bite-Sized Luxury Step-by-step instructions
- Prep
- Cook
- Total
- Serves
- 12
Before you start
Before starting, ensure the kataifi is already toasted and finely crushed. Measure all ingredients and have a parchment-lined baking sheet ready. Chop the dark chocolate into small, even pieces for tempering.
Set up a double boiler or a heatproof bowl over a saucepan of simmering water. Keep your dipping forks or skewers nearby, as well as the edible gold leaf and crushed pistachios for garnishing.
Ingredients at a glance (7)
- 1 1/2 cups finely crushed toasted kataifi
- 1 cup pistachio cream
- 2 tbsp tahini
- 1 pinch salt
- 12 oz 70% dark chocolate, tempered
- Edible gold leaf, for garnish, to taste
- Crushed pistachios, for garnish, to taste
Instructions
Mix and Roll
- Make the Pistachio-Kataifi FillingIn a large bowl, combine the finely crushed toasted kataifi, pistachio cream, tahini, and a pinch of salt. Use a spatula or your hands to mix until the mixture holds together when pressed. It should be moist but not sticky, similar to a firm dough.Look for The mixture clumps together easily and feels slightly tacky but not wet.Tip If the mixture seems too dry, add a teaspoon of pistachio cream at a time until it binds.
- Roll into Truffle BallsScoop out about 1 tablespoon of the mixture and roll it between your palms into a tight, firm sphere. Repeat with the remaining mixture to make 12 truffle balls. Place each ball on a parchment-lined baking sheet as you go.Look for You have 12 smooth, round balls that hold their shape without cracking.Tip Wet your hands lightly with water if the mixture sticks to your palms.
The filling should be uniform, with the kataifi evenly distributed and the mixture holding together when pressed.
The truffle balls should be smooth, firm, and uniform in size—about the diameter of a golf ball. They should not crack or crumble, and they should feel slightly cold when you touch them.
Freeze and Temper
- Freeze the Truffle BallsPlace the baking sheet with the truffle balls in the freezer. Freeze for 10 minutes, or until the balls are firm and hold their shape when gently pressed. This step is essential for a clean dip into the chocolate.Look for The balls are firm to the touch and no longer soft in the center.Tip Do not freeze longer than 15 minutes, or the chocolate may crack when dipping.
- Temper the Dark ChocolateWhile the truffle balls chill, temper the dark chocolate. Chop the chocolate finely and melt two-thirds of it in a heatproof bowl set over a saucepan of simmering water, stirring until it reaches 115°F (46°C). Remove from heat and add the remaining third, stirring until melted and the temperature drops to 89°F (32°C).Look for The chocolate is smooth, glossy, and has a slight sheen when stirred.Tip Use a digital thermometer for accuracy; proper tempering gives a crisp snap.
After freezing, the truffle balls are rock-solid and easy to handle. The tempered chocolate is smooth, glossy, and has a slight sheen when stirred. When you dip a spoon into it, the chocolate coats the spoon evenly and sets quickly, with a clean snap when broken.
Dip and Garnish
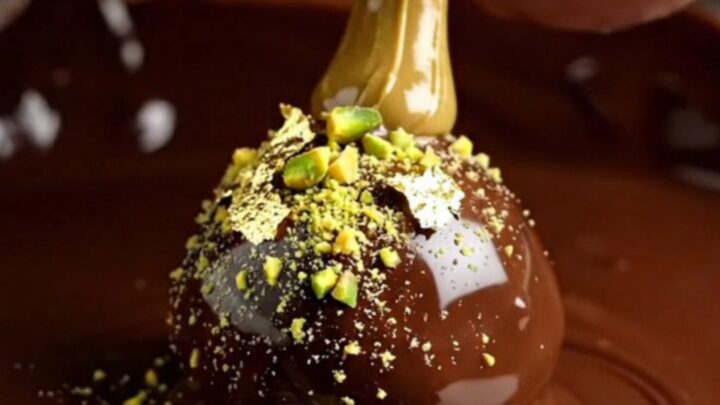
- Dip the Truffles in ChocolateRemove the truffle balls from the freezer. Using a dipping fork or skewer, submerge each ball completely into the tempered chocolate, then lift it out, allowing any excess to drip off. Place the dipped truffle back on the parchment-lined sheet. Repeat with all truffles.Look for Each truffle is evenly coated with a glossy chocolate shell, with no bare spots.Tip Tap the fork gently on the bowl rim to remove excess chocolate for a neat finish.
- Garnish and SetWhile the chocolate is still wet, garnish each truffle with a small piece of edible gold leaf and a sprinkle of crushed pistachios. Let the truffles set at room temperature until the chocolate is firm and snaps when broken, about 5 minutes.Look for The chocolate is set and gives a clean snap when you bite into a truffle.Tip Work quickly when garnishing, as the chocolate sets fast.
Each truffle is evenly coated with a glossy chocolate shell, with no bare spots or drips. The garnish—gold leaf and crushed pistachios—sticks to the wet chocolate. Once set, the chocolate is firm and gives a crisp snap when you bite into a truffle, revealing the bright green, crunchy center.
Common mistakes
One common mistake is over-mixing the filling, which can make it oily or dense. Another is not freezing the truffle balls long enough—if they're too soft, they'll slump in the chocolate.
When tempering, avoid overheating the chocolate; if it exceeds 120°F (49°C), it may seize and become grainy. Also, work quickly when dipping, as the chocolate sets fast, and avoid touching the truffles with your fingers until the shell is fully hardened.
How to tell it’s done
The truffles are done when the chocolate shell is firm and glossy, and it cracks with a clean snap when bitten into. The filling should be crisp and crunchy, not soggy, with a bright green color from the pistachio cream.
To test, gently press the side of a truffle—it should feel solid and not yield. If the chocolate is soft or dull, it may not be fully tempered; allow it to set longer at room temperature.
Up next · Part 3 of 3
4 variations · storage & make-ahead · 5 answers · printable card
Tips, FAQ & printable recipe (Part 3)← Back to the ingredients (Part 1)