Dinner · Part 2 of 3: Instructions
Crispy Pan-Seared Pierogi Ruskie with Bacon and Brown Butter Step-by-step instructions
- Prep
- Cook
- Total
- Serves
- 4
Before you start
Before starting, ensure all ingredients are measured and ready, especially the potato filling, which should be completely cool. Prepare the dough circles and have them laid out on a floured surface to prevent sticking.
Set up your workspace with the pot of water, the skillet, and a serving platter nearby to ensure a smooth transition from boiling to searing. Having everything prepped in advance is key to maintaining the correct timing and temperature for a perfect, golden-brown crust.
Ingredients at a glance (10)
- 400 g smooth mashed potatoes
- 180 g farmer's cheese
- 1 cup sharp cheddar, shredded
- 100 g caramelized onions
- 1/4 tsp black pepper
- 24 circles of 3mm sour-cream dumpling dough
- 60 g salted butter
- 80 g smoked bacon, diced
- 1/2 cup sour cream for serving
- 2 tbsp fresh dill, chopped
Instructions
Filling and assembly
- Prepare the filling and assembleCombine the smooth mashed potatoes, farmer's cheese, sharp cheddar, caramelized onions, and black pepper in a large bowl. Mix until well incorporated. Place a spoonful of the mixture onto the center of each sour-cream dumpling dough circle. Fold the dough over the filling and crimp the edges tightly to seal each pierogi.Look for The mixture should be thick and uniform, and the edges of the dough circles must be sealed completely to prevent the filling from leaking during cooking.Tip Ensure the potato mash is completely cooled before adding the cheese to prevent the filling from becoming too soft to work with.
The filling should be a smooth, cohesive mixture that holds its shape well. Ensure each pierogi is sealed tightly with no visible gaps in the crimping, as this will prevent the filling from leaking during the parboiling or searing process.
The assembled pierogi should be uniform in size and neatly arranged on a tray before you move to the boiling phase.
Parboiling the dough
- Parboil the pierogiBring a large pot of salted water to a gentle boil. Carefully drop the assembled pierogi into the water and cook for two minutes. Remove them using a slotted spoon and place them on a clean towel to dry slightly before searing.Look for The pierogi will float to the surface of the water as they cook. Two minutes is sufficient to set the dough without making it too soft.Tip Do not overcrowd the pot; cook the pierogi in batches if necessary to maintain a steady temperature and prevent them from sticking together.
The pierogi should float to the surface within two minutes, indicating they are ready to be removed. The dough will look slightly translucent but should still be firm enough to handle with a slotted spoon. Ensure they are drained well on a clean kitchen towel to remove excess water, which is vital for achieving a crisp crust in the next step.
Searing in bacon butter
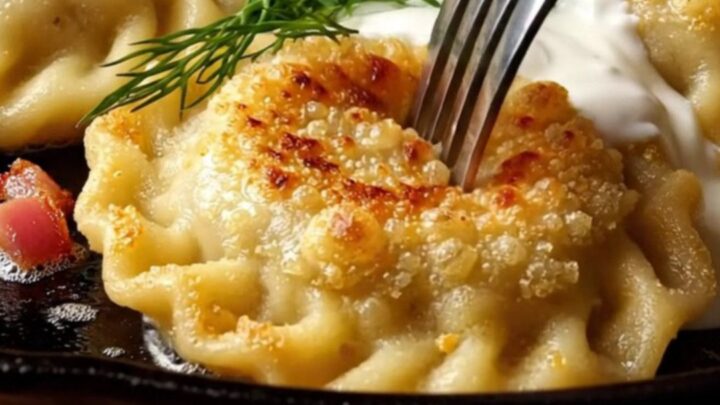
- Sear in bacon butterHeat a cast-iron skillet over medium-high heat. Add the salted butter and diced smoked bacon. Once the butter is foaming, add the parboiled pierogi in a single layer. Sear for three minutes per side until the internal temperature of the bacon reaches 160°F (71°C) and the pierogi develop a blistered, golden-brown crust. Serve immediately topped with sour cream and fresh dill.Look for The butter should be bubbling and golden, and the bacon bits should be crispy. The pierogi should have a deep golden-brown crust on both sides.Safe temperature 160°F (71°C) internal temperature (ground meat)Tip Watch the butter closely so it does not burn; if it darkens too quickly, slightly lower the heat to maintain a steady sear without scorching.
The pierogi should be sizzling in the skillet, with the butter foaming and turning a deep golden color. The bacon bits should be rendered and crispy, and the pierogi should have a distinct, blistered crust on both sides. The aroma should be rich, nutty, and smoky, signaling that the pierogi are ready to be plated and served immediately.
Common mistakes
Avoid overstuffing the pierogi, as this can cause the dough to burst during the parboiling phase. Do not skip the drying step after boiling; wet pierogi will steam rather than sear, leading to a soggy texture instead of a crispy one.
Another common mistake is overcrowding the skillet, which lowers the pan temperature and prevents the dough from browning evenly. Finally, be careful not to burn the butter; keep a close watch and adjust the heat as needed to maintain a gentle, consistent foam.
How to tell it’s done
The pierogi are done when the exterior is uniformly blistered and golden-brown on both sides. The filling should be heated through, and the bacon bits in the skillet should be dark and crispy.
Using a food thermometer, ensure the bacon reaches at least 160°F (71°C) to confirm it is fully cooked. The dough should feel firm and crisp to the touch, and the butter in the pan should have a rich, nutty aroma, indicating it has reached the perfect brown butter stage.
- Ground meat: 160°F (71°C) in the thickest part
Up next · Part 3 of 3
2 variations · storage & make-ahead · 3 answers · printable card
Tips, FAQ & printable recipe (Part 3)← Back to the ingredients (Part 1)