Dinner · Part 2 of 3: Instructions
Crispy Gnocchi in Spicy Vodka Cream Sauce Step-by-step instructions
- Prep
- Cook
- Total
- Serves
- 4
Before you start
Before starting, have all ingredients measured and ready. Dice the shallot, mince the garlic, grate the Pecorino Romano, and tear the basil. Ensure the gnocchi are at room temperature if refrigerated; if using frozen, keep them frozen until ready to cook.
Heat the olive oil in a large nonstick skillet over medium-high heat. Have the vodka, cream, and chili paste within reach, as the steps move quickly.
Ingredients at a glance (10)
- 500 g potato gnocchi
- 2 tbsp olive oil
- 1 shallot, diced
- 4 cloves garlic, minced
- 85 g tomato paste
- 45 ml vodka
- 180 ml heavy cream
- 1 tbsp Calabrian chili paste
- 70 g Pecorino Romano, grated
- 1/4 cup fresh basil leaves, torn
Instructions
Sear and Sauté
- Pan-Fry the GnocchiHeat the olive oil in a large nonstick skillet over medium-high heat. Add the gnocchi in a single layer and cook, without stirring too often, until golden and crispy on all sides, about 5-7 minutes. Use a spatula to turn them carefully to brown evenly.Look for The gnocchi should be deeply golden with crispy edges and a soft interior.Tip Do not overcrowd the pan; cook in batches if needed to ensure even browning.
- Sauté AromaticsReduce heat to medium. Add the diced shallot and minced garlic to the skillet. Cook, stirring frequently, until fragrant and softened, about 2 minutes. The garlic should not brown too much.Look for The shallot turns translucent and the garlic smells sweet and nutty.Tip If the pan looks dry, add a splash of olive oil or water to prevent burning.
The gnocchi are golden and crispy, the shallot and garlic are fragrant and softened, and the tomato paste has darkened. The pan should have a rich, savory aroma. The gnocchi should be easily flipped without sticking. If they stick, give them another minute before turning.
Build the Sauce
- Caramelize the Tomato PasteAdd the tomato paste to the skillet. Cook, stirring constantly, for 1-2 minutes until the paste darkens and becomes fragrant. This step deepens the flavor.Look for The tomato paste turns a deeper brick-red color and sticks slightly to the pan.Tip Stir continuously to prevent the paste from burning.
- Deglaze with VodkaPour in the vodka and stir, scraping up any browned bits from the bottom of the pan. Let the vodka bubble and reduce by half, about 1-2 minutes. The alcohol will cook off.Look for The vodka sizzles and the pan is deglazed, with a rich aroma.Tip Use a wooden spoon to loosen any stuck bits for extra flavor.
- Swirl in Cream and ChiliReduce heat to low. Pour in the heavy cream and add the Calabrian chili paste. Stir gently to combine. Heat the sauce until it is steaming and slightly thickened, about 2-3 minutes. Do not let it boil.Look for The sauce is a glossy, vibrant orange and coats the back of a spoon.Tip Keep the heat low to prevent the cream from curdling.
The vodka has mostly evaporated, and the cream and chili paste have formed a smooth, glossy orange sauce. The sauce should be steaming but not boiling, and it should coat the back of a spoon.
The aroma is spicy and creamy. The sauce should not be too thick; it will thicken further with the cheese.
Finish and Serve
- Toss Gnocchi in SauceReturn the crispy gnocchi to the skillet. Gently fold them into the sauce until every piece is coated. Let them warm through for 1-2 minutes, allowing the edges to stay crispy.Look for The gnocchi are evenly coated with the velvety sauce, and the crispy edges are still visible.Tip Use a gentle folding motion to avoid breaking the gnocchi.
- Melt in the PecorinoRemove the skillet from the heat. Sprinkle the grated Pecorino Romano over the gnocchi and stir until the cheese melts into the sauce, creating a creamy, rich texture.Look for The cheese melts smoothly, and the sauce turns even more velvety.Tip Off the heat prevents the cheese from clumping.
- Finish with Basil and ServeScatter the torn fresh basil over the top. Serve immediately while hot, making sure each plate gets a good amount of sauce and crispy gnocchi.Look for The basil brightens the dish with color and aroma.Tip Add the basil at the last moment to keep it fresh.
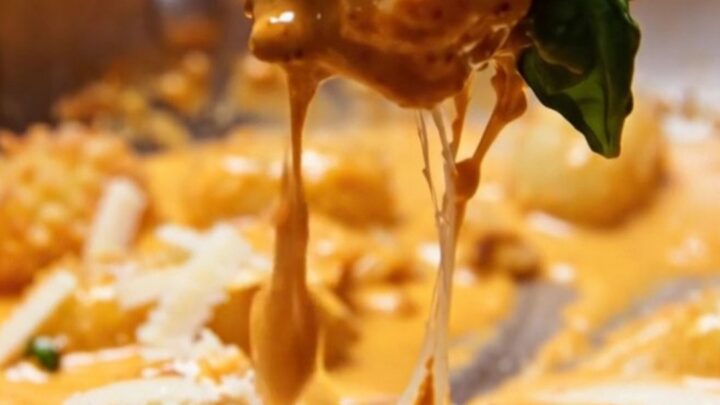
The gnocchi are evenly coated in the velvety sauce, and the Pecorino has melted into a rich, creamy texture. The basil is bright green and fragrant. The dish looks glossy and inviting, with crispy edges still visible. Serve immediately to enjoy the contrast of textures.
Common mistakes
One common mistake is overcrowding the skillet when searing the gnocchi, which traps steam and prevents browning. Cook in batches if necessary.
Another pitfall is boiling the cream sauce, which can cause it to curdle; keep the heat low after adding the cream. Also, avoid over-stirring the gnocchi once they are in the sauce, as this can break them apart. Let the sauce come together gently.
How to tell it’s done
The dish is done when the gnocchi are crispy and golden, the sauce is thick and velvety, and the Pecorino is fully melted. The sauce should coat the back of a spoon and not be watery.
If the sauce becomes too thick, add a splash of pasta water or cream to loosen it. The basil should be fresh and bright. Serve immediately for the best texture.
Up next · Part 3 of 3
4 variations · storage & make-ahead · 5 answers · printable card
Tips, FAQ & printable recipe (Part 3)← Back to the ingredients (Part 1)