Dinner · Part 2 of 3: Instructions
Crispy Japanese Ebi Fry with Chunky Tartar Sauce Step-by-step instructions
- Prep
- Cook
- Total
- Serves
- 4
Before you start
Before starting, gather all ingredients and set up a breading station with three shallow bowls. Pat the shrimp dry with paper towels if needed. Prepare the tartar sauce if making it from scratch, and shave the cabbage.
Heat the oil to 350°F (175°C) using a deep-fry thermometer for accuracy. Have a wire rack lined with paper towels ready for draining the fried shrimp.
Ingredients at a glance (7)
- 8 colossal black tiger shrimp, peeled, tails on, and straightened
- 1/2 cup all-purpose flour
- 1 large egg, beaten
- 2 cups Japanese panko breadcrumbs
- 3 cups neutral oil, for frying
- 1/2 cup Japanese tartar sauce (store-bought or made ahead)
- 2 cups shaved green cabbage
Instructions
Prep and Bread
- Straighten and Prepare the ShrimpPlace a peeled shrimp on a cutting board. Using a small sharp knife, make small shallow diagonal slits along the belly of the shrimp, about 1/4 inch apart. Press down gently on the shrimp until the muscle snaps and the shrimp stays straight. Repeat with all remaining shrimp.Look for The shrimp should lie flat and straight without curling.Tip Make the slits shallow to avoid cutting through the shrimp completely.
- Set Up the Breading StationPlace the flour in one shallow bowl, the beaten egg in a second bowl, and the panko breadcrumbs in a third bowl. Line a plate or tray with parchment paper for the breaded shrimp.Look for All three bowls are ready and within easy reach.Tip Use one hand for wet ingredients and the other for dry to keep the coating light.
- Coat the ShrimpDredge each straightened shrimp in the flour, shaking off any excess. Dip it into the beaten egg, letting the excess drip off. Press the shrimp firmly into the panko breadcrumbs, coating all sides evenly. Place the breaded shrimp on the prepared tray.Look for Each shrimp is evenly coated with panko and holds its straight shape.Tip Press the panko gently but firmly so it adheres well and creates a craggy crust.
The shrimp are straight, evenly coated with flour, egg, and panko, and hold their shape on the tray.
The breading station is set up and ready for frying. Take a moment to check the color, texture and aroma before you move on to the next step.
Fry to Golden
- Heat the OilPour the neutral oil into a large heavy-bottomed pot or deep skillet, filling it about 2 inches deep. Heat over medium-high heat until a deep-fry thermometer registers 350°F (175°C).Look for The oil shimmers and a breadcrumb dropped in sizzles immediately.Tip Maintain the oil temperature between 340°F and 360°F for even cooking.
- Fry the ShrimpCarefully lower the breaded shrimp into the hot oil in batches, without crowding. Fry for about 3 minutes, turning once, until golden amber and buoyant. Use tongs to transfer the fried shrimp to a wire rack set over paper towels to drain.Look for The shrimp are golden amber, crisp, and float to the surface.Safe temperature 145°F (63°C) internal temperature (shellfish)Tip Fry in small batches to keep the oil temperature steady and the crust crisp.
- Rest and DrainLet the fried shrimp rest on the wire rack for 1 to 2 minutes so the crust stays crisp and any excess oil drips off. The internal temperature of the shrimp should reach 145°F (63°C).Look for The shrimp are crisp to the touch and no longer steaming excessively.Safe temperature 160°F (71°C) internal temperature (egg dishes)Tip Resting on a rack, not on paper towels, keeps the bottom crust crunchy.
The oil is at 350°F (175°C), and the shrimp fry until golden amber, floating and crisp. They are transferred to a wire rack to drain. Take a moment to check the color, texture and aroma before you move on to the next step.
Serve and Dip
- Prepare the Serving PlateSpread the shaved cabbage on a serving platter or individual plates. Arrange the fried shrimp on top of the cabbage, tails pointing outward.Look for The cabbage forms a crisp bed for the shrimp.Tip Use a generous amount of cabbage for a fresh contrast to the fried shrimp.
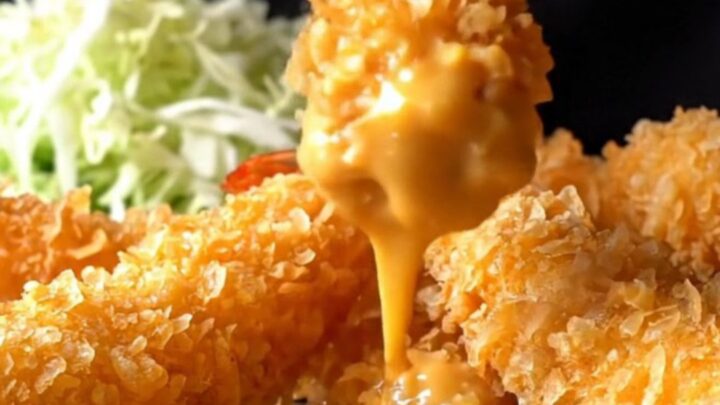
- Serve with Tartar SauceServe the ebi fry immediately with the Japanese tartar sauce on the side or drizzled over the top. Dip each shrimp into the sauce before eating to enjoy the full crunch and creamy contrast.Look for The tartar sauce is chunky and creamy, ready for dipping.Tip For the best texture, dip just before eating so the crust stays crisp.
The shrimp are arranged over shaved cabbage with tartar sauce on the side. The first bite delivers a loud crunch and creamy sauce. Take a moment to check the color, texture and aroma before you move on to the next step.
Common mistakes
A common mistake is overcrowding the pan, which lowers the oil temperature and results in greasy, soggy shrimp. Fry in small batches.
Another mistake is not pressing the panko firmly enough, causing the coating to fall off during frying. Also, skipping the straightening step will cause the shrimp to curl, making them cook unevenly.
How to tell it’s done
The shrimp are done when they are golden amber, buoyant in the oil, and have an internal temperature of 145°F (63°C). The crust should be deeply crisp and shatter when bitten.
Overcooking will make the shrimp tough, so remove them from the oil as soon as they reach the right color and temperature.
- Shellfish: 145°F (63°C) in the thickest part
- Egg dishes: 160°F (71°C) in the thickest part
Up next · Part 3 of 3
4 variations · storage & make-ahead · 5 answers · printable card
Tips, FAQ & printable recipe (Part 3)← Back to the ingredients (Part 1)