Dinner · Part 2 of 3: Instructions
Crispy Hot Honey Buttermilk Chicken Sliders Step-by-step instructions
- Prep
- Cook
- Total
- Serves
- 8
Before you start
Before starting, set up a dredging station with the seasoned cornstarch and flour mix in a shallow dish. Have a wire rack ready for the coated chicken and another for the fried chicken.
Heat the frying oil to 375°F (190°C) and keep the hot honey glaze ingredients measured and ready. The buttermilk marinade should be prepared and the chicken sliced before beginning.
Ingredients at a glance (17)
- 2 lb boneless, skinless chicken breasts, sliced into slider-sized cutlets
- 1 1/2 cups buttermilk
- 1/4 cup hot sauce
- 2 tbsp pickle juice
- 1 tbsp garlic powder
- 1 tbsp smoked paprika
- 1 tsp salt
- 2 cups seasoned cornstarch and flour mix
- neutral oil, for frying, to taste
- 1/2 cup wildflower honey
- 2 tbsp butter
- 2 tbsp hot sauce
- 1 tsp cayenne pepper
- 8 mini brioche slider buns
- garlic butter, for toasting, to taste
- dill pickle chips, to taste
- creamy cabbage slaw, to taste
Instructions
Marinate and Coat
- Marinate the ChickenSlice the chicken breasts into slider-sized cutlets, about 1/2-inch thick. In a large bowl, whisk together the buttermilk, hot sauce, pickle juice, garlic powder, smoked paprika, and salt. Add the chicken cutlets and turn to coat completely. Cover and refrigerate for at least 30 minutes or up to 4 hours.Look for The chicken is fully submerged in a pinkish, spiced buttermilk mixture.Tip For extra tenderness, marinate overnight. The acid in the buttermilk helps tenderize the meat.
- Prepare the CoatingPlace the seasoned cornstarch and flour mix in a shallow dish. Remove the chicken from the marinade, letting any excess drip off, and dredge each cutlet in the coating, pressing firmly to adhere. Shake off any excess and set the coated chicken on a wire rack.Look for Each cutlet is evenly coated with a dry, powdery layer.Tip Let the coated chicken rest for 10 minutes before frying to help the coating stick.
The chicken is coated in a thick, spiced buttermilk mixture and then dredged in the seasoned flour.
The coating should cling evenly without any bare spots. The raw chicken is ready for frying, with the oil heating nearby.
Fry and Glaze
- Fry the ChickenHeat 2 inches of neutral oil in a deep skillet or Dutch oven to 375°F (190°C). Working in batches, carefully add the chicken cutlets and fry for 6 minutes, turning occasionally, until golden brown and cooked through. The internal temperature should read 165°F (74°C) on an instant-read thermometer. Transfer to a wire rack to drain.Look for The coating is deep golden brown and the chicken is cooked through, with juices running clear.Safe temperature 165°F (74°C) internal temperature (poultry)Tip Do not overcrowd the pan; fry in batches to keep the oil temperature steady.
- Make the Hot Honey GlazeIn a small saucepan over medium heat, combine the honey, butter, hot sauce, and cayenne pepper. Cook, stirring occasionally, until the butter is melted and the glaze is smooth and bubbling. Remove from heat and keep warm.Look for The glaze is glossy, thick, and slightly bubbling.Tip If the glaze thickens too much, add a teaspoon of water to loosen it.
- Glaze the ChickenUsing tongs, dip each fried chicken cutlet into the hot honey glaze, turning to coat completely. Let any excess glaze drip off, then place the glazed chicken on a wire rack set over a baking sheet.Look for Each piece is shiny, sticky, and evenly coated with the glaze.Tip Glaze the chicken while it is still hot so the glaze clings better.
The chicken is golden brown, crisp, and cooked through. The hot honey glaze is bubbling and smooth. Each piece is dipped and coated, leaving a shiny, sticky surface. The kitchen smells of fried chicken and sweet heat.
Toast and Assemble
- Toast the BunsSplit the mini brioche slider buns and spread the cut sides with garlic butter. Heat a skillet or griddle over medium heat and toast the buns, cut side down, until golden and fragrant, about 1-2 minutes.Look for The buns are golden brown and smell buttery and garlicky.Tip Toasting the buns adds a crisp edge that holds up to the juicy chicken.
- Assemble the SlidersOn the bottom half of each toasted bun, layer a few dill pickle chips and a spoonful of creamy cabbage slaw. Place a glazed chicken cutlet on top, then add the top bun. Press gently to set.Look for The sliders are stacked with pickles, slaw, and a shiny chicken piece.Tip For extra heat, drizzle a little more hot honey over the chicken before adding the top bun.
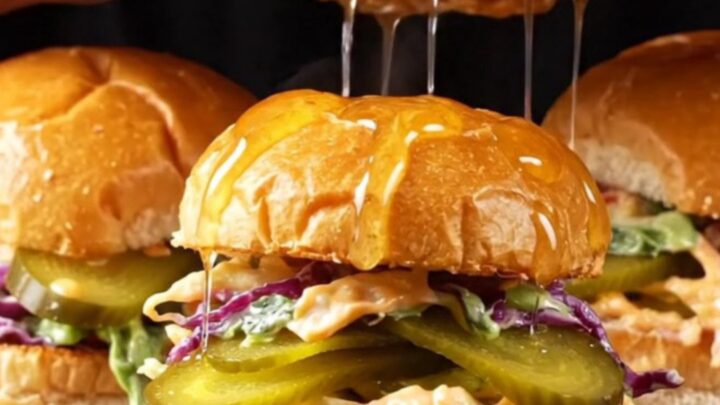
- Serve with Extra DrizzleArrange the sliders on a serving platter and drizzle with additional hot honey glaze if desired. Serve immediately while the chicken is still crispy and the buns are warm.Look for The sliders are glossy, with extra honey dripping down the sides.Tip Serve with extra pickles on the side for a crunchy, tangy contrast.
The buns are toasted golden, the pickles and slaw are ready, and the glazed chicken is stacked high. The sliders look glossy and inviting, with a few drips of honey on the plate. They are ready to serve.
Common mistakes
A common mistake is overcrowding the pan, which drops the oil temperature and makes the coating greasy instead of crisp. Fry in small batches and let the oil return to 375°F between batches.
Another pitfall is not letting the coated chicken rest before frying; this helps the coating adhere. Finally, glazing the chicken while it's too cool will make the glaze slide off, so glaze immediately after frying.
How to tell it’s done
The chicken is done when it reaches an internal temperature of 165°F (74°C) on an instant-read thermometer. The coating should be deep golden brown and very crisp.
When you cut into a piece, the juices should run clear and the meat should be opaque throughout. The glaze should be thick and cling to the chicken without running off.
- Poultry: 165°F (74°C) in the thickest part
Up next · Part 3 of 3
4 variations · storage & make-ahead · 5 answers · printable card
Tips, FAQ & printable recipe (Part 3)← Back to the ingredients (Part 1)