Dinner · Part 2 of 3: Instructions
Crispy Hatay Kaytaz Böreği: Paper-Thin Phyllo Meat Pastries Step-by-step instructions
- Prep
- Cook
- Total
- Serves
- 6
Before you start
Before you start, make sure you have a clean, large work surface, preferably one that can be wiped down easily. You will need a large bowl for the dough, a rolling pin (though you may not need it if you stretch by hand), a pastry brush, and a baking sheet lined with parchment paper.
Have all your ingredients measured and ready. The dough requires a 30-minute rest, and the filling can be prepared during that time. The recipe makes 12 pastries, which can be served as a main course or an appetizer. If you are new to stretching dough, give yourself extra time — it takes a few tries to get the hang of it.
Ingredients at a glance (9)
- 4 cups all-purpose flour
- 1 1/2 cups water, at room temperature
- 1 tsp salt
- 1/2 cup unsalted butter, melted
- 1/4 cup vegetable oil
- 1 lb ground beef
- 1 onion, finely chopped
- 1/2 tsp black pepper
- 1/2 tsp salt
Instructions
Make and Rest the Dough
- Make the DoughIn a large mixing bowl, combine the flour and salt. Gradually add the water, mixing with your hands until a shaggy dough forms. Turn the dough out onto a lightly floured surface and knead for about 10 minutes, until smooth and elastic. The dough should be firm but not stiff; if it feels dry, add a tablespoon of water at a time. Cover with a damp cloth and let rest for 30 minutes.Look for The dough should be smooth, not sticky, and spring back when pressed.Tip Kneading well develops the gluten, which helps the dough stretch thin without tearing.
- Rest the DoughAfter kneading, divide the dough into 12 equal pieces. Roll each piece into a smooth ball. Place the balls on a tray, cover with a damp cloth, and let them rest for 30 minutes. This resting period relaxes the gluten, making the dough easier to stretch.Look for The dough balls should be soft and pliable, not springy.Tip Keep the dough covered at all times to prevent a skin from forming.
At the end of this phase, you should have a smooth, elastic dough that has rested for 30 minutes. The dough balls should be soft and pliable, and when you press a finger into one, it should slowly spring back. The dough should not be sticky or dry. If it feels dry, you can add a tiny bit of water; if sticky, dust with flour. This phase sets the foundation for the thin stretching that follows.
Stretch and Fill
- Prepare the FillingWhile the dough rests, prepare the filling. In a bowl, combine the ground beef, finely chopped onion, black pepper, and salt. Mix well with your hands until the ingredients are evenly distributed. Set aside. The filling should be well seasoned but not overly salty, as the dough also contains salt.Look for The filling should be cohesive and aromatic.Tip Use your hands to mix thoroughly, ensuring the onion is evenly distributed.
- Stretch the Dough ThinLightly oil your work surface and hands. Take one dough ball and flatten it with your palm. Using your fingers, gently stretch the dough from the center outward, working in a circular motion, until it is paper-thin and almost translucent. The dough should be so thin that you can see your hand through it. Place the stretched dough on a clean, dry surface. Repeat with the remaining dough balls, stacking them with a light dusting of flour between each to prevent sticking.Look for The dough should be sheer and delicate, but still strong enough to handle without tearing.Tip Work slowly and gently; if the dough tears, patch it with a small piece of dough.
- Coat with Butter and OilIn a small bowl, mix the melted butter and vegetable oil. Using a pastry brush, generously brush the top of each stretched dough sheet with the butter-oil mixture. This coating is essential for creating the flaky, crispy layers during baking.Look for The dough should be evenly coated and glistening.Tip Brush every surface, including the edges, to ensure even browning.
By the end of this phase, you will have paper-thin sheets of dough coated with the butter-oil mixture. The dough should be translucent and delicate, but still strong enough to handle without tearing. You will also have the meat filling ready. When you fold the dough, the layers should be visible, and the pastries should be neatly sealed. The filling should be evenly distributed, with no gaps or bulges.
Bake and Finish
- Fold and Fill the PastriesTake one buttered dough sheet and fold it in half, then in half again, to create a rectangle. Place a spoonful of the meat filling in the center. Fold the dough over the filling and pleat the edges, pinching to seal, forming a half-moon or round pastry. Repeat with the remaining dough and filling.Look for The pastries should be well sealed, with no filling showing.Tip Pleating creates the classic flaky texture; press firmly to seal.
- Bake the PastriesPreheat the oven to 375°F (190°C). Place the pastries on a baking sheet lined with parchment paper, leaving space between them. Brush the tops with any remaining butter-oil mixture. Bake for 25–30 minutes, until the pastries are deep golden brown and crispy. The internal temperature of the meat should reach 160°F (71°C).Look for The pastries will be puffed, golden, and the edges will look flaky and crisp.Safe temperature 160°F (71°C) internal temperature (ground meat)Tip Rotate the baking sheet halfway through for even browning.
- Cool and ServeRemove the pastries from the oven and let them cool on the baking sheet for 5 minutes. Serve warm, while the crust is still shatteringly crisp. The pastries can be eaten whole or broken apart to show the flaky layers and juicy filling.Look for The pastries should be crisp to the touch and the filling steamy.Tip Cooling briefly allows the juices to set, making the pastries easier to handle.
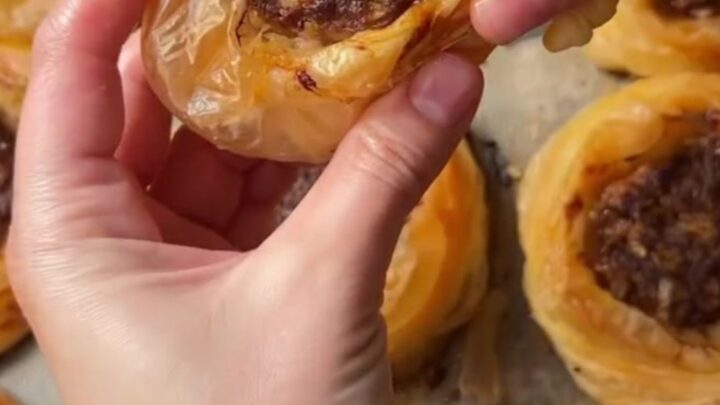
The pastries should emerge from the oven deep golden brown, with visible flaky layers and a crisp, shattery texture. The filling should be cooked through, with the internal temperature reaching 160°F (71°C).
The aroma of butter and toasted pastry should fill the kitchen. After cooling for a few minutes, the pastries should hold their shape and break apart with a satisfying crunch, revealing the juicy meat inside.
Common mistakes
One common mistake is not stretching the dough thin enough — if it's too thick, the pastries will be doughy and heavy instead of flaky. Another is overfilling, which can cause the pastries to burst open during baking. Make sure to seal the edges well, using a little water if needed.
If the dough tears while stretching, patch it with a small piece of dough and continue. Also, don't skip the resting period; it's essential for the dough's elasticity. Finally, use a light hand when brushing the butter-oil mixture — too much can make the pastries greasy, too little will prevent proper crisping.
How to tell it’s done
The pastries are done when they are deep golden brown all over and the edges look flaky and crisp. The internal temperature of the meat should read 160°F (71°C) on an instant-read thermometer inserted into the center of a pastry.
The crust should feel firm and shatter when you bite into it. If the pastries are browning too quickly but the meat isn't cooked through, lower the oven to 350°F (175°C) and bake a few minutes longer. Let them cool for 5 minutes before serving to allow the juices to set.
- Ground meat: 160°F (71°C) in the thickest part
Up next · Part 3 of 3
4 variations · storage & make-ahead · 5 answers · printable card
Tips, FAQ & printable recipe (Part 3)← Back to the ingredients (Part 1)