Dinner · Part 2 of 3: Instructions
Crispy Hasselback Butternut Squash with Maple Chipotle Brown Butter Step-by-step instructions
- Prep
- Cook
- Total
- Serves
- 4
Before you start
Before beginning, ensure your oven is clean and ready for the temperature shift. Have your baking sheet prepared with parchment paper for easy cleanup. Wash the squash thoroughly and dry it well. Gather all glaze ingredients near the stovetop so you can quickly whisk them together while the squash is par-roasting, keeping your workspace organized.
Having your tools, such as the knife and dowels, ready on your cutting board will make the transition from par-roasting to slicing seamless and efficient, preventing the squash from cooling down too much before the final bake.
Ingredients at a glance (7)
- 1 kg butternut squash, peeled and halved lengthwise
- 60 g unsalted butter
- 2 tbsp pure maple syrup
- 1 tsp chipotle flakes
- 2 fresh bay leaves
- 1/3 cup toasted pumpkin seeds (pepitas)
- 1/2 tsp flaky sea salt
Instructions
Par-Roasting
- Initial RoastPreheat the oven to 400°F (200°C). Peel the butternut squash, cut it in half lengthwise, and remove the seeds with a spoon. Place the squash halves on a baking sheet and roast for 15 minutes to soften the flesh, which makes it easier to slice.Look for The squash should feel slightly softened and easier to handle.Tip Ensure the squash is stable on the baking sheet to prevent it from rolling.
The squash should feel slightly softened to the touch. It should not be fully cooked, as it needs to remain firm enough to withstand the slicing process without falling apart. The skin should look slightly duller than when it started, and it should be cool enough to handle safely with your hands while you prepare it for the next stage of the recipe.
Precise Slicing
- Hasselback SlicingRemove the squash from the oven. Place each half between two wooden dowels to prevent the knife from cutting all the way through the squash. Carefully slice crosswise into 3-millimeter ridges along the entire length of the squash.Look for The slices should be thin and consistent, held together at the bottom by the uncut portion.Tip Take your time with the slicing to ensure even cooking across all ridges.
Check that your slices are approximately 3 millimeters thick. The squash should still be held together at the bottom. If you notice any slices are disconnected, try to keep them aligned as best as possible on the tray, as they will still cook beautifully. The goal is to maximize the surface area so the glaze can seep into every single crevice of the squash.
Glazing and Roasting
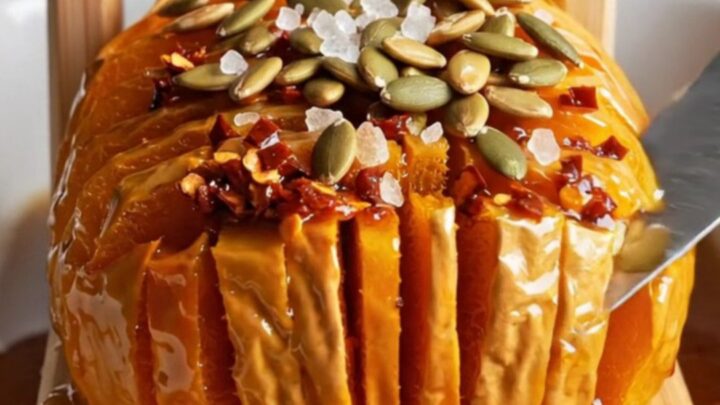
- Glazing and Final RoastIncrease the oven temperature to 425°F (220°C). Combine the butter, maple syrup, chipotle flakes, and bay leaves. Baste the squash with the mixture. Roast for 35 minutes, basting every 10 minutes to ensure deep caramelization. Finish by scattering with toasted pumpkin seeds and flaky sea salt before serving.Look for The edges should be deeply caramelized and the squash tender when pierced with a knife.Tip Baste thoroughly between the slices to distribute the smoky maple flavor.
The squash should look glossy and golden brown. The smell of toasted maple and chipotle should be prominent. The pumpkin seeds should be added right at the end to maintain their crunch against the tender squash.
The glaze should be bubbling slightly and have a deep, rich color that indicates the sugars have caramelized perfectly without burning the delicate edges.
Common mistakes
A common mistake is slicing the squash too deeply or too quickly, which can cause the pieces to separate completely. Always use the wooden dowel technique to create a barrier.
Another error is neglecting to baste frequently; frequent basting is the secret to achieving that deep, golden-brown color and preventing the thin edges from drying out before the center is cooked. Ensure your oven is fully preheated to the higher temperature before returning the squash, as a cooler oven will steam the squash rather than crisping the edges.
How to tell it’s done
The squash is done when it is tender throughout and the edges of the slices are deeply caramelized and crispy. A small pairing knife should slide through the thickest part of the squash with no resistance.
The glaze should have thickened into a rich, syrupy consistency that clings to the ridges of the squash. Because there is no raw meat involved, you are looking for the perfect texture: soft and buttery on the inside, with a slight resistance on the outside that indicates a well-developed, flavorful crust.
Up next · Part 3 of 3
2 variations · storage & make-ahead · 3 answers · printable card
Tips, FAQ & printable recipe (Part 3)← Back to the ingredients (Part 1)