Appetizers · Part 2 of 3: Instructions
Crispy Ham and Cheese Puff Pastry Roll Step-by-step instructions
- Prep
- Cook
- Total
- Serves
- 6
Before you start
Before beginning, ensure the puff pastry is thawed just enough to be pliable but still cold to the touch. If it becomes too warm, the butter will melt prematurely, resulting in a dense, greasy pastry instead of a light, flaky one.
Preheat the oven well in advance to ensure it reaches the target temperature, as a hot oven is the secret to getting the pastry to puff instantly upon contact with the heat.
Ingredients at a glance (4)
- 1 sheet puff pastry, store-bought or made ahead
- 1/2 lb diced ham
- 1 1/2 cups shredded cheese
- 1 egg, beaten for egg wash
Instructions
Assembly and Filling
- Prepare the fillingLay out the puff pastry sheet on a clean surface. Evenly distribute the diced ham and shredded cheese over the surface of the pastry, leaving a small border around the edges to ensure a tight seal once rolled.Look for The cheese and ham are spread in a uniform layer across the dough.Tip Keep the pastry cold until the moment you start rolling to maintain its flaky structure.
The pastry should be laid out flat with the ham and cheese spread evenly, leaving enough room at the edges to seal the log effectively. Ensure the surface is dry to prevent the dough from becoming soggy.
Rolling and Glazing
- Roll and sealCarefully roll the pastry tightly into a log shape. Pinch the seams together to prevent the cheese from leaking during the baking process. Transfer the roll onto a parchment-lined baking sheet and brush the entire exterior with the beaten egg wash.Look for The pastry is sealed tightly and coated with a thin layer of egg wash.Tip Use a light hand when brushing the egg wash to avoid tearing the delicate layers of dough.
The log should be rolled as tightly as possible without squeezing the filling out. The egg wash should be applied in a thin, even layer over the entire surface, which will provide the beautiful, glossy shine.
Baking and Resting
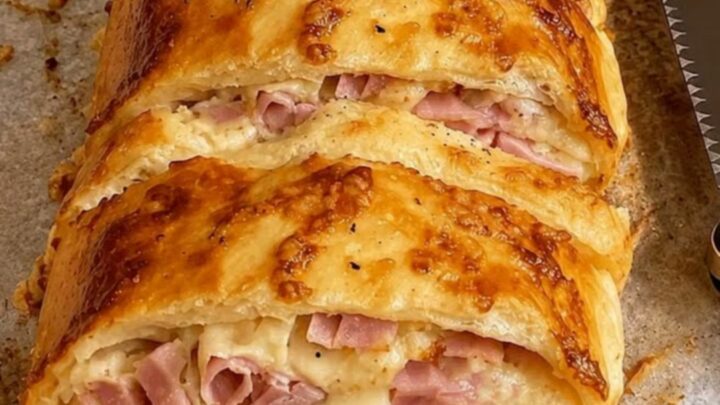
- Bake until goldenPreheat the oven to 400°F (200°C). Bake the roll for approximately 20 minutes, or until the pastry is deeply golden and puffed. If using eggs as a binder, ensure the internal temperature of the filling reaches 160°F (71°C) to confirm it is fully set.Look for The pastry is deeply golden brown and the cheese is bubbling out of the sides.Safe temperature 160°F (71°C) internal temperature (egg dishes)Tip Let the pastry rest for five minutes before slicing to allow the filling to stabilize.
The pastry should be puffed and golden, with a crisp sound when tapped. The internal temperature must be confirmed before removing from the oven, followed by a brief rest to ensure the structure holds together.
Common mistakes
The most common mistake is overloading the pastry with too much filling, which prevents it from rolling tightly and causes leaks. Another error is working in a warm kitchen, which softens the butter too much.
Always work quickly and return the pastry to the refrigerator if it feels sticky or limp during the assembly process to ensure the final texture remains light and airy.
How to tell it’s done
The roll is finished when the exterior is a uniform, deep golden-brown color. The edges should show signs of the cheese bubbling and browning slightly.
When tested with an instant-read thermometer, the center of the filling should reach 160°F (71°C).
Allow the roll to rest for five minutes after removing it from the oven to let the cheese firm up slightly, which makes for easier and cleaner slicing.
- Egg dishes: 160°F (71°C) in the thickest part
Up next · Part 3 of 3
2 variations · storage & make-ahead · 3 answers · printable card
Tips, FAQ & printable recipe (Part 3)← Back to the ingredients (Part 1)