Desserts · Part 2 of 3: Instructions
Crispy Guava and Cream Cheese Tortilla Pastelitos Step-by-step instructions
- Prep
- Cook
- Total
- Serves
- 4
Before you start
Set up the station before touching the filling: air fryer plugged in and preheated or at least the basket ready, a small bowl for the beaten egg, a pastry brush, a sharp knife, a fork for crimping, and a flat cutting board large enough for four tortillas.
Take the cream cheese straight from the refrigerator so the blocks cut firm, and slice the guava paste last, wiping the blade between cuts so the sticky slabs lift away cleanly. Melt the butter and have the confectioners' sugar standing by in a sieve.
Ingredients at a glance (6)
- 4 6-inch flour tortillas, soft and fresh
- 2 oz cream cheese per pastelito, cold, cut into a block
- 2 oz guava paste per pastelito, cut into a slab
- 1 large egg, beaten, for sealing the borders
- 1 tbsp unsalted butter, melted, for brushing
- Confectioners' sugar, to taste, for dusting
Instructions
Prep the filling and wraps
- Beat the egg washCrack the egg into a small bowl and beat it with a fork until completely uniform, with no streaks of white left. Set it beside the cutting board with a pastry brush, so the wash is ready the moment a filled tortilla needs its borders painted.Look for The yolk and white should blend into one smooth, pale-yellow liquid.Tip Beating the egg well matters: streaks of unblended white can leave shiny, unsealed patches on the folded edge.
- Cut the cream cheese and guavaCut the cream cheese into a 2 oz block and the guava paste into a 2 oz slab, trimming each piece so it sits in the center of a tortilla with a clear margin all around. A sharp, thin knife keeps the sticky guava paste from dragging and tearing.Look for Each block should be compact and about the size of a small matchbox.Tip Wipe the knife between cuts; guava paste is sticky, and a clean blade gives neat slabs that fold without smearing.
- Warm and lay out the tortillasGive the tortillas ten seconds in the air fryer basket set aside, or a few seconds in a dry pan, just until pliable. Lay them flat on the board. A warm tortilla folds around the filling without cracking along the crease, which keeps the pastelito sealed.Look for The tortilla should bend over your hand without snapping or whitening at the fold.Tip Stack paper-thin warm tortillas with a clean towel over them so they stay soft while the filling is portioned.
At the end of this phase the station should look like a small production line: a bowl of beaten egg with no streaks of unblended white, four 2 oz blocks of cream cheese and four slabs of guava paste trimmed and waiting on the board, and four tortillas warmed until they bend over a hand without cracking or whitening at the crease.
Nothing should be assembled yet. Check that the cream cheese blocks are compact and cold to the touch, that the guava slabs lift off the knife without smearing, and that the pastry brush sits beside the egg.
Fill, fold and crimp
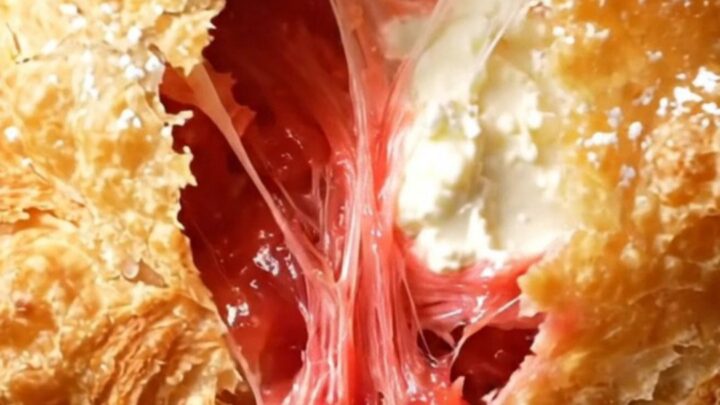
- Fill the tortillasPlace one block of cream cheese and one slab of guava paste side by side, slightly overlapping, just below the center of each tortilla. Keep both pieces away from the edges by at least an inch; filling that reaches the border will squeeze out when the edges are crimped.Look for A clear ring of bare tortilla should surround the filling on every side.Tip Side-by-side, not stacked, gives the molten pink-and-white swirl when the pastelito is broken open.
- Egg wash and fold into half-moonsBrush the beaten egg along the entire upper border of each tortilla, about half an inch wide. Fold the tortilla over the filling into a tight half-moon, press gently to push out air, and line the pockets up so the wash has a moment to tack before crimping.Look for The edges should press together and hold without springing back open.Tip Press from the center of the fold outward so trapped air escapes instead of puffing against the seam.
- Crimp the edges with a forkPress the tines of a fork firmly all along the curved edge of each half-moon, working in overlapping stamps so the seam is sealed edge to edge. The crimp both locks the filling in and gives the pastelitos their classic ridged, bakery-style border.Look for No gaps should show between the fork marks along the sealed edge.Tip Dip the fork in the egg wash if the tines start to stick; a freshly coated fork stamps a cleaner, tighter crimp.
Each tortilla should now be a tight half-moon with a fork-crimped border, resting seam-side down or flat and not leaking at any point. Look closely at the crimp: the fork marks must overlap with no bare gaps, and the egg-washed edge should hold when pressed.
The filling should sit centered, a full inch of bare tortilla between it and the seal. Lift one pocket gently by its curved edge; it should feel self-supporting, not sagging or bulging where the filling pooled. If anything has seeped, wipe it away and reinforce that stretch of crimp before the pastelitos go anywhere near the basket.
Air-fry, blister and finish
- Brush with butter and air-fryBrush the top of each crimped pastelito with melted butter. Arrange them in a single layer in the air fryer basket and cook at 390°F for 6 minutes, until the tortillas are puffed and blistered golden and the egg-washed seam is fully cooked through, 160°F (71°C) at the edge.Look for Deep golden blisters across the surface and a firm, dry seam that no longer looks wet or glossy with egg.Safe temperature 160°F (71°C) internal temperature (egg dishes)Tip Work in batches so the pastelitos never touch; crowding steams the tops and dulls the blistered crust.
- Check the blistered shellLift a pastelito with tongs and look at the underside: it should be as golden as the top, with crisp, dry ridges along the crimp. If the base is still pale, return the batch to the basket for another minute, checking often so the guava does not darken past glossy.Look for The pastelito sounds hollow-tapped and the crimped edge snaps rather than bends.Tip A minute of extra heat is cheap insurance; a burnt guava edge is not, so check at one-minute intervals.
- Dust with sugar and serveDust the hot pastelitos generously with confectioners' sugar through a fine sieve, letting it catch in the crimped ridges. Serve immediately, breaking one open to show the molten cream cheese stretching beside the glossy guava paste. Cool any leftovers for two hours before refrigerating.Look for The sugar should melt faintly on contact, leaving a matte, snowy finish over the blisters.Tip Dust while hot so a thin layer melts into the crust and a second light dusting keeps its snowy look at the table.
The pastelitos come out puffed, deeply golden and blistered across both faces, smelling of toasted tortilla and caramelized guava, with a faint buttery note from the brush of melted butter. The crimped ridges look dry and snap under a fingertip, and the egg-washed seam is set and matte, fully cooked through.
Tap the shell: it should knock firmly, not feel soft. Give the underside a look — it should match the top in color. Only now does the confectioners' sugar go on, dusted hot so a thin layer melts into the crust. Break one open to confirm the molten pink-and-white swirl before the rest are served.
Common mistakes
The most common failure is overfilling: more than a 2 oz block and slab per tortilla, or filling placed too close to the border, forces filling through the crimp and onto the basket, where it burns. The second is a lazy seal — an egg-washed border too narrow, or fork marks with gaps between them — which lets steam escape unevenly and the seam gape. Cold, stiff tortillas crack at the fold, so warm them briefly. Skipping the butter leaves the shell blond and leathery instead of blistered.
How to tell it’s done
A finished pastelito is puffed, deeply blistered and evenly golden on both faces, with crimped ridges that look dry and crisp rather than pale or doughy. Tap the shell: it should sound firm and knock hollow, and the edge should snap under gentle pressure. The egg-washed seam must be fully cooked, set and matte, with no shiny or wet patches; for safety the egg wash should reach 160°F (71°C), which the six minutes at 390°F delivers across the thin border.
- Egg dishes: 160°F (71°C) in the thickest part
Up next · Part 3 of 3
4 variations · storage & make-ahead · 5 answers · printable card
Tips, FAQ & printable recipe (Part 3)← Back to the ingredients (Part 1)