Appetizers · Part 2 of 3: Instructions
Crispy Golden Paçanga Börek with Melted Cheese Step-by-step instructions
- Prep
- Cook
- Total
- Serves
- 6
Before you start
Before starting, gather all ingredients and equipment. Thaw yufka if frozen, keeping it covered with a damp cloth to prevent drying. Cut the yufka sheets into triangles—each sheet can be cut into 4 triangles. Slice pastırma into thin strips if not already sliced.
Dice the green peppers finely. Shred the mozzarella if using a block. Whisk the eggs and milk in a shallow bowl, and place breadcrumbs in another. Preheat the oven to 400°F (200°C) and line a baking sheet with parchment paper. Have a small bowl of water for sealing the rolls.
Ingredients at a glance (8)
- 6 fresh yufka sheets, cut into triangles
- 8 oz spiced pastırma, thinly sliced
- 1 cup shredded mozzarella cheese
- 1/2 cup diced green peppers
- 2 large eggs
- 2 tbsp milk
- 1 1/2 cups crispy breadcrumbs
- 2 tbsp unsalted butter, melted
Instructions
Assemble the Rolls
- Prepare the FillingLay the 6 triangular yufka sheets on a clean work surface. Evenly distribute the sliced pastırma, shredded mozzarella, and diced green peppers along the base of each triangle, leaving a small border at the edges.Look for The filling should be evenly spread, not overstuffed, to allow easy rolling.Tip Keep the filling about 1 inch from the sides to prevent leakage during baking.
- Roll the BörekFold the side flaps of each triangle inward over the filling, then roll tightly from the base to the point, forming a thick cylinder. Seal the tip with a dab of water to prevent unrolling.Look for Rolls should be firm and compact, with no gaps in the layers.Tip Tuck the sides in firmly as you roll to keep the filling enclosed.
After this phase, you should have 6 neat, tightly rolled cylinders with the filling securely enclosed. The yufka should be pliable and not torn. The rolls should feel firm and compact, with no gaps.
The filling should be evenly distributed from end to end, and the edges should be sealed with a dab of water. If any rolls have loose ends, press them to seal. The work surface should be clean, and the rolls ready for coating.
Coat and Arrange
- Coat with Egg WashIn a shallow bowl, whisk the eggs with the milk until well combined. Dip each roll into the egg mixture, turning to coat all sides evenly, allowing any excess to drip off.Look for The rolls should be fully coated with the egg wash, appearing glossy.Tip Use one hand for dipping and the other for dredging to keep hands cleaner.
- Dredge in BreadcrumbsPlace the crispy breadcrumbs in a separate shallow dish. Roll each egg-coated börek in the breadcrumbs, pressing gently to ensure a thick, even crust on all sides.Look for The coating should be heavy and completely cover the rolls.Tip For extra crunch, double-coat by repeating the egg and breadcrumb steps.
- Arrange and ButterPreheat the oven to 400°F (200°C). Line a baking sheet with parchment paper. Place the breaded rolls seam-side down on the prepared sheet. Drizzle the melted butter evenly over the tops.Look for The rolls should be spaced at least 1 inch apart on the baking sheet.Tip Brushing the butter instead of drizzling gives a more even golden finish.
At this stage, the rolls should be heavily encrusted with breadcrumbs, completely covering the egg-washed surface. The coating should adhere well and not fall off easily. The rolls should be placed seam-side down on the parchment-lined baking sheet, spaced at least an inch apart. The melted butter should be drizzled evenly, creating a glossy sheen. The oven should be preheated, and the rolls ready for baking.
Bake and Finish
- Bake Until GoldenBake in the preheated oven for 20 minutes, or until the rolls are deeply golden brown and crunchy. The internal temperature of the egg coating should reach 160°F (71°C) to ensure the eggs are fully set.Look for The crust should be deep golden and sound crispy when tapped.Safe temperature 160°F (71°C) internal temperature (egg dishes)Tip If the rolls brown too quickly, tent with foil for the last 5 minutes.
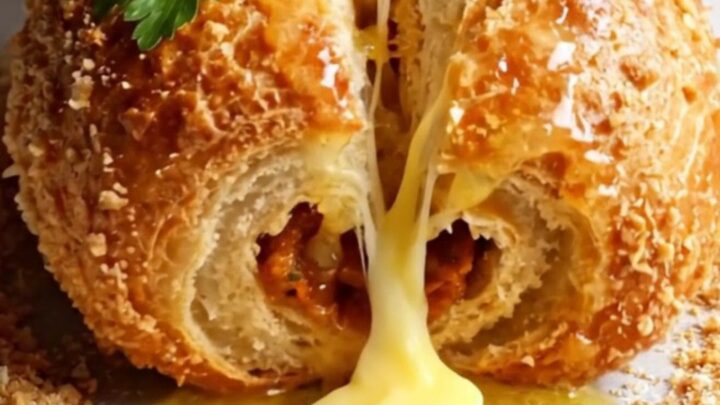
- Rest and ServeRemove from the oven and let the börek rest for 3 minutes on the baking sheet. This allows the cheese to set slightly and makes them easier to handle. Serve warm, snapping one in half to show the crispy crust and melted cheese.Look for The cheese should be melted and slightly stretchy when pulled apart.Tip Serve immediately for the crispiest texture; they soften as they cool.
After baking, the rolls should be deeply golden brown and crunchy. The crust should be firm and crackle when lightly pressed. The cheese should be melted and bubbly, but not leaking out excessively. The rolls should have puffed slightly and the breadcrumbs should look toasted. After resting for 3 minutes, they should hold their shape and be easy to handle. The aroma should be rich, buttery, and savory.
Common mistakes
One common mistake is overfilling the yufka, which makes rolling difficult and causes filling to leak during baking. Keep the filling to about 2 tablespoons per roll. Another issue is not sealing the edges properly; use a dab of water to secure the tip and press firmly.
Skipping the egg wash or using too little breadcrumbs results in a pale, soft crust. Ensure each roll is fully coated. Also, avoid overcrowding the baking sheet, as rolls need space for heat to circulate and crisp evenly. Finally, don’t underbake; the rolls should be deeply golden, not just lightly browned.
How to tell it’s done
The paçanga börek are done when they are deeply golden brown and crunchy on all sides. The crust should feel firm and sound hollow when tapped. To ensure the egg coating is fully cooked, insert an instant-read thermometer into the thickest part of a roll; it should read 160°F (71°C).
The cheese inside should be completely melted and hot, but allow the rolls to rest for 3 minutes before serving so the cheese sets slightly and doesn’t burn your mouth. If the rolls look dark but the center isn’t hot, lower the oven temperature and bake a few minutes longer.
- Egg dishes: 160°F (71°C) in the thickest part
Up next · Part 3 of 3
4 variations · storage & make-ahead · 5 answers · printable card
Tips, FAQ & printable recipe (Part 3)← Back to the ingredients (Part 1)