Appetizers · Part 2 of 3: Instructions
Cacio e Pepe Focaccia with Toasted Black Pepper Step-by-step instructions
- Prep
- Cook
- Total
- Serves
- 8
Before you start
Before starting, measure all ingredients and bring the water to 110°F (43°C) if using active dry yeast. Toast and grind the peppercorns, and grate the Pecorino Romano.
Have a 9x13-inch baking pan ready and a baking stone or cast-iron skillet if available.
The dough requires about 90 minutes of rising time, so plan accordingly. No special equipment is needed beyond a stand mixer or a strong arm for kneading.
Ingredients at a glance (8)
- 4 cups all-purpose flour
- 1 1/2 cups warm water (110°F/43°C)
- 2 1/4 tsp active dry yeast
- 1 tsp honey
- 2 tsp kosher salt
- 1/4 cup extra-virgin olive oil, plus more for the pan
- 2 tbsp Tellicherry black peppercorns, toasted and coarsely ground
- 1 1/2 cups freshly grated Pecorino Romano, divided
Instructions
Mix and Rise
- Toast the pepper and mix the doughIn a dry skillet over medium heat, toast the Tellicherry peppercorns until fragrant, about 2 minutes, shaking the pan frequently. Transfer to a bowl and let cool, then coarsely grind in a spice grinder or with a mortar and pestle. In the bowl of a stand mixer, combine the warm water, yeast, and honey. Let stand until foamy, about 5 minutes. Add the flour, kosher salt, 2 tablespoons of the olive oil, and half of the ground pepper.Look for The dough pulls away from the bowl and feels smooth, not tacky.Tip Toast the pepper in a dry pan until it smells nutty, not burnt.
- Fold in the pepper and pecorinoWith the mixer running on low, gradually add the remaining ground pepper and 1 cup of the grated Pecorino Romano. Mix just until incorporated, about 1 minute. The dough will become speckled with black pepper and cheese. Turn the dough out onto a lightly floured surface and knead a few times by hand to ensure even distribution.Look for The dough is evenly flecked with pepper and cheese bits.Tip Do not overmix after adding the cheese; it can make the dough tough.
- First risePlace the dough in a lightly oiled bowl, turning to coat. Cover with plastic wrap or a damp kitchen towel and let rise in a warm spot until doubled in size, about 1 hour. The dough should be puffy and airy.Look for The dough has doubled and springs back slowly when poked.Tip A warm oven (turned off) with the light on is a great proofing spot.
At the end of this phase, the dough should be smooth, elastic, and doubled in size after the first rise. It should feel airy and spring back when poked, and the pepper and cheese should be evenly distributed throughout.
Shape and Bake
- Shape and second riseGenerously oil a 9x13-inch baking pan with the remaining olive oil. Transfer the dough to the pan and gently stretch it to fit, using your fingertips to dimple the surface. If the dough resists, let it rest for 10 minutes before stretching again. Cover with plastic wrap and let rise until puffy and nearly doubled, about 30 minutes.Look for The dough fills the pan and looks pillowy.Tip Dimple deeply so the oil pools in the pockets for a crisp bottom.
- Top with remaining pecorinoPreheat the oven to 460°F (238°C). If using a baking stone or cast-iron skillet, place it in the oven while it heats. Just before baking, sprinkle the remaining 1/2 cup of grated Pecorino Romano evenly over the surface of the dough, pressing lightly so it adheres.Look for The top is fully covered with a thin layer of cheese.Tip Use a microplane for a fine grate that melts into a lacy crust.
- Bake until golden and blisteredPlace the pan on the hot stone or directly on the oven rack. Bake for 20 to 25 minutes, rotating halfway, until the crust is deep golden brown and the cheese is bubbling and blistered in spots. The internal temperature of the bread should reach about 200°F (93°C) if measured with an instant-read thermometer.Look for The top is crackled with brown blisters and the edges are crisp.Tip Do not open the oven too often; steam helps the crust puff.
The shaped dough should be puffy and nearly doubled in the pan. After baking, the top should be golden brown with bubbling cheese blisters, and the bread should sound hollow when tapped on the bottom.
Cool and Serve
- Cool and restRemove the focaccia from the oven and let it cool in the pan for 5 minutes. Then transfer to a wire rack and let cool for at least 10 more minutes. This allows the cheese crust to set and the interior to steam slightly, making it easier to slice without crushing.Look for The crust is crisp and the bread feels light when lifted.Tip Cooling briefly keeps the cheese from pulling off when cut.
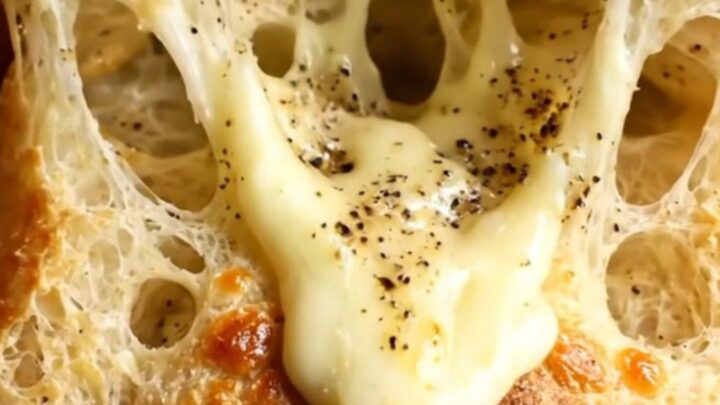
- Tear and serveTear or slice the focaccia while still warm. Pull apart a piece to reveal the honeycomb crumb and the lacy cheese crust. Serve warm or at room temperature. The toasted pepper flavor is strongest when fresh.Look for The interior shows airy pockets and a glossy, cheesy crumb.Tip Warm focaccia is best; reheat leftovers in a 350°F oven for 5 minutes.
The focaccia should be cool enough to handle but still warm inside. The crust should be crisp and crackling, and the interior should show airy honeycomb pockets with a moist, tender crumb.
Common mistakes
A common mistake is not toasting the pepper enough; it should smell fragrant but not burn, as burnt pepper becomes bitter. Another is over-flouring the dough, which yields a dense, heavy bread.
Use a light touch when shaping and stretching. Also, be careful not to overmix after adding the cheese, which can develop gluten too much and make the focaccia tough.
How to tell it’s done
The focaccia is done when the top is deep golden brown with darker blisters of melted cheese, and the edges have pulled away from the pan slightly.
The internal temperature should read about 200°F (93°C) on an instant-read thermometer. If the top browns too quickly but the center is not cooked, cover loosely with foil and continue baking for a few more minutes.
Up next · Part 3 of 3
4 variations · storage & make-ahead · 5 answers · printable card
Tips, FAQ & printable recipe (Part 3)← Back to the ingredients (Part 1)