Appetizers · Part 2 of 3: Instructions
Crispy Brown Butter Sage and Garlic Focaccia Step-by-step instructions
- Prep
- Cook
- Total
- Serves
- 8
Before you start
Before beginning, ensure the focaccia dough has been proofed according to standard bread-making procedures until it has doubled in size and looks airy. Have the garlic cloves peeled and ready, and ensure the fresh sage leaves are washed and patted dry to prevent splattering in the hot butter.
Preheat the oven to 450°F (232°C) well in advance to ensure the temperature is stable. Prepare a clean workspace and have all toppings measured and accessible for assembly.
Ingredients at a glance (6)
- 6 tbsp unsalted butter
- 12 fresh sage leaves
- 15 peeled garlic cloves
- 1 lb high-hydration focaccia dough, proofed
- flaky sea salt, for serving
- 3 oz prosciutto ribbons
Instructions
Infusing the brown butter
- Prepare the brown butter toppingPlace the unsalted butter in a skillet over medium heat. Add the fresh sage leaves and peeled garlic cloves. Cook for 5 minutes, stirring occasionally, until the butter is foaming and turns a rich golden-brown color with a nutty aroma.Look for The butter smells nutty and the garlic is softened.Tip Watch the butter closely so it does not burn once it starts to brown.
The butter should be a deep amber color, smelling intensely nutty and fragrant. The sage leaves will have crisped up, and the garlic cloves should feel soft when pressed with a spoon.
Ensure the mixture is not dark brown or blackened, as this indicates the butter has moved past the nutty stage into a burnt flavor profile. Once the color is consistent, remove the skillet from the heat immediately to prevent overcooking.
Dimpling and seasoning
- Dimple and top the doughTransfer the proofed high-hydration focaccia dough into a baking pan. Use your fingers to press deep dimples all over the surface of the dough. Pour the sage brown butter, garlic cloves, and sage leaves evenly over the dimpled surface.Look for The dough is covered in deep indentations filled with butter.Tip Press firmly to ensure the butter pools in the dimples.
The dough should be dimpled thoroughly, with the butter and aromatics evenly distributed across the entire surface. Ensure the butter mixture has settled into the deep indentations created by your fingers. The dough should look textured and rustic, with the garlic and sage visible in the wells. If the dough seems to spring back too quickly, allow it to rest for a few more minutes before finishing the dimpling process.
Baking to perfection
- Bake and finishTop the dough with flaky sea salt and arrange the prosciutto ribbons on top. Bake in a preheated oven at 450°F (232°C) for 20 minutes until the crust is golden and shattering. Remove from the oven and serve warm.Look for The crust is deep golden and the prosciutto is crispy.Tip Let the bread cool slightly before slicing to maintain the texture.
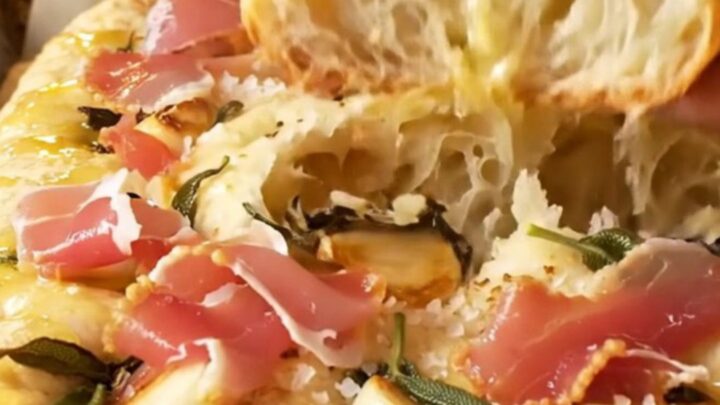
The finished focaccia should be golden-brown all over, with a crisp, shattering crust that contrasts with the soft interior. The prosciutto should be perfectly crispy, and the garlic cloves should be caramelized. The bread should be aromatic, with the scent of browned butter and toasted sage filling the kitchen. If the top browns too quickly, tent it lightly with foil for the final few minutes of the baking time.
Common mistakes
Avoid burning the butter; once the milk solids turn golden, remove the pan from the heat immediately, as the residual heat will continue the browning process. Do not rush the dimpling step; take the time to press firmly to create deep wells, which are essential for holding the butter and garlic.
Finally, ensure the oven is fully preheated to 450°F before adding the bread, as a lower temperature will result in a dense, pale loaf instead of the desired airy, crispy result.
How to tell it’s done
The focaccia is done when the crust has developed a deep golden-brown color and feels firm and crisp to the touch. When tapped, the crust should sound hollow, indicating a well-developed, airy structure.
The prosciutto ribbons should be browned and crispy, and the garlic cloves should be tender and golden. Use a thermometer to check that the internal temperature of the bread has reached 200°F (93°C) for a fully cooked crumb.
Up next · Part 3 of 3
2 variations · storage & make-ahead · 3 answers · printable card
Tips, FAQ & printable recipe (Part 3)← Back to the ingredients (Part 1)