Appetizers · Part 2 of 3: Instructions
Crispy Bacon-Wrapped Stuffed Onion Bombs Step-by-step instructions
- Prep
- Cook
- Total
- Serves
- 5
Before you start
Before beginning, ensure all ingredients are at room temperature to promote even cooking. Thoroughly clean the work surface and prepare the baking sheet by lining it with foil. Have a meat thermometer ready to check the internal temperature of the beef, as this is critical for food safety.
Pre-portioning the cheese and prepping the onion shells ahead of time will make the assembly phase much smoother, allowing the focus to remain on wrapping the bacon tightly around each onion bomb to prevent unraveling in the oven.
Ingredients at a glance (4)
- 5 large yellow onions, peeled and halved
- 1 lb ground beef
- 1 cup cheddar cheese, shredded
- 10 slices bacon
Instructions
Onion Preparation
- Prepare the onion shellsCarefully peel the yellow onions and slice them in half. Remove the inner layers of the onions, keeping only the outer shells to form sturdy bowls for the filling. Set these aside while preparing the beef mixture.Look for The onion shells should be thick enough to hold the filling without breaking.Tip Slice off the root ends slightly to create a flat surface so the onion bombs sit upright.
The onion shells should be hollowed out carefully, leaving at least two outer layers to maintain structural integrity. The shells should sit flat on the cutting board without wobbling. Ensure the interiors are clean and dry, as excess moisture can prevent the beef from adhering properly during the assembly stage. Once the shells are ready, they should look like sturdy, empty bowls waiting to be filled with the seasoned ground beef and cheese mixture.
Assembly and Wrapping
- Fill and assembleIn a large mixing bowl, combine the ground beef with any preferred seasonings. Take a portion of the seasoned beef and press it into the bottom of an onion shell. Add a generous amount of shredded cheddar cheese, then top with more beef to seal the cheese inside. Repeat this for all onion shells.Look for Ensure the beef is packed tightly to prevent the cheese from leaking during the cooking process.Tip Keep the cheese centered so it is fully encased by the ground beef.
- Wrap with baconTake the stuffed onion spheres and wrap two strips of bacon tightly around each one, overlapping the slices to ensure full coverage. Secure the ends of the bacon if necessary, though the fat will shrink and help hold the shape during roasting.Look for The bacon should wrap snugly around the entire surface of the onion bomb.Tip Use thick-cut bacon for better structural integrity during the long roasting time.
The assembled onion bombs should be tightly packed spheres with no visible gaps. The bacon should be wrapped in an overlapping pattern, covering the entire surface of the beef. If the bacon strips are too short, use toothpicks to secure them, ensuring they stay in place during the roasting phase. At this point, the bombs should feel heavy and solid, indicating that they are properly stuffed and ready for the oven without any risk of falling apart.
Roasting
- Roast to perfectionPlace the bacon-wrapped onion bombs on a foil-lined baking sheet. Preheat the oven to 400 degrees Fahrenheit. Bake for approximately 35 to 40 minutes, or until the bacon is crispy and the internal temperature of the ground beef reaches 160 degrees Fahrenheit (71 degrees Celsius). Remove from the oven and let rest for 5 minutes before serving.Look for The bacon should appear charred and crispy, and the cheese should be fully melted and bubbling.Safe temperature 160°F (71°C) internal temperature (ground meat)Tip Use a meat thermometer to ensure the beef is cooked through safely.
During roasting, the kitchen will fill with the aroma of caramelized onions and crisping bacon. The bombs should be positioned with enough space between them on the baking sheet to allow heat to circulate evenly.
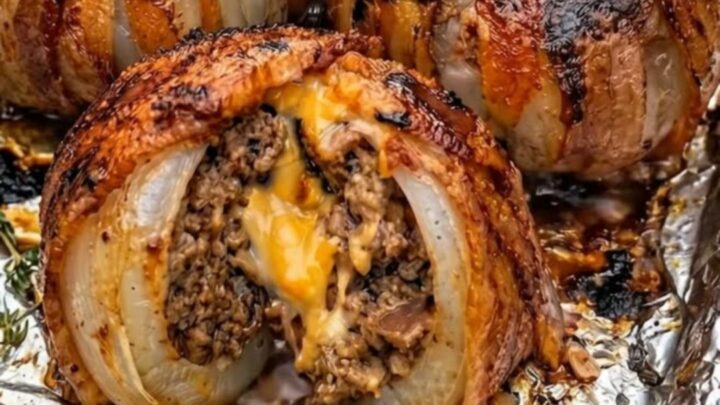
By the end of this phase, the bacon should be golden-brown and crispy, and the onions should have softened significantly. Check the internal temperature of the beef at the center of the largest bomb to ensure it has reached the safe temperature of 160 degrees Fahrenheit.
Common mistakes
A common error is overstuffing the onion shells, which can cause them to burst or leak cheese during the baking process. Ensure there is enough space left at the top of the onion to seal the beef properly.
Another mistake is using thin-cut bacon that may burn before the beef is fully cooked; opt for standard or thick-cut bacon for better results. Additionally, failing to secure the bacon strips properly can lead to them falling off, so ensure they are wrapped snugly around the entire structure.
How to tell it’s done
The onion bombs are ready when the bacon is deeply browned and crispy to the touch. The internal temperature of the ground beef must reach at least 160 degrees Fahrenheit (71 degrees Celsius) to be considered safe.
When sliced, the cheese should be completely molten and oozing from the center, while the onion layers should be tender enough to cut through easily with a fork. Always allow the bombs to rest for 5 minutes after removing them from the oven to let the juices redistribute.
- Ground meat: 160°F (71°C) in the thickest part
Up next · Part 3 of 3
2 variations · storage & make-ahead · 3 answers · printable card
Tips, FAQ & printable recipe (Part 3)← Back to the ingredients (Part 1)