Dinner · Part 2 of 3: Instructions
Creamy Swiss Mushroom Turkey Breast Crockpot Dinner Step-by-step instructions
- Prep
- Cook
- Total
- Serves
- 4
Before you start
Before you start, pat the turkey cutlets dry and season them lightly with salt and pepper if you like (the soup and cheese add plenty of flavor). Slice the mushrooms if they aren’t pre-sliced.
Have the condensed soup, sour cream, and shredded Swiss cheese measured and ready. No need to preheat the slow cooker—just place the ingredients in the crock as directed. This recipe is truly dump-and-go, so the prep is minimal and the payoff is a creamy, satisfying dinner.
Ingredients at a glance (5)
- 1 1/2 lb boneless skinless turkey breast cutlets
- 8 oz cremini mushrooms, sliced
- 1 can (10.5 oz) condensed cream of mushroom soup
- 1/2 cup sour cream
- 1 1/2 cups shredded Swiss cheese
Instructions
Layer and Top
- Layer the Turkey and MushroomsPlace the turkey breast cutlets in the bottom of the slow cooker in a single layer, overlapping slightly if needed. Scatter the sliced cremini mushrooms evenly over the turkey.Look for The turkey covers the bottom, and the mushrooms form a rustic layer on top.Tip If the cutlets are very thick, pound them to an even thickness for more uniform cooking.
- Add the Cream of Mushroom SoupSpoon the condensed cream of mushroom soup over the turkey and mushrooms, spreading it gently to cover most of the surface. No need to stir—the slow cooker will do the work.Look for The soup forms a thick, pale blanket over the mushrooms.Tip Use a spatula to scrape every bit of soup from the can.
After layering the turkey, mushrooms, and soup, the slow cooker should look like a neat stack of ingredients—turkey on the bottom, mushrooms scattered, and a thick layer of soup covering most of it.
The sour cream and Swiss cheese sit on top, creating a white and golden patchwork. It will look dry at first, but the slow cooker will turn it into a luscious sauce. Before moving on, make sure the turkey is in a single layer for even cooking.
Slow Cook
- Top with Sour Cream and Swiss CheeseDollop the sour cream over the soup layer, then scatter the shredded Swiss cheese evenly over the top. The cheese will melt into the sauce as it cooks.Look for The sour cream creates white pockets, and the cheese covers everything in a golden blanket.Tip For a smoother sauce, let the sour cream come to room temperature before adding (but keep it refrigerated until then).
- Cook on Low Until TenderCover the slow cooker and cook on low for 4 to 5 hours, until the turkey is fork-tender and reaches an internal temperature of 165°F (74°C). Avoid lifting the lid during cooking to keep the heat steady.Look for The sauce will be bubbling gently around the edges, and the kitchen will smell rich and savory.Safe temperature 165°F (74°C) internal temperature (poultry)Tip Check the turkey at the 4-hour mark—cooking times vary with the size of the cutlets and the slow cooker.
As the turkey cooks, the sauce will become bubbly and aromatic, with a rich, earthy scent filling the kitchen. The cheese will melt into the sauce, and the sour cream will blend in, creating a creamy, golden liquid.
The turkey will shrink slightly and become tender. At the 4-hour mark, check the temperature—it should be at least 165°F (74°C). The sauce should be smooth, not curdled, and the mushrooms will have softened.
Shred and Serve
- Shred the Turkey in the SauceOnce the turkey is cooked through, use two forks to shred the meat directly in the slow cooker. Stir the shredded turkey into the sauce so every piece is coated.Look for The turkey pulls apart easily and the sauce is smooth and creamy.Tip If the sauce seems thin, let it cook uncovered for 10-15 minutes to thicken.
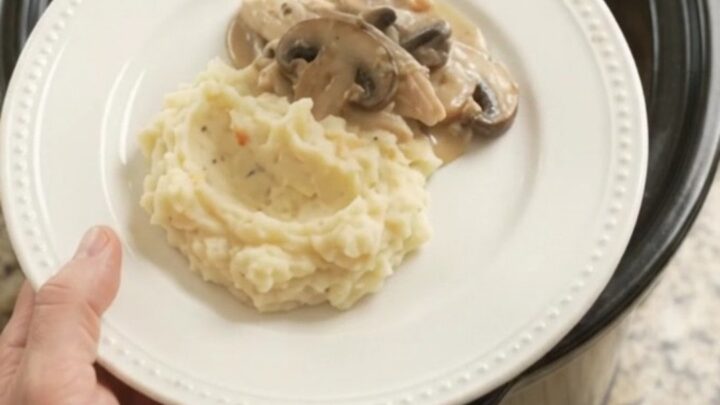
- Serve Over Mashed PotatoesSpoon the creamy turkey and mushroom mixture over warm mashed potatoes or your favorite side. Serve hot, with extra sauce spooned over the top.Look for The rich sauce pools around the potatoes, and the turkey is moist and tender.Tip For a complete meal, add a side of steamed green beans or a simple green salad.
Once the turkey is cooked, shredding it directly in the pot will reveal tender, juicy strands that easily pull apart. The sauce should coat the shreds, and the whole mixture should look creamy and cohesive. Stir gently to combine, but avoid over-mixing. The final dish should be spoonable, with the sauce clinging to the turkey and mushrooms. Serve it immediately over mashed potatoes or your favorite side.
Common mistakes
A common mistake is lifting the lid too often to check on the turkey—this releases heat and extends cooking time. Trust the recipe and wait until the minimum time. Another pitfall is using low-fat sour cream, which can curdle and make the sauce grainy.
Stick with full-fat. Also, if the turkey cutlets are very thick, they may need a bit longer; always check temperature rather than time. Finally, don’t skip shredding the meat—it allows the sauce to coat every piece.
How to tell it’s done
The turkey is done when it reaches an internal temperature of 165°F (74°C) in the thickest part. At that point, the meat should shred easily with two forks and show no pink in the center. The sauce should be hot, bubbly, and slightly thickened—if it looks too thin, let it cook uncovered for 10-15 minutes. The cheese should be fully melted and incorporated into the sauce, creating a smooth, glossy texture.
- Poultry: 165°F (74°C) in the thickest part
Up next · Part 3 of 3
4 variations · storage & make-ahead · 5 answers · printable card
Tips, FAQ & printable recipe (Part 3)← Back to the ingredients (Part 1)