Dinner · Part 2 of 3: Instructions
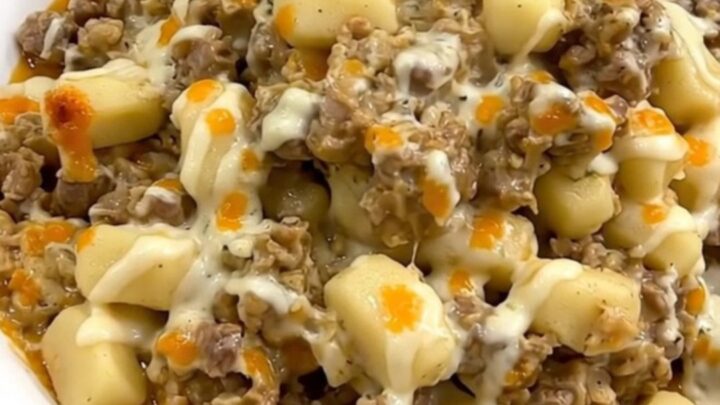
Creamy Slow Cooker Beef and Gnocchi Casserole Step-by-step instructions
- Prep
- Cook
- Total
- Serves
- 4
Before you start
Before you begin, ensure your slow cooker is clean and placed on a flat, heat-resistant surface. Keep your ingredients within reach so you can layer them quickly. Since the process requires no sautéing, you can assemble the entire dish in minutes.
Verify that your slow cooker is plugged in and ready for operation. Having your ingredients prepared and measured beforehand ensures a smooth assembly process, allowing you to focus on the simple act of layering the components to achieve the best results for your dinner.
Ingredients at a glance (4)
- 1 lb ground beef
- 16 oz potato gnocchi, uncooked
- 1 packet all-purpose seasoning
- 16 oz alfredo sauce
Instructions
Layering the base
- Layering the ingredientsPlace the raw ground beef into the bottom of the slow cooker, crumbling it into smaller pieces as you add it. Scatter the uncooked potato gnocchi evenly over the top of the beef layer.Look for ensure the beef is spread across the bottomTip crumbing the beef helps it cook more evenly in the slow cooker
At this stage, the beef is raw and at the bottom, and the gnocchi are distributed on top.
Ensure the ingredients are not packed down too tightly, as this allows for better heat circulation throughout the slow cooker, which is crucial for the beef to cook evenly and for the gnocchi to steam properly during the initial phase of the cooking process.
Adding flavor and sauce
- Seasoning and saucingSprinkle the entire seasoning packet over the gnocchi layer. Pour the jar of Alfredo sauce over the top, ensuring it covers the gnocchi and beef thoroughly to provide moisture.Look for the sauce should cover the majority of the dry ingredientsTip do not stir the ingredients before starting the cooking process
The seasoning is distributed and the Alfredo sauce is poured over the top. At this point, the slow cooker should look like a layered structure of meat, pasta, and sauce. Check that the sauce has covered most of the gnocchi to prevent them from drying out during the long cooking time, as this moisture is essential for the final creamy result.
Cooking and finishing
- Cooking and finishingCover the slow cooker and cook on low for 4 hours. Once the time is up, stir the mixture gently to combine the sauce, beef, and softened gnocchi. Verify the beef has reached an internal temperature of 160°F (71°C) before serving.Look for the sauce is hot and bubbling and the beef is fully brownedSafe temperature 160°F (71°C) internal temperature (ground meat)Tip let the dish rest for 5 minutes to allow the sauce to thicken slightly
The dish has finished its four-hour cook time. The mixture should be steaming, the beef browned, and the sauce thickened. A quick stir will combine everything into a uniform, creamy consistency. Check the temperature of the beef to ensure it is at 160°F (71°C) before you proceed to serve the dish to your guests or family members.
Common mistakes
Avoid the temptation to stir the ingredients before the cooking process is complete, as this can break up the gnocchi or lead to uneven cooking of the meat. Additionally, ensure you do not overcook the dish, as this can cause the gnocchi to become overly soft or the sauce to separate.
Finally, verify that your slow cooker is not overloaded, as proper airflow is necessary for consistent heat distribution, which is key to achieving the desired creamy texture for this casserole.
How to tell it’s done
The dish is done when the ground beef has reached an internal temperature of 160°F (71°C) and the gnocchi are tender but still hold their shape. The Alfredo sauce should be thickened and clinging to the beef and gnocchi, rather than watery.
If you notice the sauce is too thin, stir the mixture and let it sit for a few minutes; the starch from the gnocchi will help naturally thicken the sauce as it cools slightly, creating a perfect, creamy consistency for serving.
- Ground meat: 160°F (71°C) in the thickest part
Up next · Part 3 of 3
2 variations · storage & make-ahead · 3 answers · printable card
Tips, FAQ & printable recipe (Part 3)← Back to the ingredients (Part 1)