Dinner · Part 2 of 3: Instructions
Creamy Shrimp Enchiladas with White Sauce in One Baking Dish Step-by-step instructions
- Prep
- Cook
- Total
- Serves
- 6
Before you start
Thaw the shrimp in the refrigerator if frozen, then peel and devein them and pat them thoroughly dry. Shred the cheese if it is not pre-shredded — about two cups. Mince the garlic and measure out the spices, broth, sour cream and cream so everything is within reach at the stove; the sauce comes together quickly and there is no time to hunt for jars mid-whisk.
Set out the saucepan, the large skillet, the whisk and the baking dish, and rub the dish with a thin film of oil or a spoonful of sauce. Preheat the oven to 375°F (190°C) near the end of assembly so it is ready when the dish is. Finally, warm the tortillas so they are pliable for rolling.
Ingredients at a glance (14)
- 1 lb large shrimp, peeled and deveined
- 8 flour tortillas (8-inch)
- 2 cups shredded Monterey Jack cheese, divided
- 3 tbsp unsalted butter
- 3 tbsp all-purpose flour
- 2 cups chicken broth
- 3 cloves garlic, minced
- 2 tsp chili powder
- 1 tsp ground cumin
- 1 cup sour cream
- 1/2 cup heavy cream
- 2 tbsp vegetable oil
- 1 tsp kosher salt, plus more to taste
- 1/2 tsp black pepper
Instructions
Make the cream sauce
- Build the rouxMelt the butter in a medium saucepan over medium heat. Whisk in the flour and cook for 2 minutes, stirring constantly, until it smells faintly nutty and turns a pale blond. This short cook keeps the flour raw taste out of the sauce without darkening it.Look for The mixture looks like wet sand and bubbles gently around the whisk.Tip Keep the roux moving; even a minute of stillness can scorch it and give the sauce brown flecks.
- Season the sauce baseWhisk in the garlic, chili powder, cumin, salt and pepper and cook for 30 seconds so the spices bloom in the butter. Pour in the broth slowly, whisking as it goes, and bring the sauce to a steady simmer. It should thicken enough to coat the back of a spoon.Look for Steam rises and the sauce ribbons off the whisk, not a thin stream.Tip Adding the broth in stages prevents lumps far better than whisking harder later.
- Finish with the creamTake the pan off the heat and whisk in the sour cream and heavy cream until the sauce is completely smooth and glossy. Taste and adjust the salt. Reserve about 1 cup of sauce for spooning over the baked enchiladas, and keep the rest for assembling.Look for The sauce turns ivory white, silky and pourable, with no streaks of sour cream left.Tip Off-heat is the key: over direct heat, sour cream can split and turn grainy.
At the end of this phase the sauce should be smooth, ivory white and pourable — it ribbons off the whisk and coats a spoon. There should be no lumps, no brown specks, and no visible streaks of sour cream. Taste it: the seasoning should read slightly bold, since the tortillas and shrimp will mellow it. Reserve one cup for serving and set the rest aside for assembling. If it has thickened while sitting, loosen it with a splash of broth before moving on.
Sear, fill and roll
- Season and sear the shrimpPat the shrimp dry with paper towels, then season lightly with salt and pepper. Heat the oil in a large skillet over medium-high heat and add the shrimp in a single layer. Cook for about 1 minute per side, just until the shells turn opaque at the edges; they will finish in the oven.Look for The shrimp blush pink on the outside but are still slightly translucent at the center.Tip Dry shrimp sear; wet shrimp steam and release water that can loosen the sauce.
- Soften the tortillasWarm the tortillas briefly in a dry skillet or wrapped in a damp towel in the microwave, about 20 seconds, until pliable. Lightly coat the bottom of the baking dish with a thin layer of the cream sauce so nothing sticks.Look for Each tortilla bends easily without cracking or springing back.Tip Warming ten seconds too long dries tortillas out; pull them while they are still flexible.
- Fill and rollSpoon a little sauce down the center of each tortilla, add a few shrimp and a generous pinch of cheese, then roll each one snugly and place it seam-side down in the dish. Pack them side by side so they hold their shape while baking.Look for Eight snug rolls fill the dish edge to edge with no big gaps.Tip Keep the filling away from the edges of each tortilla so the rolls seal cleanly.
- Top and get ready to bakePour the remaining sauce evenly over the rolled enchiladas so every surface is covered, then scatter the rest of the cheese over the top. Heat the oven to 375°F (190°C) while the dish sits at room temperature for no more than 30 minutes.Look for No dry tortilla peeks through; the sauce blankets everything.Tip Covering the tortillas fully with sauce keeps the exposed edges from turning crisp and hard.
The shrimp should blush pink on the outside with a slightly translucent center — they finish in the oven, so do not cook them through now. Every tortilla should roll without cracking, each one filled with sauce, shrimp and cheese and set seam-side down, packed snugly in the sauced dish.
The remaining sauce should blanket the rolls completely with no dry tortilla showing, and the last of the cheese should scatter evenly over the top. The oven should read 375°F (190°C) before the dish goes in.
Bake, rest and serve
- Bake until bubblingBake for 20 to 25 minutes, until the sauce bubbles at the edges of the dish and the cheese on top is fully melted and golden in spots. The shrimp inside must reach an internal temperature of 145°F (63°C); check the thickest piece with an instant-read thermometer.Look for Bubbles break slowly at the edges and the cheese takes on light golden patches.Safe temperature 145°F (63°C) internal temperature (shellfish)Tip If the cheese colors too fast, tent the dish loosely with foil for the last minutes.
- Rest, sauce and serveLet the dish rest for 5 minutes so the sauce settles and the rolls hold together when cut. Rewarm the reserved cup of sauce gently if it has thickened, spoon it over each portion, and lift one out with a metal spatula to serve while the cheese still pulls.Look for A portion lifts cleanly, the cheese stretches, and steam rises from the cut.Tip The short rest matters: cut too soon and the rolls slump apart on the plate.
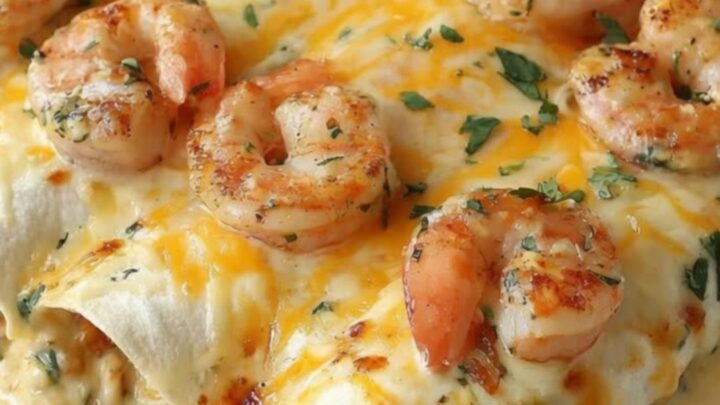
Out of the oven, the sauce should bubble at the edges, the cheese should be melted and golden in places, and the thickest shrimp should register 145°F (63°C) on an instant-read thermometer. After the five-minute rest, a portion lifted with a metal spatula holds together, the cheese stretches, and steam rises from the cut. Spoon over the reserved warm sauce if the rolls look dry, and bring the dish to the table while the cheese is still pulling.
Common mistakes
The most common slip is overcooking the shrimp in the skillet. They need only about a minute per side; anything more and they turn tight and rubbery once baked. The second is adding the sour cream over direct heat, which can grainy up the sauce — always take the pan off the burner first. Cold broth poured in all at once lumps a roux; add it gradually and keep whisking.
Skipping the tortilla-warming step leads to cracked rolls. And leaving exposed tortilla edges uncovered by sauce gives hard, crisp corners. Cover the rolls completely, check the shrimp temperature before serving, and resist cutting into the dish straight from the oven — the five-minute rest keeps each portion intact.
How to tell it’s done
The enchiladas are done when three things line up. First, the sauce bubbles steadily at the edges of the dish — slow, thick bubbles, not a simmer at the surface only. Second, the cheese on top is fully melted with light golden patches; it should look glossy, not dried out.
Third, and most important, the shrimp must reach an internal temperature of 145°F (63°C) — insert an instant-read thermometer into the thickest piece in the center of the dish. The shrimp should look opaque throughout, firm but still plump. If the sauce has not bubbled but the temperature is reached, give it a few more minutes; if the cheese browns too fast, tent with foil.
- Shellfish: 145°F (63°C) in the thickest part
Up next · Part 3 of 3
4 variations · storage & make-ahead · 5 answers · printable card
Tips, FAQ & printable recipe (Part 3)← Back to the ingredients (Part 1)