Desserts · Part 2 of 3: Instructions
Creamy Pumpkin Pie Fudge Squares Step-by-step instructions
- Prep
- Cook
- Total
- Serves
- 12
Before you start
Ensure all ingredients are measured and ready before starting. Line your baking sheet completely with parchment paper, leaving an overhang on the sides to make lifting the finished fudge easier.
Have your white chocolate melted and kept warm in a small bowl, and keep your spice mixture prepared in a small ramekin for easy sprinkling. Clear ample space in your kitchen so the baking sheet can sit perfectly flat while you decorate, preventing any uneven surfaces or spills during the process.
Ingredients at a glance (3)
- 1 lb pumpkin fudge base, prepared
- 2 oz white chocolate, melted
- 1 tsp pumpkin pie spice
Instructions
Arranging the Base
- Arrange the FudgeLine a baking sheet with parchment paper. Arrange the pumpkin fudge squares in neat rows on the prepared sheet, ensuring they are evenly spaced for the drizzle.Look for The squares should be uniform and sit flat on the parchment.Tip Use a steady hand to nestle the squares into place.
The squares should be arranged in neat, orderly rows on the parchment-lined sheet. Each square should be distinct and stable, providing a flat surface for the subsequent drizzle. Check that the spacing is consistent between rows to allow for an even application of the white chocolate, ensuring that the final presentation is uniform and visually appealing before you proceed to the next step.
Drizzling the Chocolate
- Drizzle with ChocolateUsing a spoon, drizzle the melted white chocolate in thin, consistent lines across every square. Ensure the chocolate covers the surface evenly for a professional finish.Look for The chocolate should flow in a smooth, thin stream.Tip Move the spoon quickly across the rows to create clean lines.
The white chocolate should be applied in thin, elegant lines that span across the rows of fudge. The lines should be continuous and smooth, without any large pools of chocolate. Check that the drizzle is centered on each square to maintain a balanced look. The chocolate should begin to lose its glossy sheen as it cools, indicating that it is setting correctly on the surface of the pumpkin fudge.
Finishing with Spice
- Dust with SpiceImmediately sprinkle the pumpkin pie spice from a ramekin over the white chocolate drizzle while it is still wet. Allow the squares to set completely before serving.Look for The spice should lightly coat the chocolate drizzle.Tip Use a small pinch to ensure an even distribution of spice.
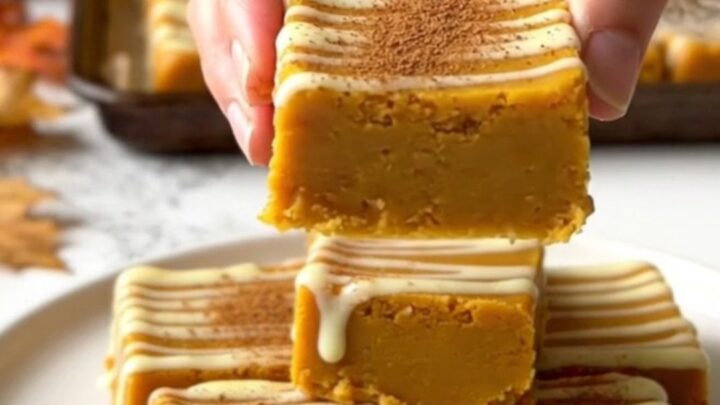
The final dusting of pumpkin pie spice should be light and even, covering the chocolate drizzle without overwhelming the squares. The spice should be visible against the white chocolate, creating a beautiful, textured appearance.
When you lift a square, it should feel firm and hold its shape perfectly, confirming that the base and the toppings are well-integrated and ready to be served to your guests.
Common mistakes
A common mistake is applying the white chocolate while it is too hot, which can cause it to run and lose its defined shape. Allow the melted chocolate to cool slightly until it reaches a thick, pourable consistency.
Another error is waiting too long to add the pumpkin pie spice; if the chocolate sets completely before you sprinkle the spice, it will not adhere to the surface. Additionally, failing to line the pan with parchment paper makes removal difficult, so ensure the paper is secure.
How to tell it’s done
The fudge is done when the white chocolate drizzle has fully hardened and is no longer tacky to the touch. When you press the surface lightly, the chocolate should offer a slight snap rather than leaving an indentation.
The squares should hold their shape perfectly when lifted, providing a clean, crisp edge. The spice should be evenly distributed and appear slightly embedded in the chocolate, indicating that it was applied at the correct moment during the setting process.
Up next · Part 3 of 3
2 variations · storage & make-ahead · 3 answers · printable card
Tips, FAQ & printable recipe (Part 3)← Back to the ingredients (Part 1)