Dinner · Part 2 of 3: Instructions
Creamy No-Boil Cheesy Broccoli Pasta Bake Step-by-step instructions
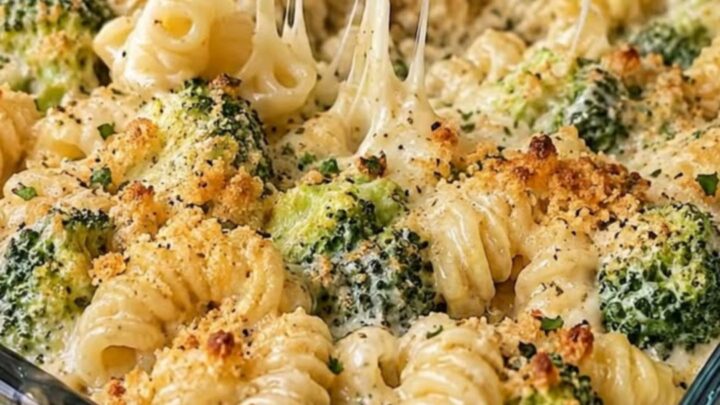
- Prep
- Cook
- Total
- Serves
- 4
Before you start
Before beginning, preheat your oven to 375°F (190°C) to ensure it reaches the target temperature. Ensure your glass baking dish is clean and dry. Chop the broccoli into uniform, bite-sized florets so they cook at the same rate as the pasta.
Have all your ingredients measured and ready to go, especially the cheese sauce, as this will help keep the assembly process efficient and organized. Preparing your workspace in advance allows for a smooth transition from assembly to the oven.
Ingredients at a glance (4)
- 1 lb rotini pasta, uncooked
- 4 cups fresh broccoli florets
- 3 cups prepared cheese sauce
- 1/2 cup panko breadcrumbs
Instructions
Assembly Phase
- Prepare the BasePreheat your oven to 375°F (190°C). In a large glass baking dish, combine the uncooked rotini pasta and fresh broccoli florets, ensuring they are evenly distributed across the bottom of the dish.Look for Evenly spread the pasta and broccoli.Tip Ensure the broccoli florets are cut into bite-sized pieces for even cooking.
At the end of this phase, the rotini and broccoli should be evenly distributed in the dish. There should be no dry pasta visible on the surface. Everything is ready to be combined with the sauce and covered for the initial long cook.
Steaming Phase
- Add Sauce and BakePour the cheese sauce over the dry pasta and broccoli mixture. Use a spatula to gently stir, ensuring every piece of pasta is coated. Cover the dish tightly with aluminum foil and place it in the oven for 30 minutes.Look for The sauce should fully submerge the pasta.Tip Tightly sealing with foil is crucial for steaming the pasta properly without boiling.
Once the timer goes off, the dish should be filled with steam when you carefully lift the foil. The pasta should be significantly softer and the sauce should have started to thicken and cling to the rotini.
Browning Phase
- Finish and BrownRemove the foil, sprinkle the breadcrumbs over the top, and return the dish to the oven uncovered for an additional 10 minutes until the top is golden brown and the cheese is bubbling.Look for The top should be golden and the sauce bubbling.Tip Watch closely during the final minutes to prevent the breadcrumbs from burning.
The final result is a beautiful, bubbling casserole with a crispy, golden-brown crust. The sauce should be thick and creamy, and the broccoli should be perfectly tender, indicating the dish is ready for service.
Common mistakes
A common error is using a dish that is too small, which can lead to uneven cooking and sauce overflowing. Ensure your 9x13-inch dish is deep enough to hold all ingredients comfortably.
Another mistake is failing to seal the foil completely; if steam escapes, the pasta may remain crunchy or undercooked.
Finally, avoid using breadcrumbs that are too large, as they may burn before the dish is fully heated through; stick to panko or fine crumbs for the best texture.
How to tell it’s done
The pasta bake is finished when the sauce is bubbling vigorously around the edges of the dish and the breadcrumb topping has achieved a deep golden-brown color. The pasta should be tender but still retain a slight bite, and the broccoli should be fork-tender.
Because this recipe relies on heat and moisture absorption, ensure the center of the dish is hot and the sauce has thickened significantly before removing it from the oven to serve.
Up next · Part 3 of 3
2 variations · storage & make-ahead · 3 answers · printable card
Tips, FAQ & printable recipe (Part 3)← Back to the ingredients (Part 1)