Desserts · Part 2 of 3: Instructions
Creamy No-Bake Coconut Cake for Easy Entertaining Step-by-step instructions
- Prep
- Cook
- Total
- Serves
- 8
Before you start
Before beginning, ensure all ingredients are measured and ready on the counter. Clear enough space in the refrigerator for the baking dish to sit level, which is critical for the setting process.
If the shredded coconut is clumped, break it apart with your fingers so it distributes evenly across the top.
Having a clean spatula and a whisk ready will make the assembly process seamless and efficient, preventing any unnecessary delays while working with the pudding mixture.
Ingredients at a glance (4)
- 24 pieces vanilla wafer cookies
- 3 cups vanilla pudding, prepared
- 1 1/2 cups heavy whipping cream
- 2 cups shredded coconut
Instructions
Base assembly
- Assemble the baseArrange a single layer of vanilla wafer cookies across the bottom of an 8-inch square glass baking dish. Ensure the wafers cover the entire surface, breaking a few cookies if necessary to fill any open gaps completely.Look for The dish bottom should be completely covered in a tight, uniform layer of cookies.Tip Use a sharp knife to trim the cookies to fit the corners perfectly for a cleaner look.
The base is complete when the bottom of the dish is fully lined with cookies. Check for any large gaps and adjust the cookie placement to ensure a solid foundation that will support the heavy pudding layer without leaking through to the bottom.
Pudding preparation
- Combine the fillingIn a large mixing bowl, gently fold together the prepared vanilla pudding and the heavy whipping cream until completely smooth and cohesive. The resulting mixture should be rich, velvety, and thick enough to spread evenly over the cookies.Look for The mixture should appear glossy, uniform, and light without any remaining streaks.Tip Keep the heavy whipping cream well chilled before folding to maintain a luscious body.
The pudding mixture is ready when it has reached a thick, glossy, and uniform consistency. It should be viscous enough to hold its shape on a spoon. Verify that there are no remaining streaks of unblended heavy cream in the bowl.
Final assembly
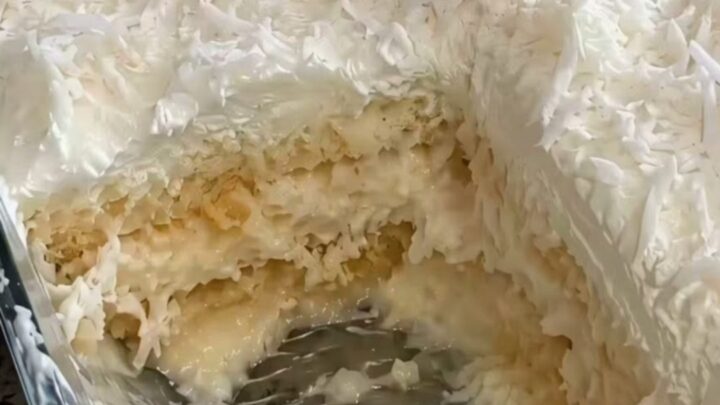
- Layer and garnishSpread the velvety cream and pudding mixture evenly over the wafer layer using a spatula. Generously dust the shredded coconut across the top until the surface is completely covered, then refrigerate the dish for at least two hours before slicing.Look for The top should display a dense, even blanket of shredded coconut without bare spots.Tip Chill the cake thoroughly so clean, defined squares can be scooped out easily.
The final assembly is finished when the pudding is spread evenly to the edges of the dish and the coconut is distributed uniformly across the top. The dish should look clean and tidy, ready for its long rest in the refrigerator.
Common mistakes
Avoid overmixing the pudding and cream filling, as excessive agitation can deflate the texture and make it runny. Ensure the cookies are placed tightly in the dish to form a stable base.
Do not rush the chilling period, as the dessert needs the full two hours to allow the wafers to absorb moisture and the pudding to firm up correctly. Finally, avoid pressing down heavily on the coconut topping to keep the surface light and airy.
How to tell it’s done
The cake is considered done when it has been refrigerated for at least two hours and the pudding layer feels firm to the touch. When slicing, the knife should glide through the layers with minimal resistance, and the pieces should hold their shape without collapsing.
There are no proteins involved, so no temperature monitoring is required. Simply look for a consistent, set texture throughout the entire dish before attempting to serve.
Up next · Part 3 of 3
2 variations · storage & make-ahead · 3 answers · printable card
Tips, FAQ & printable recipe (Part 3)← Back to the ingredients (Part 1)