Desserts · Part 3 of 3: Tips & recipe card
Creamy No-Bake Biscoff Icebox Cake Tips, FAQ & printable recipe

- Prep
- Cook
- Total
- Serves
- 9
Tips for success
For the cleanest slices, dip your knife in hot water and wipe it dry between each cut. This technique melts the cream slightly as you slice, ensuring the cookie layers don't tear. If you want a more decorative presentation, you can save a few cookies to crush and sprinkle over the top just before serving, providing a nice texture contrast to the creamy mousse.
If you find the cake is too sweet, you can balance the flavors by serving it with a side of unsweetened whipped cream or a few fresh berries, such as raspberries. The tartness of the fruit cuts through the richness of the cookie butter perfectly. Always keep the cake refrigerated until the very moment you are ready to plate it, as the mousse can soften quickly at room temperature.
Variations
- Chocolate Biscoff Cake: Add two tablespoons of high-quality unsweetened cocoa powder to the heavy cream before whipping it. This creates a rich chocolate mousse that pairs beautifully with the spiced cookies.
- Spiced Cinnamon Cake: Fold half a teaspoon of ground cinnamon into the cookie butter mousse for an extra punch of warmth. This variation is particularly popular during the cooler autumn and winter months.
Storage and make-ahead
- Fridge
- Store in the refrigerator for up to 3 days, covered tightly.
Store the cake in the refrigerator, covered tightly with plastic wrap or in an airtight container to prevent it from absorbing other flavors.
It will stay fresh for up to three days, though the texture of the cookies will continue to soften the longer it sits. For the best experience, consume the cake within the first two days of preparation, as the cookies may eventually lose too much structure.
This recipe is ideal for making ahead, as it requires a minimum of four hours to set and actually benefits from an overnight rest in the refrigerator. You can prepare it up to 24 hours in advance without any loss of quality.
The flavors have time to meld together, and the texture becomes perfectly uniform, making it a great stress-free option for hosting guests or preparing for a special weekend treat.
Serving ideas
To serve, remove the dish from the refrigerator and slice it into nine even squares using a sharp, warm knife. Lift each square carefully onto a dessert plate using a flat spatula.
The portion should hold its shape perfectly on the plate, showing off the beautiful, distinct layers of cookie and mousse. The contrast between the soft cookie and the velvety cream is the highlight of every bite.
Pair each serving with a cup of hot coffee or black tea, as the bitterness of the drink complements the sweetness of the cookie butter perfectly.
Because the cake is quite rich, smaller squares are often sufficient, though you can adjust the portion sizes based on your preference. Ensure you serve the cake immediately while it is still well-chilled to maintain the best structure and mouthfeel for your guests.
Frequently asked questions
Can this be made without a hand mixer?
Why does the cake need to be chilled for so long?
Is it possible to use a different size baking dish?
Creamy No-Bake Biscoff Icebox Cake
Ingredients
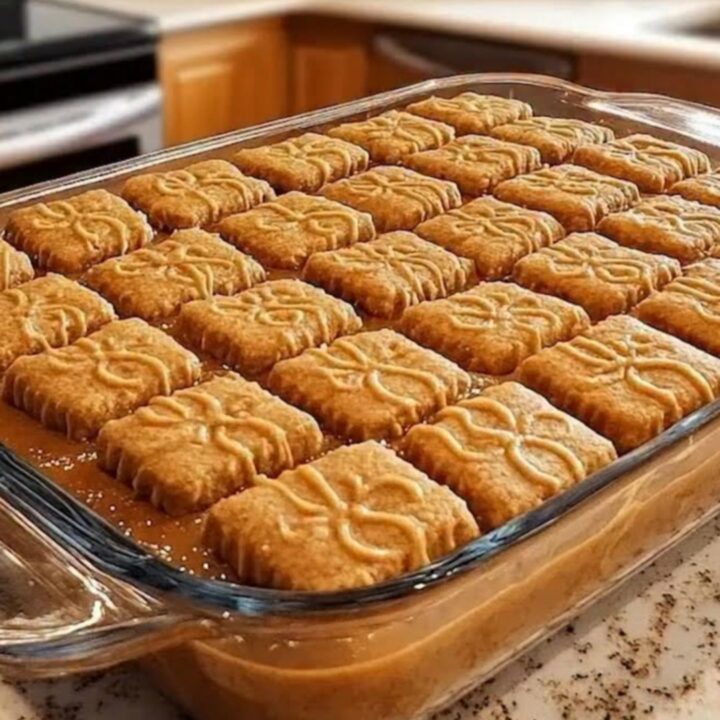
- 16 pieces speculoos cookies
- 1 cup cookie butter spread
- 2 cups heavy cream, chilled
Instructions
- In a large mixing bowl, beat the heavy cream using an electric mixer until stiff peaks form. Gently fold in the cookie butter spread until the mixture is smooth and fully combined, ensuring the mousse remains light and airy for the best texture.
- Place a single layer of speculoos cookies at the bottom of the 8-inch glass baking dish, trimming them if necessary to fit. Spread a portion of the cookie butter mousse evenly over the cookies. Repeat these layers until all ingredients are used, finishing with a neat layer of mousse on top.
- Place the assembled cake in the refrigerator for at least four hours, or preferably overnight, to allow the cookies to soften and the mousse to set. Once firm, slice into neat squares and serve immediately while chilled for the best consistency.
Estimated nutrition per serving
- Calories
- 420
- Protein
- 3.5 g
- Carbohydrates
- 32 g
- Fat
- 31 g
- Fiber
- 1 g
- Sugar
- 18 g
- Sodium
- 210 mg
Next recipe

Creamy Milo Gulaman for a Refreshing Dessert
See the recipe → →This recipe is based on a short cooking video and is published under the pen name Clara Weller. It was checked before publication, but errors can slip through. Nutrition, when shown, is an estimate. Read more in our editorial policy and on our food safety page.
More recipes to try
Rich Chocolate Fudge Cake for Decadent Dessert Lovers
Total time: 1 h 10 min
Easy Strawberry Ding Dong Sheet Cake
Total time: 1 h 5 min
Moist Chocolate Lazy Cat Cake with Whipped Cream
Total time: 55 min
Creamy No-Bake Peanut Butter Pie
Total time: 4 h 20 min
Rich and Moist Black Sheet Cake for Any Occasion
Total time: 1 h 25 min