Desserts · Part 2 of 3: Instructions
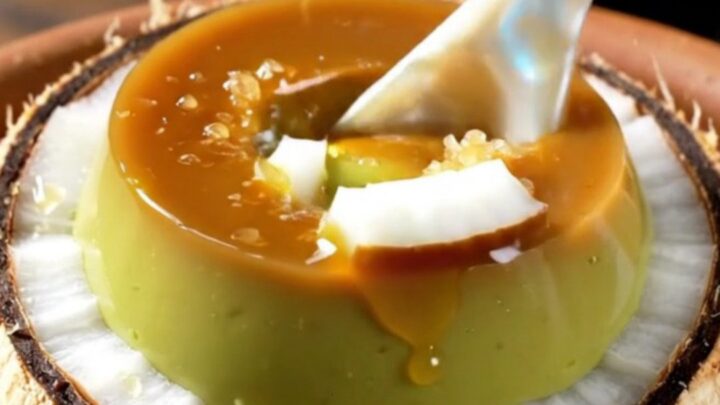
Coconut Pandan Crème Brûlée in a Real Coconut Shell Step-by-step instructions
- Prep
- Cook
- Total
- Serves
- 4
Before you start
Before you begin, gather all your ingredients and equipment. Cut the pandan leaves into 2-inch pieces and chop the palm sugar if it’s in large chunks. Halve the young coconuts and scoop out some of the flesh to create a hollow that will hold the custard. You want about 1/2 inch of coconut meat left on the sides.
Set up a blender, a fine-mesh strainer, a large bowl, and a whisk. Preheat your oven to 320°F (160°C) and have a deep roasting pan ready. Bring a kettle of water to a boil for the water bath. Chill the coconut shells in the refrigerator while you prepare the custard.
Ingredients at a glance (6)
- 6 leaves fresh pandan leaves, cut into 2-inch pieces
- 400 ml coconut cream
- 5 large egg yolks
- 90 g palm sugar, finely chopped
- 2 young white coconuts, halved
- Grated palm sugar, for torching, to taste
Instructions
Prep the Pandan Cream
- Make the Pandan Coconut CreamIn a blender, combine the pandan leaves and coconut cream. Blend on high for 1 to 2 minutes until the leaves are finely chopped and the liquid is bright green. Strain through a fine-mesh strainer into a large bowl, pressing on the solids to extract as much liquid as possible. Discard the solids.Look for The strained cream is fragrant and emerald green.Tip For a more intense color, let the strained cream sit for 5 minutes before using.
- Whisk the Custard BaseIn a separate bowl, whisk the egg yolks and palm sugar together until the sugar is dissolved and the mixture is pale and slightly thickened. Slowly pour the pandan coconut cream into the yolk mixture, whisking constantly until fully combined.Look for The custard base is smooth and evenly colored.Tip Whisk gently to avoid creating too many air bubbles.
The pandan coconut cream is a vibrant green, fragrant liquid with no large leaf pieces. The custard base is smooth and pale, with the sugar fully dissolved. The mixture should be uniform in color and slightly thickened.
The kitchen smells of fresh pandan and coconut, a sweet, grassy aroma that promises something special. Before moving on, taste a tiny spoonful — it should be sweet and creamy, but not overly sweet. If any lumps remain, strain again.
Bake and Chill
- Bake in Coconut ShellsPreheat the oven to 320°F (160°C). Place the hollowed coconut halves in a deep roasting pan. Pour the custard mixture evenly into each coconut shell, filling almost to the rim. Carefully pour hot water into the roasting pan to come halfway up the sides of the coconut shells. Cover the pan loosely with aluminum foil.Look for The water bath reaches halfway up the shells.Safe temperature 160°F (71°C) internal temperature (egg dishes)Tip Make sure the coconut shells are stable so they don't tip over.
- Steam-Bake the CustardBake for 40 minutes, or until the custard is set around the edges but still slightly wobbly in the center. The internal temperature should reach 160°F (71°C). Remove the pan from the oven and carefully lift the coconut shells out of the water bath. Let them cool on a wire rack for 30 minutes, then refrigerate for at least 2 hours until fully chilled.Look for The custard is set but the center has a slight jiggle.Safe temperature 160°F (71°C) internal temperature (egg dishes)Tip Chilling thoroughly ensures a clean torched sugar crust.
After baking, the custards are set around the edges but still wobbly in the center. The coconut shells are warm and fragrant, with the custard a soft pale green. Once chilled, the custard is firm and sliceable, and the shells are cold to the touch. The texture is smooth and creamy, with no cracks or curdling. The coconut meat has softened slightly and blends with the custard. The dessert is ready for its sugar crust.
Torch and Serve
- Torch the Sugar CrustJust before serving, sprinkle a thin, even layer of grated palm sugar over each chilled custard. Use a kitchen torch to melt the sugar, moving the flame in a circular motion until the sugar bubbles and turns deep amber. Let the crust harden for 1 minute before cracking.Look for The sugar melts and caramelizes to a glossy amber.Tip Keep the torch moving to avoid burning the sugar.
The sugar topping is a deep amber, glossy, and hard to the touch. When you tap it with a spoon, it makes a satisfying crack. The custard beneath is cool and set. The contrast between the warm, caramelized sugar and the cold custard is perfect. The aroma is now a mix of toasted sugar, pandan, and coconut. Each shell is a beautiful presentation, with the golden crust contrasting against the white coconut shell.
Common mistakes
One common mistake is overbaking the custard, which causes it to curdle and become watery. Keep a close eye on the time and pull the custards from the oven when the center still jiggles slightly. Another issue is not straining the pandan mixture well enough, leaving fibrous bits in the custard. Press firmly on the solids to extract every drop of liquid.
When torching the sugar, be careful not to hold the flame too close or the sugar will burn and turn bitter. Keep the torch moving in a circular motion and stop when the sugar is deep amber. Finally, make sure the custards are thoroughly chilled before torching, otherwise the sugar will melt into the custard instead of forming a crust.
How to tell it’s done
The custard is done when it is set around the edges but still has a slight wobble in the center. To check, gently shake the pan — the center should jiggle like gelatin, not ripple like liquid. For accuracy, insert an instant-read thermometer into the center of one custard; it should read 160°F (71°C).
Remove the custards from the water bath immediately to stop the cooking. After chilling for at least 2 hours, the custard should be fully firm to the touch. When you tap the coconut shell, the custard should not move. The torched sugar should be deep amber and harden into a glass-like crust within a minute.
- Egg dishes: 160°F (71°C) in the thickest part
Up next · Part 3 of 3
4 variations · storage & make-ahead · 5 answers · printable card
Tips, FAQ & printable recipe (Part 3)← Back to the ingredients (Part 1)