Dinner · Part 2 of 3: Instructions
Creamy Chicken Spaghetti Lasagna Bake Step-by-step instructions
- Prep
- Cook
- Total
- Serves
- 6
Before you start
Before you begin, ensure all your main components are ready for assembly. Have your spaghetti cooked to an al dente state, which means it should still have a slight bite.
If you are using freshly cooked chicken, make sure it is shredded while still warm, as it absorbs the creamy sauce much more effectively. Have your baking dish cleaned and ready on your counter, and preheat your oven to the target temperature well in advance to ensure an even bake.
Ingredients at a glance (4)
- 1 lb spaghetti, cooked al dente
- 2 cups cooked chicken, shredded
- 2 cups creamy pasta sauce
- 2 cups shredded mozzarella cheese
Instructions
Mixing the base
- Prepare the basePreheat the oven to 375°F (190°C). In a large mixing bowl, combine the cooked spaghetti, shredded chicken, and creamy pasta sauce. Toss everything together until the pasta is thoroughly coated in the sauce and the chicken is evenly distributed throughout the mixture.Look for all ingredients are evenly combinedTip Ensure the pasta is cooked al dente so it maintains its texture during the final baking process.
At the end of this phase, the spaghetti should be thoroughly coated in the creamy sauce, with the shredded chicken evenly distributed throughout. The mixture should appear glossy and cohesive, with no dry clumps of pasta.
If the mixture seems too thick, you can add a small amount of milk or broth to reach the desired consistency before transferring it to the baking dish.
Assembling the bake
- Assemble the bakeTransfer the pasta and chicken mixture into a 9x13 inch baking dish, spreading it out into an even layer. Sprinkle the shredded mozzarella cheese generously over the top of the pasta mixture, ensuring full coverage for an even, bubbly melt.Look for cheese is spread evenly over the topTip Adding a bit of extra cheese to the corners ensures every serving gets a delicious, cheesy pull.
Your baking dish should be filled with the pasta mixture in an even layer. The top should be completely covered with a thick, uniform layer of shredded mozzarella cheese. Ensure that the cheese reaches all the way to the edges of the dish to prevent any pasta from burning or drying out while in the oven.
Baking and serving
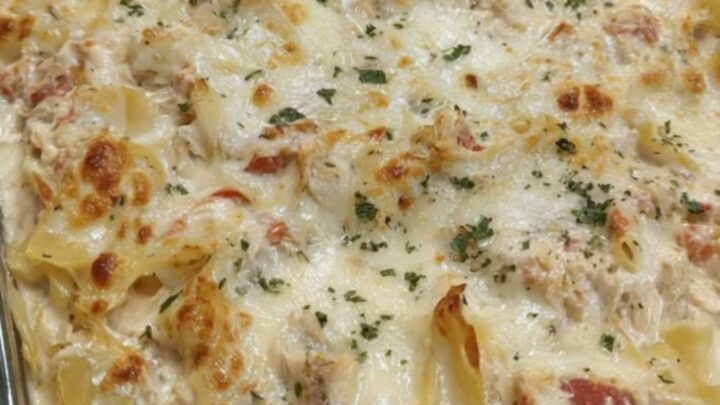
- Bake and servePlace the baking dish in the preheated oven and bake for 20 to 25 minutes until the cheese is melted, bubbling, and golden brown. Ensure the chicken reaches an internal temperature of 165°F (74°C). Remove from the oven and let it rest for 5 minutes before serving.Look for cheese is golden brown and bubblingSafe temperature 165°F (74°C) internal temperature (poultry)Tip The resting period allows the sauce to thicken slightly, making it easier to slice and serve.
The dish is ready when the cheese is bubbling and has turned a beautiful golden brown. The aroma should be rich and savory, filling your kitchen. After pulling it from the oven, let it sit for the recommended time to ensure the sauce thickens appropriately before you begin to slice and serve the portions.
Common mistakes
A common mistake is overcooking the pasta before it hits the oven, which can lead to a mushy texture after the baking process. Always aim for al dente so the spaghetti retains its structure.
Another error is failing to spread the cheese evenly to the edges, which can cause the pasta on the surface to dry out. Lastly, do not skip the resting period, as it is essential for allowing the sauce to set so the portions remain intact when served.
How to tell it’s done
The bake is finished when the cheese layer is completely melted and has developed a deep, golden-brown color across the entire surface. You will see the sauce bubbling vigorously around the edges of the dish.
To ensure food safety, verify that the internal temperature of the chicken has reached 165°F (74°C). The structure of the pasta should feel firm but tender when pierced with a fork, and the dish should hold its shape when lifted with a spatula.
- Poultry: 165°F (74°C) in the thickest part
Up next · Part 3 of 3
2 variations · storage & make-ahead · 3 answers · printable card
Tips, FAQ & printable recipe (Part 3)← Back to the ingredients (Part 1)