Dinner · Part 2 of 3: Instructions
Creamy Blackened Chicken Fettuccine Alfredo Step-by-step instructions
- Prep
- Cook
- Total
- Serves
- 4
Before you start
Before starting, slice the chicken breasts into thin cutlets and pat them dry. Measure out the blackening spice and have the olive oil, butter, garlic, cream, parmesan, and nutmeg ready.
Bring a large pot of salted water to a boil for the pasta. Set a large cast iron skillet over medium-high heat so it is hot when you’re ready to sear.
Ingredients at a glance (11)
- 1 1/2 lb boneless, skinless chicken breasts, sliced into cutlets
- 2 tbsp blackening spice
- 2 tbsp olive oil, divided
- 3 tbsp unsalted butter
- 3 cloves garlic, minced
- 2 cups heavy cream
- 1 cup freshly grated parmesan cheese
- 1/8 tsp ground nutmeg
- 12 oz fettuccine pasta
- Fresh parsley, chopped, for serving
- Extra parmesan, for dusting, to taste
Instructions
Sear the Chicken
- Prep and Sear the ChickenSlice the chicken breasts horizontally into thin cutlets. Pat them dry with paper towels. Coat both sides generously with the blackening spice, pressing it into the meat. Heat 1 tablespoon of olive oil in a large cast iron skillet over medium-high heat until shimmering. Add the chicken in a single layer, working in batches if needed. Sear for 3 minutes per side, until the crust is dark and charred and the chicken is cooked through. Transfer to a plate and tent loosely with foil.Look for The chicken should have a deep, dark brown crust and register 165°F (74°C) in the thickest part.Safe temperature 165°F (74°C) internal temperature (poultry)Tip Do not overcrowd the pan; searing in batches ensures a good crust.
- Rest the ChickenLet the seared chicken rest for at least 3 minutes on a cutting board. This allows the juices to redistribute, keeping the meat moist. While the chicken rests, begin the sauce in the same skillet.Look for The chicken will release some juices as it rests.Tip Resist cutting into the chicken immediately to keep it juicy.
The chicken should be deeply browned with a dark, spicy crust. The kitchen will smell smoky and inviting. The chicken should be cooked through to 165°F (74°C). Rest it while you start the sauce.
Make the Alfredo Sauce
- Start the Alfredo SauceReduce the heat to medium. Add the remaining 1 tablespoon of olive oil and the butter to the skillet. Once the butter is melted and foaming, add the minced garlic and sauté for about 30 seconds until fragrant, being careful not to brown it. Pour in the heavy cream and bring to a gentle simmer. Let it cook for 3 minutes, stirring occasionally, until the cream has slightly thickened.Look for The cream will bubble gently and coat the back of a spoon.Tip Scrape up any browned bits from the chicken for extra flavor.
- Finish the SauceWhisk in the freshly grated parmesan cheese and ground nutmeg. Continue whisking until the cheese is fully melted and the sauce is smooth and velvety. Season with salt and pepper to taste. If the sauce seems too thick, add a splash of pasta water to loosen it.Look for The sauce should be glossy and coat the back of a spoon.Tip Use freshly grated parmesan for the smoothest sauce.
- Cook the PastaWhile the sauce simmers, bring a large pot of salted water to a boil. Add the fettuccine and cook according to package instructions until al dente. Reserve about 1 cup of pasta water before draining. Drain the pasta well.Look for The pasta should be tender but still firm to the bite.Tip Do not overcook; the pasta will cook slightly more in the sauce.
- Combine Pasta and SauceAdd the drained fettuccine directly to the skillet with the Alfredo sauce. Use tongs to toss vigorously, coating every strand with the sauce. If the sauce is too thick, add reserved pasta water a few tablespoons at a time until the desired consistency is reached.Look for Each noodle should be coated in a thick, glossy layer of sauce.Tip Toss quickly over low heat to meld the flavors.
The sauce should be smooth, velvety, and slightly thickened. It should coat the back of a spoon and smell richly of garlic and parmesan. The pasta should be al dente and ready to toss.
Combine and Serve
- Slice the ChickenThinly slice the rested chicken breasts against the grain into strips. The crust should be dark and crisp, and the interior should be white and juicy.Look for The slices should be clean and the meat should look moist.Tip Slice just before serving to keep the crust crisp.
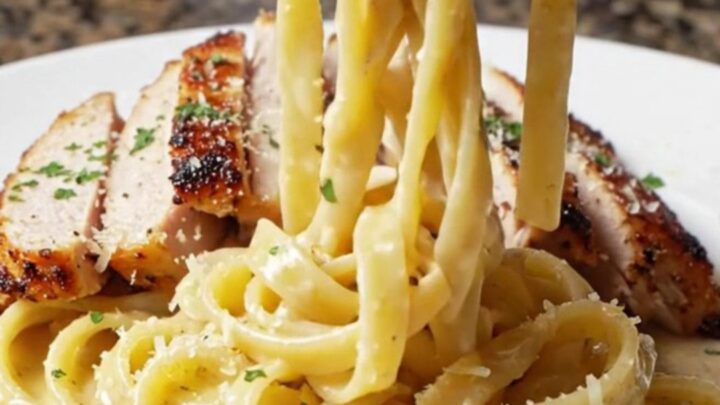
- Plate and GarnishTwirl a generous portion of the creamy fettuccine onto each plate or into a large serving bowl. Fan the sliced blackened chicken over the top. Dust with extra parmesan and sprinkle with chopped fresh parsley.Look for The dish should look vibrant with the dark chicken against the creamy pasta.Tip Serve immediately while hot.
- Serve and EnjoyServe the creamy blackened chicken fettuccine Alfredo hot, with extra parmesan and parsley on the side. Twirl a big forkful and enjoy the combination of silky sauce, al dente pasta, and spicy, charred chicken.Look for The sauce should be creamy and cling to the pasta.Tip Pair with a simple green salad for a complete meal.
The pasta should be fully coated in the glossy sauce, with the chicken fanned on top.
The dish should look vibrant with the dark chicken against the creamy pasta and fresh parsley. Serve immediately.
Common mistakes
One common mistake is overcrowding the pan when searing the chicken, which causes it to steam rather than char. Another is using pre-shredded parmesan, which can make the sauce lumpy.
Avoid boiling the cream too vigorously, as it can curdle; keep it at a gentle simmer. Finally, don’t rinse the pasta after draining—the starch helps the sauce cling.
How to tell it’s done
The chicken is done when it registers 165°F (74°C) in the thickest part and the crust is dark and charred. The Alfredo sauce should be thick enough to coat the back of a spoon.
The pasta should be al dente—tender but with a slight bite. When tossed with the sauce, every strand should be glossy and well coated.
- Poultry: 165°F (74°C) in the thickest part
Up next · Part 3 of 3
4 variations · storage & make-ahead · 5 answers · printable card
Tips, FAQ & printable recipe (Part 3)← Back to the ingredients (Part 1)