Drinks · Part 2 of 3: Instructions
Coral Pink Guava Strawberry Smoothie with White Chocolate Curls Step-by-step instructions
- Prep
- Cook
- Total
- Serves
- 2
Before you start
Before starting, make sure the guavas are ripe and the strawberries are hulled. Grate the white chocolate and set it aside in a small bowl. Have the Greek yogurt, honey, and ice measured and ready.
Chill the serving glasses in the freezer for 10 minutes if you want an extra-frosty presentation. This smoothie comes together quickly, so having everything prepped makes the process smooth.
Ingredients at a glance (8)
- 2 ripe pink guavas, sliced and diced
- 1 1/2 cups red strawberries, hulled and halved
- 2 oz pink strawberry white chocolate, grated into curls
- 1 cup Greek yogurt
- 2 tbsp honey
- 1 cup ice cubes
- Whipped cream, for topping, to taste
- 2 strawberries, halved, for garnish
Instructions
Prep the Fruit and Chocolate
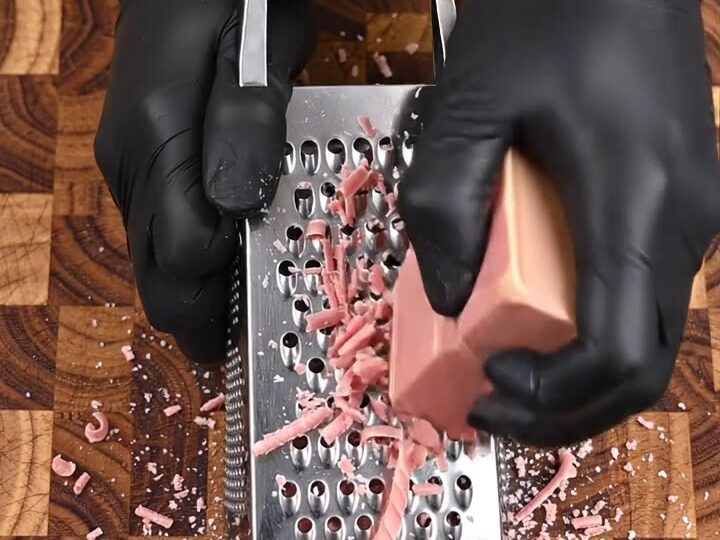
- Prep the fruit and chocolateSlice the pink guavas in half and scoop out the flesh. Dice the flesh into thick chunks. Hull the strawberries and cut them into thick wedges. Grate the pink strawberry white chocolate on the large holes of a box grater to create a pile of pink curls. Set aside.Look for The guava flesh is soft and fragrant, the strawberries are juicy, and the chocolate curls are light and airy.Tip Chill the chocolate block for 10 minutes before grating for cleaner curls.
At this stage, you should have a pile of diced pink guava, strawberry wedges, and a bowl of pink chocolate curls. The fruit should look fresh and vibrant. The chocolate should be in light, airy curls, not clumps. Everything is ready to go into the blender.
Blend the Smoothie
- Blend the smoothieAdd the diced guava flesh, strawberry wedges, Greek yogurt, honey, and ice cubes to a blender pitcher. Lock the lid in place and blend on high until the mixture is completely smooth and thick, with a swirling vortex visible in the pitcher. Stop and scrape down the sides if needed, then blend again until fully combined.Look for The smoothie is thick, frosty, and coral pink, with no visible chunks of fruit or ice.Tip If the blender struggles, add a splash of cold water, 1 tablespoon at a time, until it blends easily.
The blender should be whirring smoothly, and you’ll see a vortex forming. The mixture will turn coral pink and become thick and creamy. Stop when no chunks remain and the smoothie looks completely homogeneous. It should have a thick, pourable consistency.
Pour and Garnish
- Pour and garnishPour the thick smoothie from the blender pitcher into two crystal glasses. Top each glass with a generous swirl of whipped cream. Place a halved strawberry on the rim of each glass and sprinkle the pink chocolate curls over the whipped cream. Serve immediately.Look for The smoothie is frosty and coral pink, crowned with white whipped cream, a bright strawberry, and pink chocolate curls.Tip For a prettier presentation, drizzle a little honey around the inside of the glass before pouring.
The smoothie is poured into glasses, topped with a cloud of whipped cream, a strawberry half, and a shower of pink chocolate curls.
The presentation is beautiful and inviting. Serve immediately so the chocolate curls stay crisp and the smoothie remains frosty.
Common mistakes
One common mistake is over-blending, which can make the smoothie too thin and watery. Blend just until smooth, then stop. Another is using unripe fruit, which results in a less flavorful and less colorful smoothie.
If the smoothie is too thick to blend, add a splash of cold water, but do not add too much or it will lose its thick texture. Finally, don’t skip the chocolate curls—they add a lovely visual and textural finish.
How to tell it’s done
The smoothie is done when it is thick and smooth, with no visible chunks of fruit or ice. It should pour slowly from the blender and mound slightly in the glass. The color should be a uniform coral pink.
Taste and adjust sweetness with a little extra honey if needed. The finished drink should be frosty and cold, with a creamy texture that coats the back of a spoon.
Up next · Part 3 of 3
4 variations · storage & make-ahead · 5 answers · printable card
Tips, FAQ & printable recipe (Part 3)← Back to the ingredients (Part 1)