Desserts · Part 1 of 3: Ingredients
Classic Butter Marble Cake with a Velvety Crumb
- Prep
- Cook
- Total
- Serves
- 10
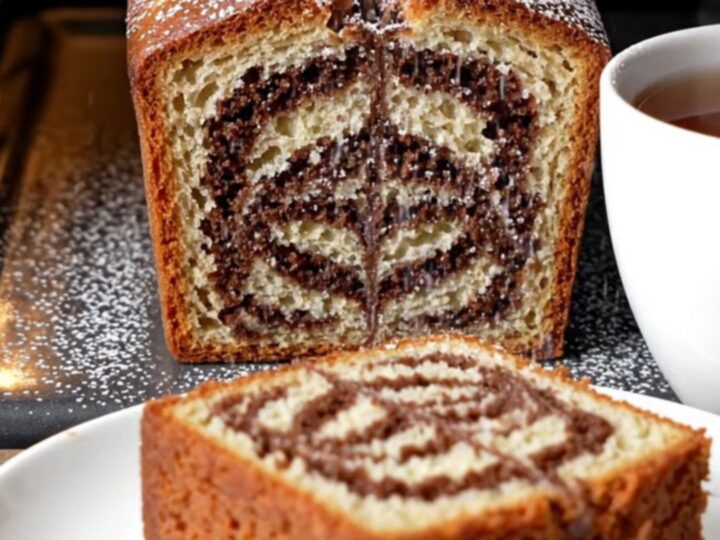
This classic butter marble cake delivers the most velvety crumb and an impossible zebra swirl. A simple creamed batter, half flavored with vanilla and half with rich Dutch cocoa, is spooned into a loaf pan and swirled with a knife to create those beautiful ribbons.
Baked until golden and domed, then dusted with powdered sugar, this loaf is perfect for tea, coffee, or a simple dessert. The recipe uses basic pantry ingredients and comes together quickly, making it a reliable choice for any home baker.
Marble cake is a beloved classic, and this version lives up to its name. The combination of tender vanilla and deep chocolate in a single slice is both visually stunning and delicious. The key is to keep the two batters distinct, so you get that striking zebra pattern.
The creaming method ensures a fine, tender crumb, while the buttermilk—here, whole milk—adds moisture and a slight tang. This loaf is simple enough for a weekday treat, yet pretty enough for a special occasion. Serve it warm or at room temperature, with a cup of hot tea or coffee.
Ingredients
- 1/2 cup unsalted butter, softened (125 g)
- 1 1/2 cups granulated sugar
- 3 large eggs
- 1 cup whole milk
- 2 tsp pure vanilla extract
- 2 1/2 cups all-purpose flour
- 2 tsp baking powder
- 3 tbsp Dutch-process cocoa powder
- 2 tbsp whole milk
For dusting
- Confectioners' sugar, for dusting, to taste
Why this recipe works
The creaming method is the foundation of this cake. Beating the butter and sugar together until light and fluffy incorporates air, which expands during baking and gives the cake its tender, velvety crumb. Adding the eggs one at a time ensures the emulsion stays stable, preventing the batter from curdling. The combination of butter, sugar, and eggs creates a rich, flavorful base that supports the vanilla and chocolate layers.
The swirling technique is what creates the marble pattern. By spooning alternating scoops of vanilla and chocolate batter and then drawing a knife through in a figure-eight, you create distinct ribbons rather than a muddy mix.
The key is to keep the knife strokes gentle and few. Over-swirling will result in a grayish, blended cake. The contrast between the light vanilla and dark chocolate is not only beautiful but also provides a delightful flavor contrast in every bite.
Notes and substitutions
Use high-quality butter for the best flavor, and make sure it is truly softened to room temperature. If the butter is too cold, it won't cream properly, and if it's too warm, the batter may become greasy.
The same goes for the eggs and milk—room temperature ingredients emulsify more easily, creating a smoother batter. Dutch-process cocoa powder gives a deeper, less acidic chocolate flavor; natural cocoa can be substituted, but the color may be lighter.
A 9x5-inch loaf pan is ideal for this recipe. If using a different size, adjust the baking time accordingly. The cake is done when a toothpick inserted into the center comes out clean or with a few moist crumbs. The internal temperature should reach 200°F (93°C) for a fully baked loaf. Let the cake cool completely before slicing to allow the crumb to set, making clean cuts easier. Store any leftovers in an airtight container at room temperature for up to 4 days.
- unsalted butter: Salted butter: reduce the added salt in the recipe to 1/4 teaspoon, or simply omit the salt. The cake will still be delicious.
- whole milk: Any milk with at least 2% fat works, including oat or almond milk for a dairy-free version. The crumb may be slightly less tender.
- Dutch-process cocoa powder: Natural unsweetened cocoa powder can replace Dutch-process. The color will be a bit less deep, and the flavor slightly more acidic.
- pure vanilla extract: Vanilla bean paste or the seeds of one vanilla bean can replace the extract. Use the same amount of paste, or stir the seeds into the milk.
Equipment
- 9x5-inch loaf pan
- Electric mixer (hand or stand)
- Mixing bowls
- Rubber spatula
- Serrated knife
- Cooling rack
- Measuring cups and spoons
- Fine-mesh sieve (for dusting)
Up next · Part 2 of 3
8 steps · 45 min of cooking · what to look for at each stage
Step-by-step instructions (Part 2)