Breakfast · Part 1 of 3: Ingredients
Crispy Chorizo and Tater Tot Breakfast Burrito in 30 Minutes
- Prep
- Cook
- Total
- Serves
- 1
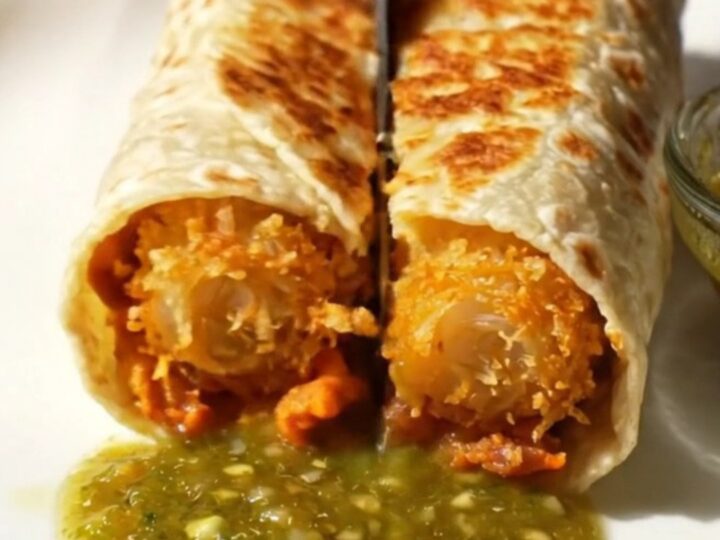
Crispy tater tots inside a chorizo breakfast burrito is elite, and this version proves it in every bite: rendered Mexican chorizo, an intact golden tot matrix, creamy cheddar eggs, and cool avocado, all rolled into a tortilla seared in bacon fat until it blisters. A spoonful of chipotle hollandaise and a dunk in green tomatillo salsa finish it.
Most breakfast burritos fail in one of two ways: the fillings are soggy, or the tortilla never crisps. This recipe fixes both. The tots are air-fried until they rattle in the basket, the chorizo renders until its edges snap, and the assembled burrito gets a hard two-minute sear per side in bacon fat on a 375°F cast-iron skillet.
That sear does more than add color; it welds the seam shut and builds a shell sturdy enough to survive the dunk in salsa. The chipotle hollandaise comes together in a blender in under a minute, and the whole burrito, start to finish, takes about forty minutes. It makes one enormous, cut-in-half, show-off burrito.
Ingredients
Fillings
- 4 oz fresh Mexican chorizo, casings removed
- 8 tater tots, air-fried until golden
- 3 large eggs, beaten
- 1/3 cup shredded cheddar cheese
- 1/3 cup diced avocado
- 1 large 12-inch flour tortilla, warmed
- 1 tbsp bacon fat
Chipotle Hollandaise
- 2 egg yolks
- 1/2 cup unsalted butter, melted and hot
- 1 tbsp fresh lime juice
- 1 chipotle chile in adobo sauce, plus 1 tsp adobo sauce
- Green tomatillo salsa, for serving (store-bought or made ahead)
Why this recipe works
The method borrows a trick from diner griddles: every filling is cooked to its own finish before it ever meets the tortilla. Chorizo renders slowly so its fat crisps the meat instead of pooling; tots go through dry air heat so their surfaces dehydrate and blister; the eggs fold gently over low heat so the curds stay glossy.
By the time anything is layered, nothing is releasing moisture, which is why the tortilla stays crisp instead of turning damp from the inside out.
The sear is the second half of the engineering. Bacon fat has a higher smoke point than butter and carries a smoky note that matches the chorizo, and cast iron holds a steady 375°F so the tortilla browns before the fillings overheat.
Searing seam-side down first welds the overlap shut, and pressing lightly with the spatula compresses the layers just enough that the cross-section cuts clean instead of collapsing.
Notes and substitutions
Buy fresh Mexican chorizo from the meat case, not the dry-cured Spanish kind; the fresh sausage renders fat as it cooks and that fat seasons the whole pan.
Shred the cheddar yourself if possible, because pre-shredded cheese carries anti-caking starch that can make the eggs pasty. Choose a large, pliable 12-inch tortilla; thinner supermarket brand tortillas tear when rolled tight, so look for one labeled large or burrito-size.
The air fryer does the tots better than any oven, but a 425°F oven on a preheated sheet pan works in a pinch; expect a few extra minutes. If there is no bacon fat in the refrigerator, a neutral oil will sear the tortilla, though the flavor loses a layer. The hollandaise is best blended right before assembling, but it holds for twenty minutes in a warm spot; give it a quick re-blend if it loosens.
- fresh Mexican chorizo: Break loose breakfast sausage into the same skillet and bump the chili powder and smoked paprika for a similar heat and color.
- tater tots: Cubed hash browns air-fried at 400°F until deeply crisp give the same crunch; keep the portion small so the burrito still rolls tightly.
- chipotle hollandaise: A spoonful of chipotle crema or avocado crema works when there is no time for the blender sauce.
- green tomatillo salsa: Any bright, spicy cooked salsa works for dunking; a smoky red salsa shifts the flavor toward the chorizo side of the spectrum.
Equipment
- cast-iron skillet
- air fryer
- blender
- nonstick skillet
- cutting board
- sharp knife
- spatula
Up next · Part 2 of 3
8 steps · 20 min of cooking · what to look for at each stage
Step-by-step instructions (Part 2)