Desserts · Part 2 of 3: Instructions
Chocolate Crunch Bars with Biscoff and Pecans in 30 Minutes Step-by-step instructions
- Prep
- Cook
- Total
- Serves
- 12
Before you start
Gather everything before you start, because the chocolate needs to be worked while it is fluid. Line an 8-by-8-inch metal tray with parchment paper, letting the paper overhang two sides so you can lift the slab out later. Chill the blonde chocolate block for about 10 minutes so it grates cleanly.
Set out the Biscoff cookies and pecan halves on a wooden board with a sharp chef's knife, and have a bowl ready for the chopped crunch mixture. Measure the cookie butter spread and keep a spatula and a small knife within reach. A clear counter and a flat spot in the refrigerator for the tray will make the rest of the process smooth and fast.
Ingredients at a glance (4)
- 1 cup Biscoff cookie butter cookies, roughly chopped
- 1/2 cup pecan halves, roughly chopped
- 8 oz blonde chocolate, cold, for grating and melting
- 3 tbsp Biscoff cookie butter spread
Instructions
Chopping, grating and melting
- Chop the cookies and pecansPlace the Biscoff cookies and pecan halves on a wooden board. Chop them with a chef's knife until you get a coarse mix of crumbs and nut pieces, with some larger shards of cookie and a few whole-looking pieces of pecan remaining. Set the mixture aside in a bowl.Look for A coarse mix of cookie crumbs and nut pieces with no large whole cookies left.Tip Chop in a rocking motion and keep the knife tip on the board for even pieces.
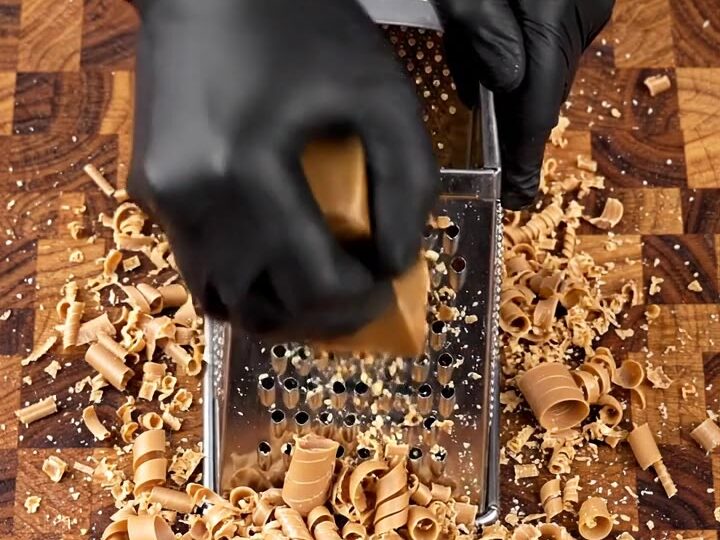
- Grate the blonde chocolateHold the cold block of blonde chocolate over a box grater and grate it on the fine side. Keep the fine shavings in a separate bowl until you need them. Grate only what you can use in the next few minutes so they stay cool.Look for Fine curled shavings that fall easily off the grater.Tip Chill the block for 10 minutes first so it grates cleanly rather than smearing.
At the end of this phase you should have a coarse bowl of cookie and pecan pieces, a pile of fine blonde chocolate shavings set aside, and a smooth pool of melted chocolate. The crunch mixture should look rough and varied, with crumbs, small shards and nut pieces, rather than dust. The grated chocolate should be fine and curled, and the melted chocolate should be glossy with no lumps or grainy patches.
Before moving on, check that the chocolate is still fluid enough to spread, and that the chopped mix has no large whole cookies left. If the chocolate has started to thicken, warm it for a few seconds more and stir. Keeping the melted chocolate warm but not hot protects the gloss and helps the layers set cleanly once you spread them.
Layering the bars
- Melt the chocolateLine a metal tray, about 8 by 8 inches, with parchment paper. Place the remaining chocolate in a heatproof bowl and melt it in the microwave in 20-second bursts, stirring between each, or over barely simmering water. Stop heating when it is almost fully melted and stir until smooth.Look for Smooth, glossy melted chocolate with no lumps.Tip Stir off the heat so residual warmth finishes the melting without scorching.
- Spread the chocolate basePour the melted chocolate into the parchment-lined tray and spread it evenly to the corners with a spatula. Drop spoonfuls of Biscoff cookie butter across the surface and drag a knife through them to create a visible swirl, leaving some streaks through the chocolate.Look for An even, glossy chocolate layer with visible ribbons of cookie butter.Tip Work quickly while the chocolate is still fluid so the layers hold together.
- Press in the crunchScatter the chopped cookie and pecan mixture generously over the chocolate layer. Press it gently with your fingertips or the back of a spoon so it adheres, and add the reserved grated chocolate shavings over the top if you like the extra texture.Look for Cookie and pecan pieces pressed into the chocolate with no loose pieces left on the parchment.Tip Press firmly enough that pieces stick, but do not crush the cookie into powder.
At the end of this phase the tray should hold an even layer of melted chocolate reaching the corners, with visible ribbons of cookie butter streaked through it and a generous scatter of the crunch mixture pressed into the top. The surface should look busy but evenly covered, with no bare patches of parchment and no pieces lying loose on the paper.
Gently press a few pieces with a fingertip to confirm they stick to the chocolate. If the chocolate has begun to firm before you finish, you can warm the tray briefly, but avoid heat that will blur the cookie butter swirl. Once everything is pressed in, move straight to the refrigerator so the layers set in the order you built them.
Setting and cutting the slab
- Set the slabPlace the tray in the refrigerator and chill it until the chocolate is completely firm to the touch, about 1 hour. Lift the slab out by the parchment overhang and let it sit at room temperature for 2 minutes to soften slightly before cutting.Look for The surface is firm and no longer tacky when lightly pressed.Tip Chilling on a flat shelf keeps the slab level and the layers even.
- Cut the barsLift the slab from the tray and set it on a board. Using a long, sharp knife, trim the edges, then cut the slab into 12 neat rectangles. Wipe the blade clean between cuts for sharp, glossy edges that show the layers of chocolate, cookie butter and crunch.Look for Clean edges with the layers of chocolate, cookie butter and crunchy pieces visible in each bar.Tip Warm the knife briefly in hot water and dry it to get the cleanest cuts.
At the end of this phase the slab should be fully firm and no longer tacky when pressed lightly, with clean edges that release from the parchment. Lift it onto a board and check that it holds its shape without sagging. Cut slowly with a long sharp knife, wiping the blade between cuts. Each bar should show the layers of chocolate, cookie butter and cookie and pecan pieces through its cut face. If a cut tears the surface, the slab may need another 10 minutes in the refrigerator before you try again. Once the bars are cut and arranged, they are ready to serve or store, with a glossy finish and distinct layers.
Common mistakes
The most common mistake is overheating the chocolate, which can seize, turn grainy or dull. Melt it gently in short bursts and stop while a few small pieces remain, then stir until smooth. Another frequent problem is chopping the cookies and pecans too finely, which turns the crunch into dust and loses the visible layers.
Keep the pieces coarse and varied. Spreading the cookie butter too heavily can also blur the swirl, so use a light hand and a single drag of the knife. Finally, cutting before the slab is fully set will tear the bars and smear the layers, so give the chilling time it needs and wipe the knife between cuts for clean edges.
How to tell it’s done
The bars are ready when the chocolate is completely firm all the way through and no longer soft or tacky when you press the surface lightly with a fingertip. The slab should lift from the parchment in one piece and hold its shape on the board. The cut faces should look sharp, with distinct layers of chocolate, cookie butter and crunchy pieces. There is no internal temperature to check for these bars, since they contain no meat, eggs or other raw protein. If the surface still gives or leaves a print, return the tray to the refrigerator for another 15 to 20 minutes and check again before cutting.
Up next · Part 3 of 3
4 variations · storage & make-ahead · 5 answers · printable card
Tips, FAQ & printable recipe (Part 3)← Back to the ingredients (Part 1)