Desserts · Part 2 of 3: Instructions
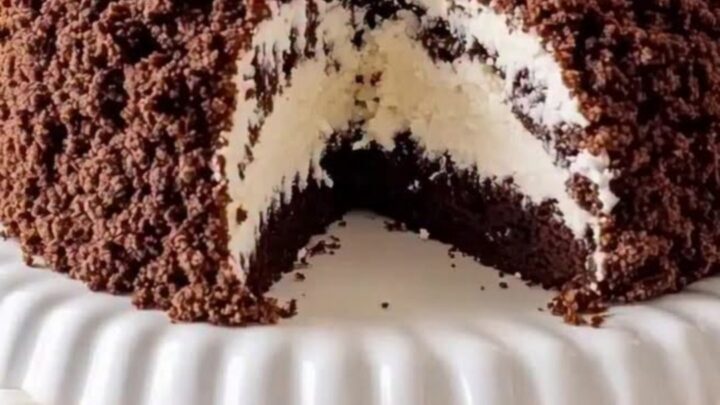
Decadent Chocolate Crumble Cake with Silky Coconut Cream Filling Step-by-step instructions
- Prep
- Cook
- Total
- Serves
- 8
Before you start
Ensure all components are prepared and at the correct temperature before starting. The coconut cream must be thoroughly chilled, as this is essential for achieving the right consistency for spreading.
Have your cake pedestal ready and ensure your workspace is clean, organized, and free of any heat sources that could compromise the temperature of the ingredients.
Ingredients at a glance (3)
- 1 cake chocolate sponge cake layer, store-bought or made ahead
- 2 cups thick coconut cream, chilled
- 1 cup dark chocolate cake crumbles
Instructions
Base Preparation
- Prepare the BasePlace the chocolate sponge cake layer on a stable work surface. Using a serrated knife, carefully trim the top to create a flat, even surface if necessary. Ensure the cake is completely cool before proceeding to avoid melting the coconut cream filling.Look for The cake surface should be level and firm.Tip Use a gentle sawing motion with the knife to prevent tearing the delicate sponge.
The cake layer should be perfectly flat and cool. Check that the sponge is not crumbling excessively while trimming; if it is too soft, place it in the freezer for fifteen minutes before attempting to level the top.
Filling Application
- Apply Coconut FillingUsing an offset spatula, spread the chilled coconut cream evenly over the top of the chocolate sponge base. Work from the center outward to ensure a consistent layer. The cream should be thick enough to hold its shape without running off the sides.Look for The cream should be smooth and spread edge to edge.Tip Chill the spatula in the freezer for ten minutes before spreading to keep the cream silky.
The coconut cream should be spread in a uniform layer. Watch for any large air pockets or uneven spots, smoothing them out with the spatula. The cream should be thick, opaque, and consistent in texture across the entire surface.
Final Assembly
- Add Crumble and SetGenerously shower the dark chocolate cake crumbles over the coconut cream layer, pressing down very lightly so they adhere. If using a custard-based filling, ensure the egg mixture reaches 160°F (71°C) during the initial cooking phase. Transfer the cake to a serving pedestal and refrigerate for at least one hour to allow the flavors to meld and the cream to set properly before slicing.Look for The crumbles should cover the entire surface of the cream.Safe temperature 160°F (71°C) internal temperature (egg dishes)Tip Clean the edges of the pedestal with a damp cloth for a professional presentation.
The crumbles should be evenly distributed, covering all the white cream. Once assembled, the cake should look tidy and cohesive.
Ensure the pedestal is clean and the cake is centered before moving it to the refrigerator to chill.
Common mistakes
A common error is spreading the filling while the cake is still warm, which leads to a messy, unstable final product.
Another mistake is using coconut milk instead of coconut cream; the higher water content in milk will prevent the filling from setting correctly, resulting in a runny, unappealing texture that fails to hold the crumble topping.
How to tell it’s done
The cake is ready when the coconut cream feels firm to the touch and the crumbles are securely embedded in the surface.
For any egg-based components, confirm they have been cooked to a safe internal temperature of 160°F (71°C). Simply check that the layers are stable and the cake holds its shape when gently nudged.
- Egg dishes: 160°F (71°C) in the thickest part
Up next · Part 3 of 3
2 variations · storage & make-ahead · 3 answers · printable card
Tips, FAQ & printable recipe (Part 3)← Back to the ingredients (Part 1)