Dinner · Part 2 of 3: Instructions
Chipotle Honey Chicken Smash Tacos, Ready in 20 Minutes Step-by-step instructions
- Prep
- Cook
- Total
- Serves
- 4
Before you start
Set out everything before the griddle heats, because the cooking itself moves fast. Portion the ground chicken, mince the chipotle in adobo, and measure the smoked paprika and garlic powder. Warm the honey for a few seconds so it will whisk smoothly with the lime juice, and have the pastry brush, spatula and a clean plate ready.
Crumble the cotija and, if the corn is not yet charred, set the kernels near the griddle for a dry, quick blister. Damp hands help when pressing the sticky, seasoned meat onto the tortillas.
Ingredients at a glance (10)
- 1 lb ground chicken
- 2 tbsp minced chipotle in adobo
- 1 tsp smoked paprika
- 1 tsp garlic powder
- 4 corn-flour tortillas, small, warm
- 2 tbsp wildflower honey, warmed
- 1 tbsp fresh lime juice
- 3/4 cup charred corn kernels, for serving
- 1/3 cup crumbled cotija cheese, for serving
- Avocado crema, for serving
Instructions
Season, warm and press
- Season the ground chickenAdd the ground chicken to a mixing bowl with the minced chipotle in adobo, smoked paprika and garlic powder. Fold gently with your hands or a spoon just until the seasoning is evenly distributed, about 30 seconds. Stop as soon as it comes together — overmixing makes the patties dense instead of juicy and tender.Look for The mixture should be evenly orange-flecked with no streaks of plain chicken left.Tip Wear disposable gloves when folding in the chipotle; the adobo stains and lingers on bare hands.
- Warm the tortillasHeat a cast-iron griddle or large flat pan over medium-high and warm the corn-flour tortillas for about 20 seconds per side until pliable and lightly speckled. Stack them under a clean towel so they stay soft. Warm tortillas press smoothly against the griddle instead of cracking when the meat is smashed on.Look for Look for faint toasted spots and a flexible, steam-softened texture.Tip If the tortillas feel dry, brush them lightly with water before warming to keep them pliable.
- Portion the meat onto the tortillasPress about 3 oz of the seasoned chicken into a thin, even layer over the face of each warm tortilla, spreading it edge to edge and slightly up the sides. Keep the layer thin and uniform so it cooks through quickly and crisps against the griddle. Work with damp hands to keep the sticky mixture from clinging.Look for Each tortilla should carry an even, thin blanket of meat covering the full surface.Tip Portion all four tortillas before the first one hits the griddle so everything cooks at the same pace.
- Mix the honey-lime glazeStir the warm wildflower honey with the fresh lime juice in a small bowl until smooth and glossy. Warming the honey first keeps it fluid, so it brushes on in a thin, even coat instead of pooling. Set the glaze beside the griddle with the pastry brush, ready for the moment the tacos flip.Look for The glaze should ribbon off the spoon in a smooth, glossy stream.Tip Ten seconds in the microwave is enough to loosen cold honey without cooking it.
By the end of the first phase, the seasoned chicken should be evenly flecked with chipotle and spices with no pale streaks, and each tortilla should carry a thin, edge-to-edge blanket of meat that looks uniform rather than mounded in the center.
The honey-lime glaze should sit glossy beside the griddle, ribbons off the spoon, waiting for the flip. Warm tortillas should feel pliable and show faint toasted spots. Nothing has touched heat yet except the tortillas — check that the griddle reads about 400°F before moving on, since a cool surface is the single biggest threat to the crust.
Sear, flip and glaze
- Griddle the tacos meat-side downLay the tacos on the hot griddle, meat-side down, and press firmly with a spatula for a few seconds to maximize contact. Cook at 400°F for about 2 1/2 minutes without moving them, letting the chicken sear into a deep brown, caramelized crust while the tortilla toasts underneath.Look for Listen for a steady sizzle and look for crisp, browned edges around the meat.Tip Resist the urge to peek early; lifting the taco too soon tears the crust before it sets.
- Flip and brush with the glazeFlip each taco so the tortilla side is down, then brush the seared chicken generously with the honey-lime glaze, coating every inch. Let the tacos cook another 2 to 3 minutes, brushing once more halfway through, until the glaze bubbles and the chicken reaches an internal temperature of 165°F (74°C) at its thickest point.Look for The glaze should look lacquered and slightly bubbly, with sticky caramelized patches.Safe temperature 165°F (74°C) internal temperature (poultry)Tip Check the temperature in two spots; thin smash layers cook unevenly near the tortilla edge.
The middle phase ends with the transformation. Meat-side down, the tacos should have seared for about two and a half minutes into deep brown, caramelized crusts with crisp, lacy edges, and a steady sizzle should have run under them the whole time.
After the flip, the honey-lime glaze should be brushed on generously and bubbled into a lacquered, sticky coat, with the chicken verified at 165°F (74°C) at its thickest point. The tortillas should sound faintly crisp when tapped with the spatula. If the glaze still looks thin and watery rather than glossy, give the tacos another thirty seconds, glaze-side up.
Char, top and serve
- Char the corn while the tacos cookIf the corn is not already charred, scatter the kernels on the empty side of the griddle for the last few minutes of cooking, tossing once, until blistered and fragrant. Charring brings out a toasty sweetness that plays against the smoky chipotle glaze and keeps each bite from tasting one-note.Look for Look for blackened blisters on at least a third of the kernels.Tip A dry griddle chars best; oil makes the kernels steam instead of blister.
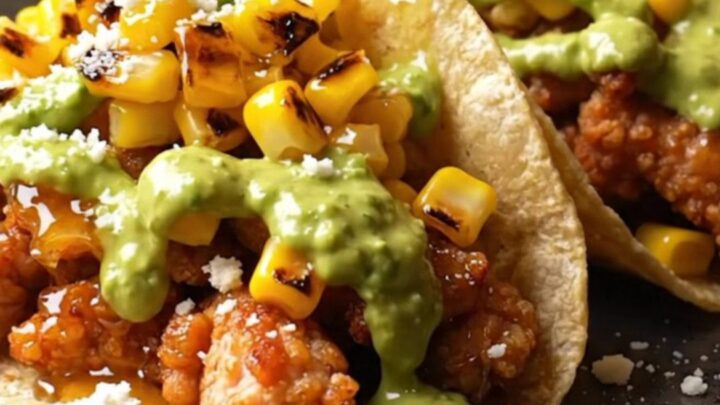
- Top and serve hotTransfer the tacos to plates glaze-side up. Scatter the charred corn over each one, follow with a heavy snow of crumbled cotija, and finish with a drizzle of avocado crema. Serve immediately, while the glaze is still glossy and the tortilla edges are crisp enough to shatter slightly at the first bite.Look for The cotija should sit on the sticky glaze rather than sliding off a dry surface.Tip Drizzle the crema in thin lines, not dollops, so it does not soften the crisp crust.
The final phase is assembly at speed. The corn kernels should come off the griddle blistered and toasty-smelling, with blackened spots on at least a third of them. Each taco, glaze-side up, gets a scatter of charred corn, a heavy snow of crumbled cotija that clings to the sticky surface, and thin lines of avocado crema drizzled over the top.
At the table the glaze should still gleam and the tortilla edges should crackle slightly at the first bite. Serve within minutes — the crust softens as the tacos sit, and the whole point is that first glossy, crackling bite.
Common mistakes
The most common slip is overmixing the seasoned chicken, which turns the thin patties dense and bouncy; fold just until the color is even. The second is crowding a cool griddle — if the surface is below temperature, the meat steams and releases juice instead of searing, and the crust never forms. Brushing the honey too early burns the sugars and turns them bitter, so glaze only after the flip. Finally, skipping the tortilla warm-up leads to cracked tortillas that shed their topping at the first bite.
How to tell it’s done
The tacos are done when the chicken crust is deep brown at the edges and the internal temperature reads 165°F (74°C) at the thickest point — check in two spots, since thin smash layers can cook unevenly near the tortilla edge. The glaze should look glossy and slightly bubbled, with sticky caramelized patches, and the tortilla underneath should toast to a firm, crisp base that flexes without bending shut. The whole surface should glisten; any matte, pale patches mean a few more seconds on the griddle.
- Poultry: 165°F (74°C) in the thickest part
Up next · Part 3 of 3
4 variations · storage & make-ahead · 5 answers · printable card
Tips, FAQ & printable recipe (Part 3)← Back to the ingredients (Part 1)