Desserts · Part 2 of 3: Instructions
Cherry Nutella Puff Pastry Braid: Flaky, Golden and Ready in About an Hour Step-by-step instructions
- Prep
- Cook
- Total
- Serves
- 8
Before you start
Start by thawing the puff pastry in the refrigerator overnight or at room temperature for about 40 minutes, until it can be unfolded without cracking. Line a rimmed baking sheet with parchment paper and set it near your board. Toast the hazelnuts in a dry skillet over medium heat for three to four minutes, shaking the pan often, until they smell nutty and turn lightly golden, then chop them coarsely and let them cool.
Pit the cherries and halve each one with a sharp knife, then pat them dry. Measure the chocolate hazelnut spread and chill the dark chocolate briefly so it grates cleanly. Beat the egg with the water in a small bowl, and have the powdered sugar and the melted chocolate ready for the finish.
Ingredients at a glance (8)
- 1 sheet puff pastry, store-bought or made ahead, thawed
- 1 cup fresh cherries, pitted and halved
- 1/3 cup toasted hazelnuts, chopped
- 1/2 cup chocolate hazelnut spread
- 2 oz dark chocolate, for grating
- 1 egg, beaten with 1 tbsp water, for brushing
- 2 tbsp powdered sugar, for dusting
- 2 oz dark chocolate, melted, for drizzling
Instructions
Filling and braid shaped
- Prepare the board and the cherriesThaw the puff pastry according to the package directions, then unroll it on a lightly floured wooden board. Pit the cherries, halve them with a sharp knife, and toast the hazelnuts in a dry skillet until fragrant, then chop them coarsely and set them aside.Look for Pastry is flat, cold and pliable, and the hazelnuts smell nutty and warm.Tip Keep the pastry cold; chill it for 10 minutes if it softens while you work.
- Layer the cherry and chocolate fillingArrange the cherry halves down the center third of the pastry, leaving a border at each side. Scatter the chopped hazelnuts over the cherries, then spoon the chocolate hazelnut spread over the fruit along the center strip.Look for A neat, even strip of cherries and spread runs down the middle of the sheet.Tip Spread the filling to within a short distance of the edges so it does not leak.
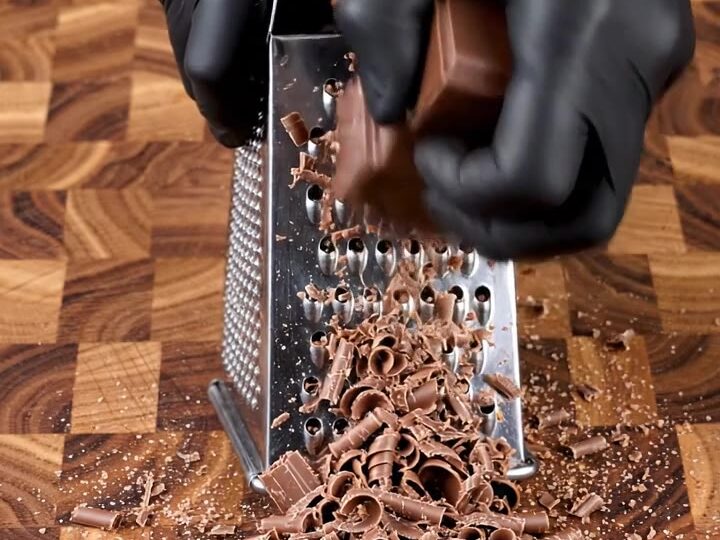
- Grate the dark chocolateHold a block of dark chocolate against the large holes of a box grater and grate it directly over the board so fine curls and shavings fall onto the filling. Sprinkle the shavings evenly over the cherries and spread.Look for Fine curls and shavings cover the center strip.Tip Chill the chocolate briefly first so it grates into curls rather than crumbling.
The pastry should look like a neat rectangle with a dense center strip of cherries, hazelnuts and spread, topped with fine chocolate curls. The side strips should be cut evenly and folded over in alternating directions, forming a braided lattice that holds its shape.
Before you move on, check that the filling is not spilling past the edges and the pastry is still cool and pliable. If it has softened, slide it onto the baking sheet and chill it for 15 minutes so the butter firms up before baking.
Braid chilled and baked
- Cut and fold the braidUsing a sharp knife, cut the pastry on both sides of the filling into diagonal strips about 1 inch wide, stopping at the filling. Fold the strips over the filling alternately from left and right, overlapping them slightly, to form a braided lattice across the top.Look for Strips cross over the filling in a neat, alternating lattice.Tip Press the ends gently so the strips stay sealed to the filling.
- Transfer and brush the braidCarefully slide the braided pastry onto a parchment-lined baking sheet, keeping its shape. Brush the surface lightly with the beaten egg and water mixture so it bakes to a deep golden shine. Rest the braid in the refrigerator for 15 minutes while the oven heats.Look for The braid holds its shape and the surface is glossy with egg wash.Tip Chilling before baking helps the layers puff sharply instead of spreading.
- Bake until deep goldenHeat the oven to 400°F (200°C) and bake the braid on the middle rack for 20 to 25 minutes, until the layers have puffed and turned a deep golden brown. Let it cool on the pan for 10 minutes before moving it.Look for Layers are puffed, crisp and a deep golden brown.Tip Rotate the pan halfway through baking for even color.
After baking, the braid should look puffed, crisp and a deep golden brown across the strips and on the edges. You should hear a light crackle as it cools on the pan, and the layers should feel firm when you press the surface gently. Check that the center of the braid has set and that the filling has warmed into glossy pockets. If the top is pale, return the braid to the oven for two to three minutes and watch it closely so the sugars do not burn.
Dusted, drizzled and sliced
- Dust and drizzle the braidSlide the braid onto a wooden board. Dust it with powdered sugar through a fine sieve. Melt the dark chocolate in a microwave-safe bowl in 20-second bursts, stirring until smooth, then drizzle it over the braid in a zigzag pattern.Look for Powdered sugar coats the top and the chocolate zigzag sets glossy.Tip Let the drizzle set for a few minutes before slicing so it does not smear.
- Slice and serveSlice the braid with a serrated knife, using a gentle sawing motion so the layers stay flaky. Serve warm or at room temperature, with the cherry and chocolate filling visible through the braid openings.Look for Slices show the cherry and chocolate filling through the lattice.Tip Use a serrated knife so the flaky layers do not compress.
The finished braid should carry a light dusting of powdered sugar and a zigzag of dark chocolate that has set glossy and firm. The cherries and chocolate should be visible through the lattice openings, and the layers should look crisp along the cut edges. Before slicing, confirm that the drizzle has set and that the pastry has rested for about ten minutes so the filling is not too hot to cut. Use a serrated knife and a gentle sawing motion for clean, flaky slices.
Common mistakes
The most common mistake is letting the pastry warm up while you work, which softens the butter and makes the layers slump instead of puffing. Keep the sheet cold, and chill the braid again if it begins to look limp or greasy. Overfilling the center is another problem, because the cherries and spread can leak out and burn on the parchment, leaving the bottom soggy.
Spread the spread in a moderate layer and keep the filling inside the strip. Cutting the strips too thick makes the braid heavy and slow to bake through, while cutting them too thin can tear during folding. Aim for strips about one inch wide and fold them gently. Finally, do not skip the drizzle time: pouring melted chocolate onto a warm braid can smear the zigzag before it sets.
How to tell it’s done
The braid is done when the layers have puffed high, the strips and edges are a deep golden brown, and the surface looks crisp rather than pale or damp. Lift a corner with a spatula: the underside should be golden and firm, not doughy. The filling should be warm and glossy, with the cherries softened and the chocolate melted into the spread.
Because this recipe uses egg wash and pastry, there is no meat or poultry to test, but a cooked and fully baked pastry should feel light, crisp and set throughout when you press it gently. If the center still feels soft, give it two to three more minutes and check again.
Up next · Part 3 of 3
4 variations · storage & make-ahead · 5 answers · printable card
Tips, FAQ & printable recipe (Part 3)← Back to the ingredients (Part 1)